Tutorial: Create an Event as a Designer Extension
This tutorial guide will walk you through creating a Designer Extension which extends the Domain Designer such that in addition to everything it already supports, it will also allow:
- Adding a new element of type
Domain Eventwhich can be added through a context menu option on folders. - Ability to apply a new Stereotype to
Classelements. - Have a property on the above Stereotype which allows selection of
Domain Eventelement types created in that Designer's Package.
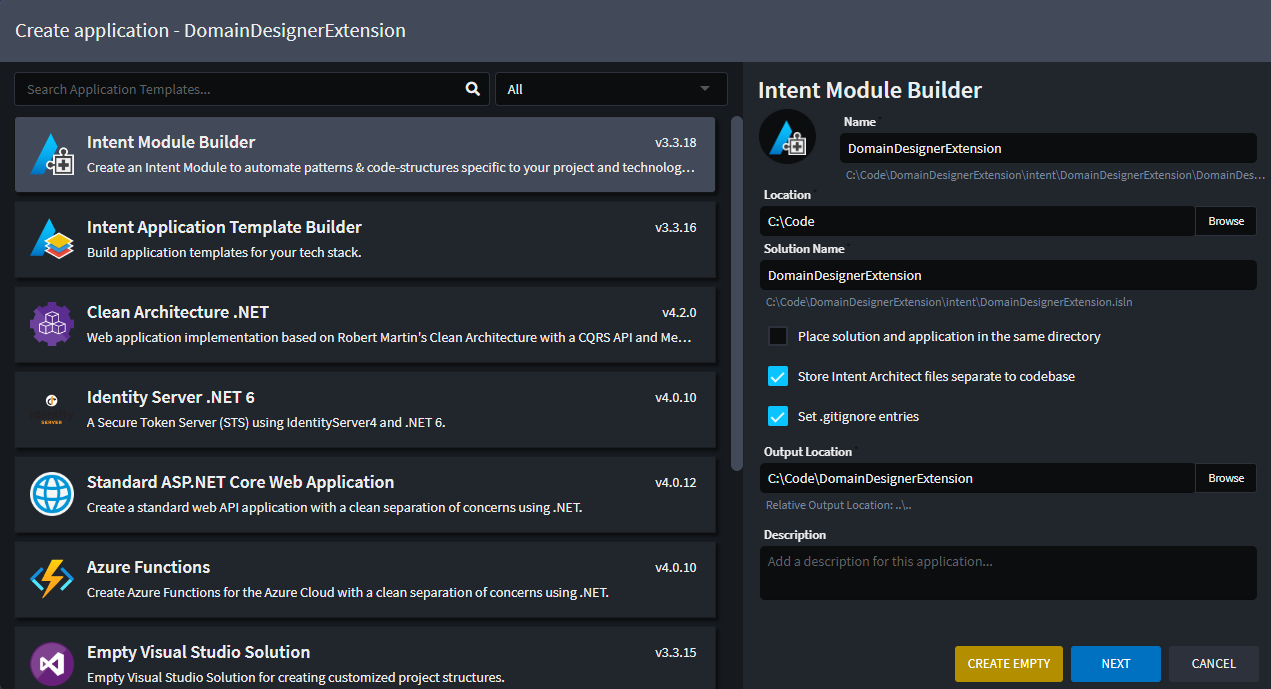
Create a new Application
Create a new Module Builder application and give it the name DomainDesignerExtension:
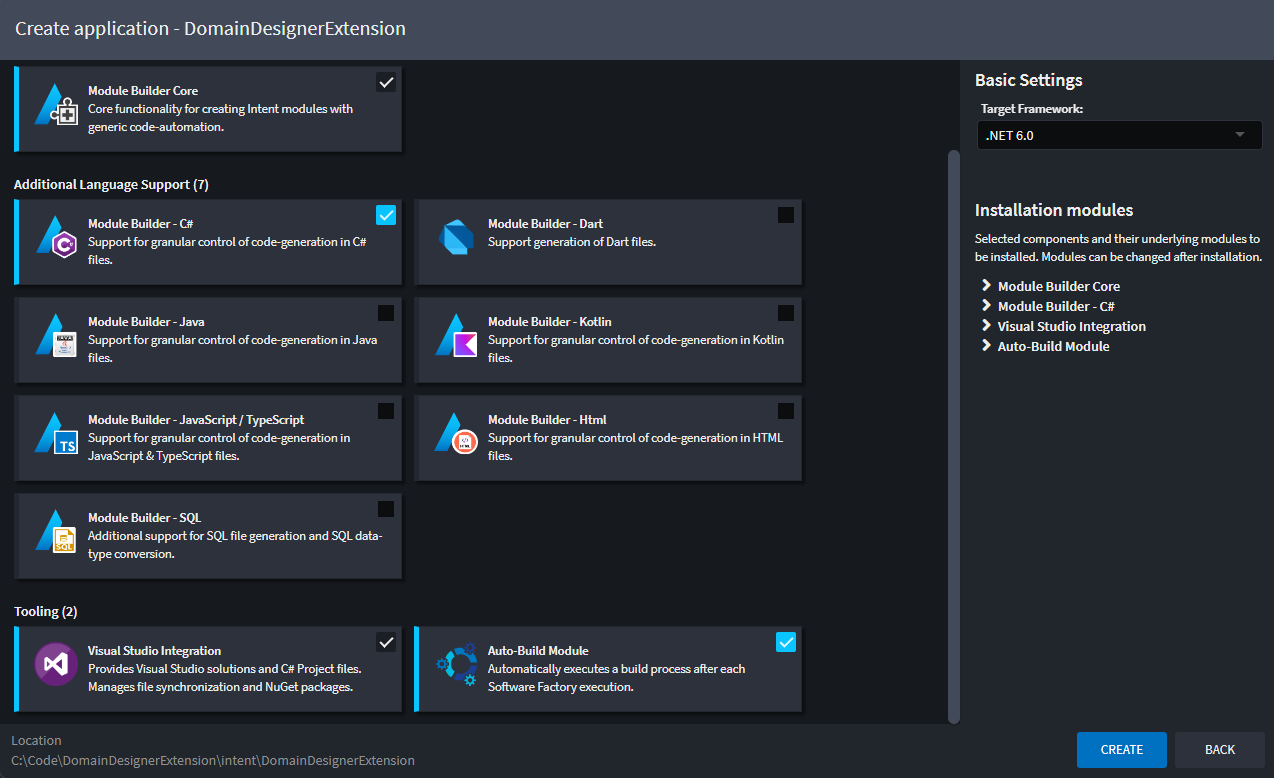
Click NEXT and on the following screen ensure that the following extra options are ticked:
Module Builder - C#.Auto-Build Module:
Click CREATE:
Once the Application Installation is complete, you will see a Ready message in the Taskbar.(bottom left of Intent Architect).
Install the Domain designer
- Right-Click on the
DomainDesignerExtensionApplication and select theManage Modulesoption. - Search for
Intent.Modelers.Domain. - Expand
Optionson the right. - Check
Install metadata only. - Click
Install:
Configure the package to reference the domain designer
- Click on the
Module BuilderDesigner on the left. - Select the top-level Package node and in the Properties pane on the right:
- Check
Include in Module. - Add
DomaintoReference in Designer.
- Check
Create and configure the Domain Event element
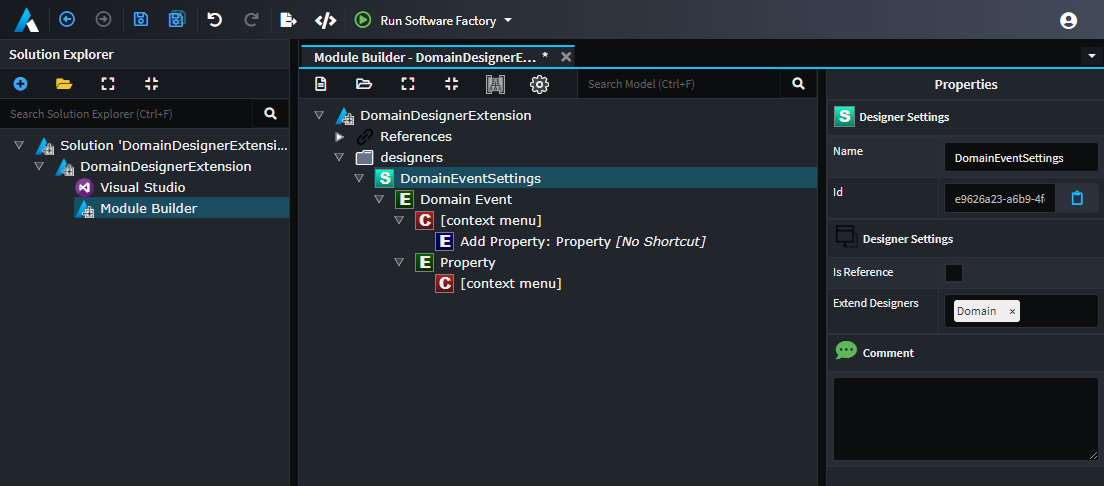
- Right-click the root Package element and click the
Add Designers Folderoption. - Right-click the
designerselement and click theNew Designer Settingsoption. - Give the new element a name of
DomainEventSettings. - Select the
DomainEventSettingselement and in the Properties pane on the right:- For
Extend DesignersaddDomain.
- For
- Right-click the
DomainEventSettingselement and click theNew Element Typeoption. - Give the new element a name of
Domain Event. - Right-click the
Domain Eventelement and click theAdd Element Settingsoption. - Give the new element a name of
Property - Select the
Propertyelement and in the Properties pane on the right:- Change
ModetoRequired. - For
Target TypesaddClass,EnumandType-Definition.
- Change
- Right-click the
[context-menu]element (the one directly withinDomain Event) and click theAdd Element Creationoption. - Give the new element a name of
Add Propertyand select thePropertytype for it:
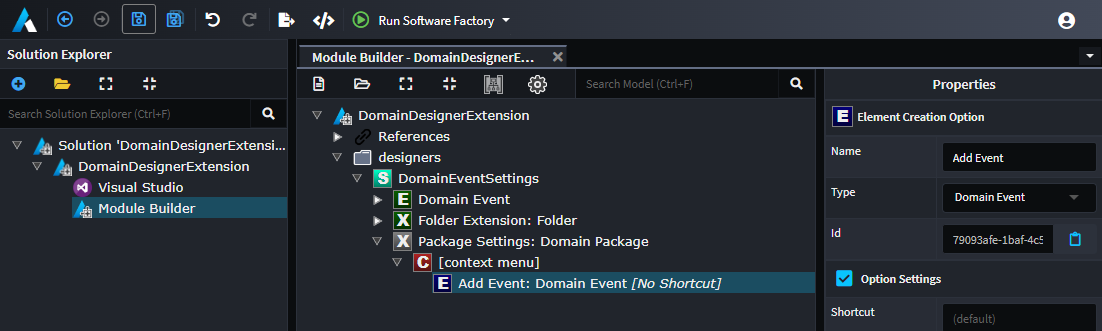
Create an Add Event context menu option for Folder elements
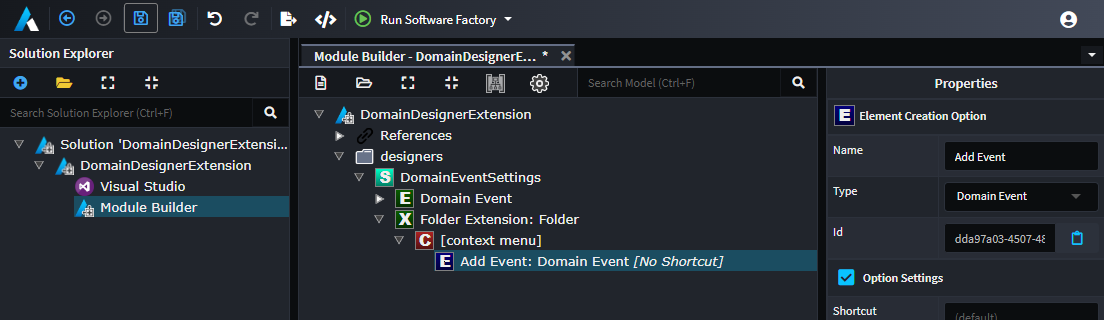
- Right-click the
DomainEventSettingsand click theNew Element Extensionoption. - Give the new element a name of
Folder Extensionand select theFoldertype for it. - Right-click the
Folder Extensionelement and click theAdd Menu Optionsoption. - Right-click the
[context-menu]element (the one directly withinFolder Extension) and click theAdd Element Creationoption. - Give the new element a name of
Add Eventand select theDomain Eventtype for it:
Create an Add Event context menu option for Package elements
- Right-click the
DomainEventSettingsand click theNew Package Extensionoption. - Give the new element a name of
Package Settingsand select theDomain Packagetype for it. - Right-click the
[context-menu]element (the one directly withinPackage Settings) and click theAdd Element Creationoption. - Give the new element a name of
Add Eventand select theDomain Eventtype for it:
Create the Stereotype
- Right-click the root Package element and click the
New Stereotype-Definitionoption. - Give the new Stereotype Definition a name of
Has Domain Event. - Select the
Has Domain Eventelement and in the Properties pane on the right:- For
Target TypesaddClass.
- For
- Right-click the
Has Domain Eventelement and click theAdd Propertyoption. - Give the Property a name of
Event. - Select the
Eventelement and in the Properties pane on the right:- Change
Control TypetoSelect. - Change
Option SourcetoLookup Element. - For
Lookup TypesaddDomain Event:
- Change
Run the Software Factory to generate the module
Run the Software Factory and optionally review the proposed changes:
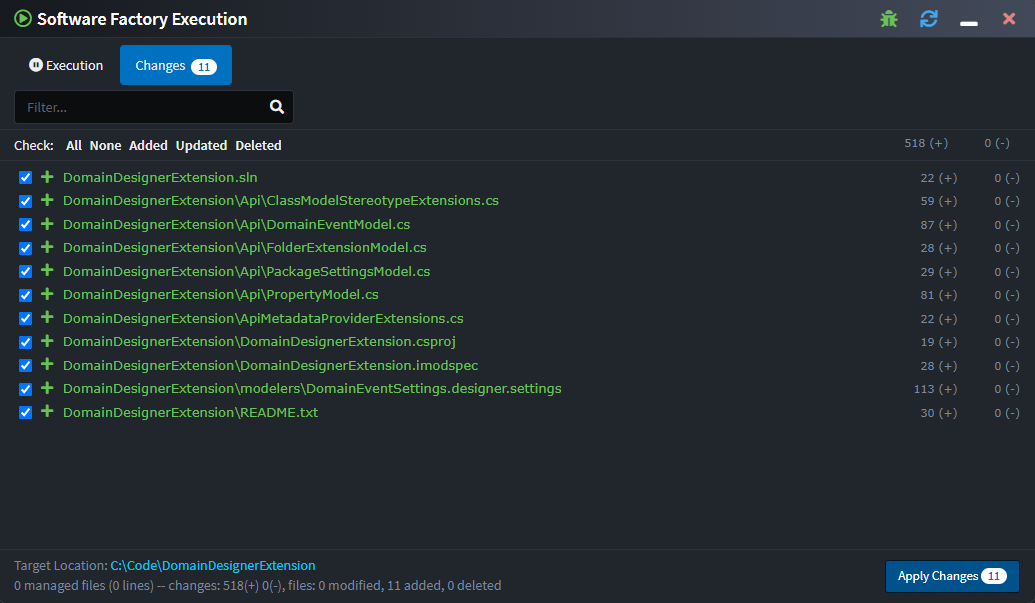
Click APPLY CHANGES.
After the Software Factory has applied the changes, you'll see that it runs dotnet build on the generated Visual Studio solution:
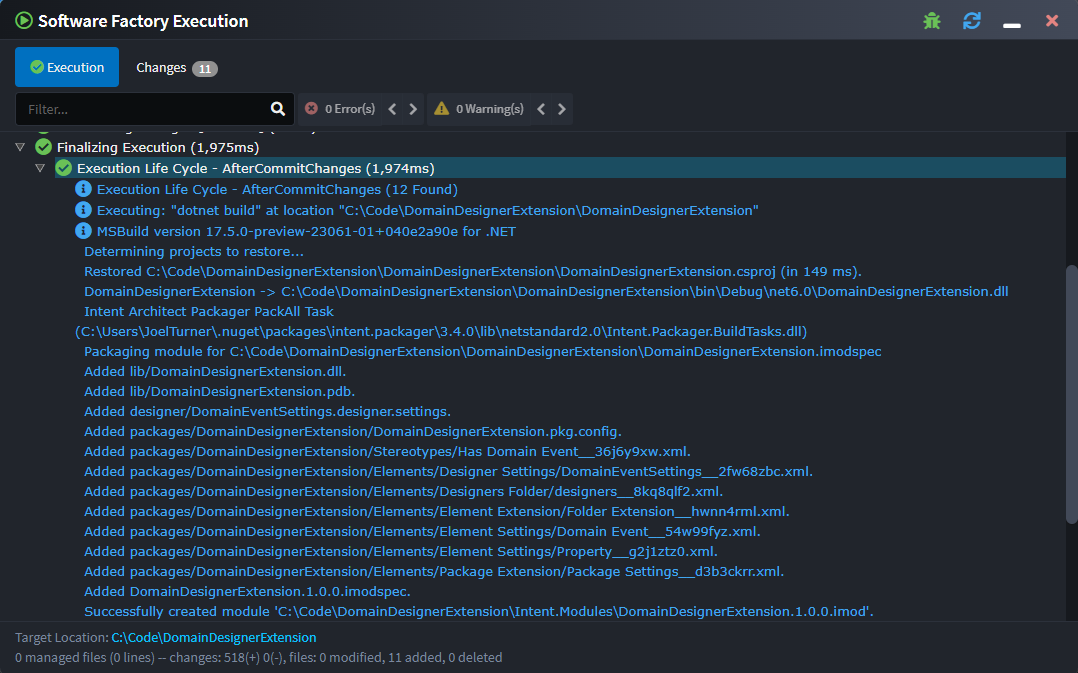
Take note of the following line in the output for the following step:
Successfully created module C:\Code\MySolution\Intent.Modules\DomainDesignerExtension.1.0.0.imod
Click CLOSE.
Test your Designer Extension Module
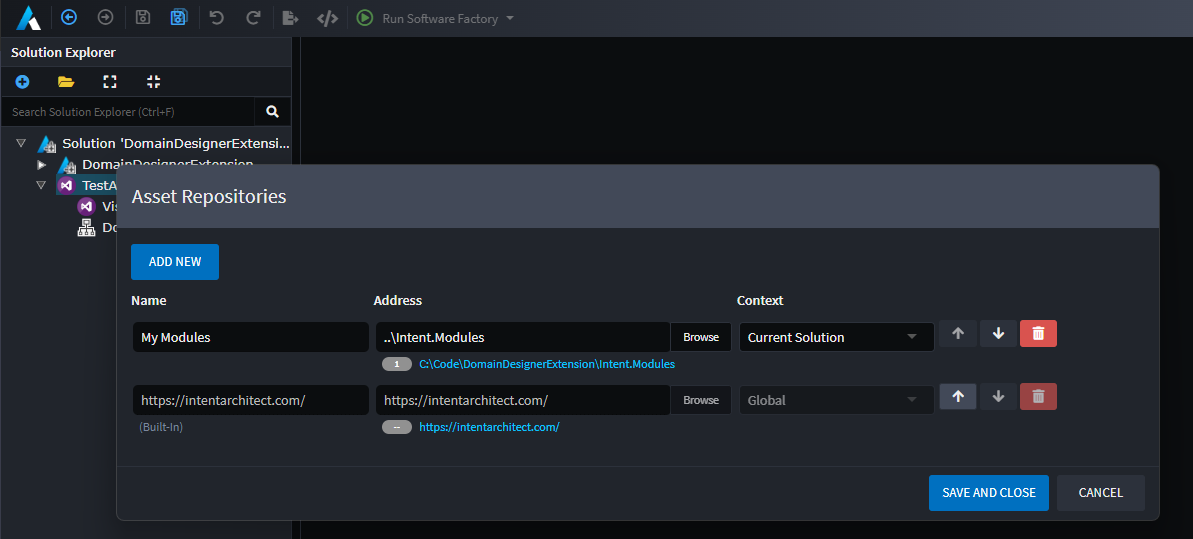
Ensure you have added the output path as noted in the above step as a repository in the Repository Manager. For the above output, the full path of the module is C:\Code\MySolution\Intent.Modules\DomainDesignerExtension.1.0.0.imod, so the repository would point to its folder, which is C:\Dev\MySolution\Intent.Modules:
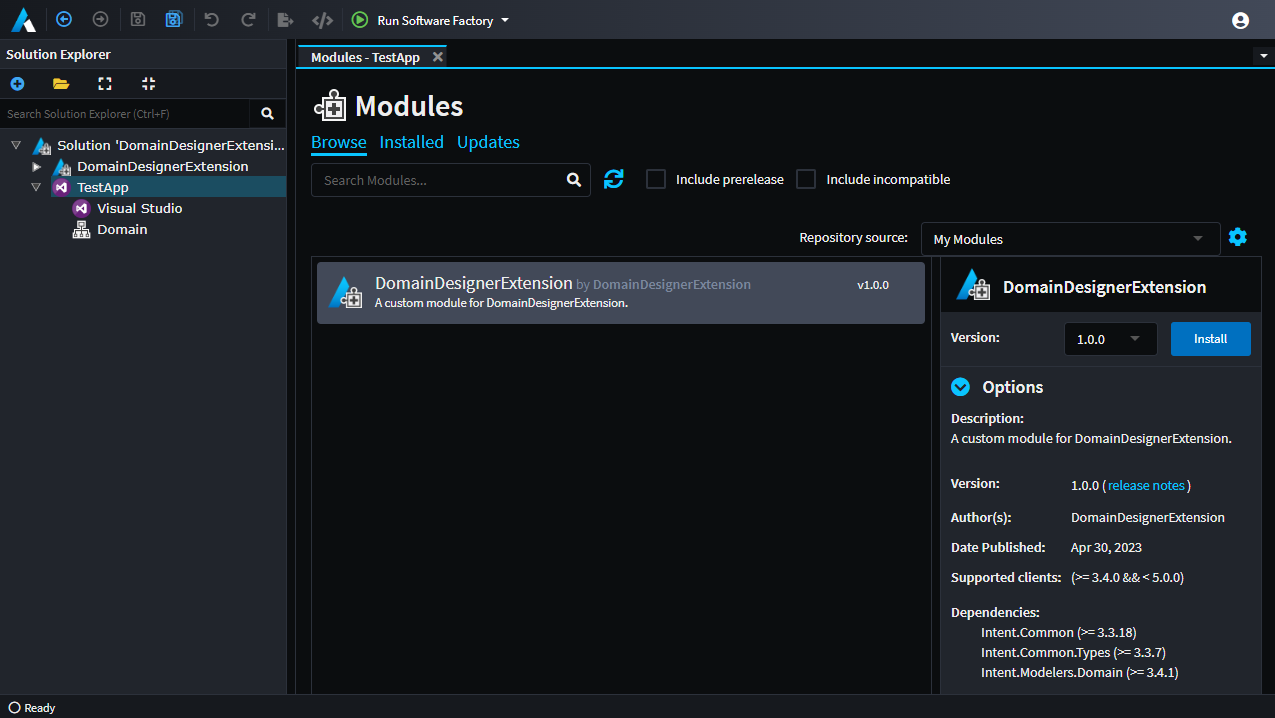
- Open or create the Intent Architect application where you want to install your newly created Module.
- Right-Click on the application and select
Manage Modules. - Ensure the application has the
Intent.Modelers.Domainmodule installed. - Select your repository from the drop-down on the right and locate your Module to install:
You will now have the option of creating the new Domain Event element and using it in the Has Domain Event Stereotype that was added by the Designer Extension we created above: