Intent.AzureFunctions
Azure Functions is a serverless computing service provided by Microsoft Azure that enables developers to build and deploy event-driven, scalable, and cost-effective applications without managing the underlying infrastructure. With Azure Functions, developers can write code in various languages like C#, Python, JavaScript, etc., and trigger its execution in response to events from a wide range of sources, such as HTTP requests, timers, message queues, and more. The service automatically scales to handle increased workloads and charges only for the actual compute resources used during the function execution, making it a flexible and efficient solution for building lightweight microservices, automating tasks, and integrating different services in the cloud.
In the service's designer you can model your services in any of the following ways.
Azure Function.Commands andQuerys' (Expose asAzure Function)Services. (Expose theOperations asAzure Function)
Http Triggers
Configure the Azure Function Stereotype:
- Trigger to be
Http Trigger.
On the Http Settings stereotype you can configure the following :
- Verb, the http Verb for the service end point.
- Route, the http route for the service end point.
- Return Type Mediatype, the content type of the service response.
For more information on Azure Function Http Triggers, refer to the official docs.
Cosmos DB Triggers
Configure the Azure Function Stereotype:
- Trigger to be
Cosmos DB Trigger.
On the Cosmos DB Trigger stereotype configure the following :
- Connection, name of the Cosmos DB connection string configured in your app.settings.
- Database name, the name of the Azure Cosmos DB database with the container being monitored.
- Container name, the name of the container being monitored.
- LeaseContainerName, the name of the container used to store leases.
- CreateLeaseContainerIfNotExists, when set to true, the leases container is automatically created when it doesn't already exist. The default value is false. When using Azure AD identities if you set the value to true, creating containers is not an allowed operation and your Function won't be able to start.
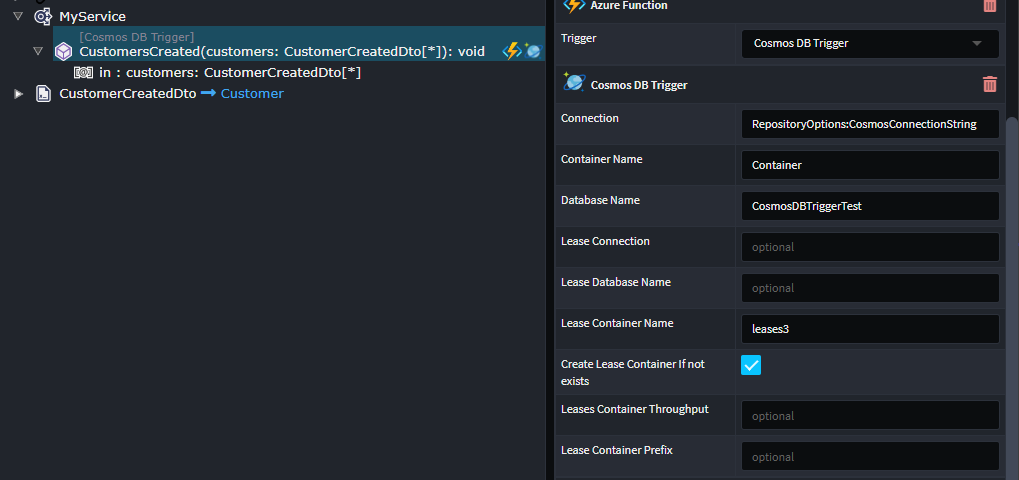
Your generated Azure Function will look similar to this:-
[Function("CustomersCreated")]
public async Task Run(
    [CosmosDBTrigger(
        databaseName: "CosmosDBTriggerTest",
        containerName: "Customers",
        Connection = "RepositoryOptions:CosmosConnectionString",
        CreateLeaseContainerIfNotExists = true,
        LeaseContainerName = "leases")] IReadOnlyCollection<CustomerCreatedDto> rawCollection,
    CancellationToken cancellationToken)
{
    if (rawCollection == null || rawCollection.Count == 0) return;
    var customers = rawCollection.ToList();
    await _appService.CustomersCreated(customers, cancellationToken);
}
Note
If you model a Command or a Service which accepts a non-collection argument, the dispatching will be batched as per the example below.
[Function("CustomersCreated")]
public async Task Run(
    [CosmosDBTrigger(
        databaseName: "CosmosDBTriggerTest",
        containerName: "Customers",
        Connection = "RepositoryOptions:CosmosConnectionString",
        CreateLeaseContainerIfNotExists = true,
        LeaseContainerName = "leases")] IReadOnlyCollection<CustomerCreatedDto> rawCollection,
            CancellationToken cancellationToken)
{
    if (rawCollection == null || rawCollection.Count == 0) return;

    foreach (var customer in rawCollection)
    {
        await _mediator.Send(customer, cancellationToken);
    }
}
For more information on Azure Function Cosmos DB Triggers, refer to the official docs.
Timer Triggers
Configure the Azure Function Stereotype:
- Trigger to be
Timer Trigger. - Schedule Expression, the NCRONTAB expressions for the timer interval.
For more information on Azure Function Timer Triggers, refer to the official docs.
Queue Triggers
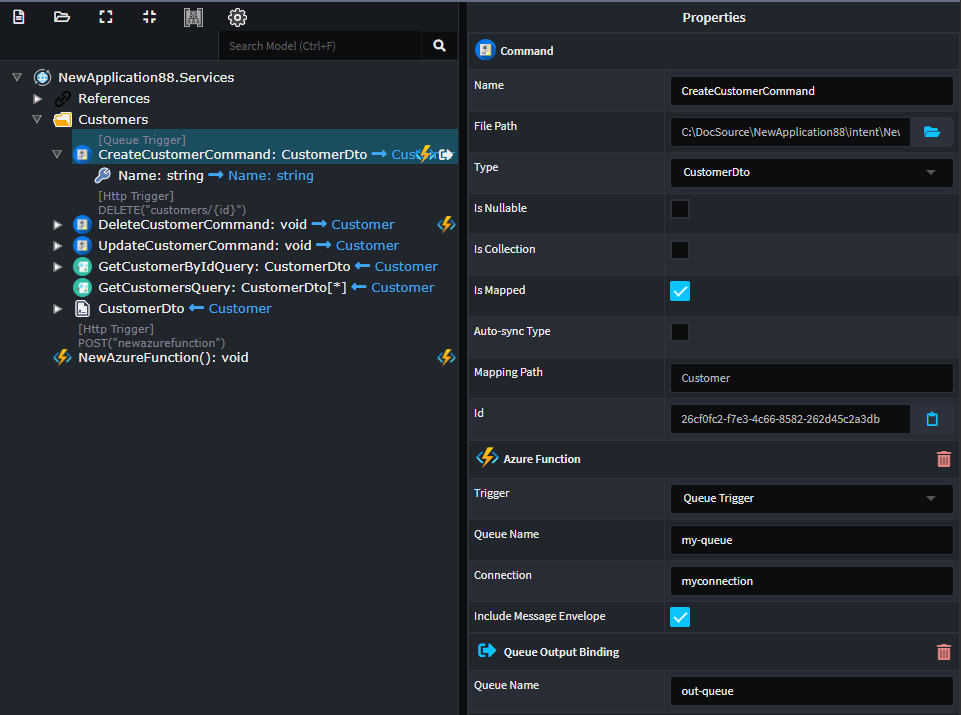
Configure the Azure Function Stereotype:
- Trigger to be
Queue Trigger. - Queue Name, the name of the queue consume.
- Connection, name of the Azure Queue Storage connection string configured in your app.settings.

Producing an azure function as follows:
[Function("CreateCustomer")]
public async Task Run(
    [QueueTrigger("my-queue", Connection = "myconnection")] CreateCustomerCommand createCustomerCommand,
    CancellationToken cancellationToken)
{
    await _mediator.Send(createCustomerCommand, cancellationToken);
}
If you want to gain access to the underlying raw queue message check the Include Message Envelope, which will give you access the QueueMessage version of the message.
Producing an azure function as follows:
[Function("CreateCustomer")]
public async Task Run(
    [QueueTrigger("my-queue", Connection = "myconnection")] QueueMessage message,
    CancellationToken cancellationToken)
{
    var createCustomerCommand = JsonConvert.DeserializeObject<CreateCustomerCommand>(message.Body.ToString())!;
    await _mediator.Send(createCustomerCommand, cancellationToken);
}
If you configure your Queue Trigger Azure function with a result, an additional stereotype will be added to the service Queue Output Binding. This stereotype allows you to configure which queue you would like the result of the service to be written to.
Producing an azure function as follows:
For InProcess functions:
[FunctionName("CreateCustomer")]
public async Task Run(
    [QueueTrigger("my-queue", Connection = "myconnection")] QueueMessage message,
    [Queue("out-queue")] QueueClient queueClient,
    CancellationToken cancellationToken)
{
    var createCustomerCommand = JsonConvert.DeserializeObject<CreateCustomerCommand>(message.Body.ToString())!;
    var result = await _mediator.Send(createCustomerCommand, cancellationToken);
    await queueClient.SendMessageAsync(JsonConvert.SerializeObject(result), cancellationToken);
}
For Isolated functions:
[Function("CreateCustomer")]
[QueueOutput("out-queue")]
public async Task<CustomerDto> Run(
    [QueueTrigger("my-queue", Connection = "myconnection")] QueueMessage message,
    CancellationToken cancellationToken)
{
    var createCustomerCommand = JsonConvert.DeserializeObject<CreateCustomerCommand>(message.Body.ToString())!;
    var result = await _mediator.Send(createCustomerCommand, cancellationToken);
    return result;
}
Related Modules
Intent.AzureFunctions.OpenApi
This module introduces Swagger generation and Swagger UI support for Http Trigger functions.
Local Development
You can use the follow tools to work and test locally for things like QueueStorage Azurite, this is a Azure storage emulator. This is installed and running by default if you are using Visual Studio 2022+. MS Azure Storage Explorer, this tool allows you to browse and interact with Azurite.
Migrating from In-Process functions
To migrate your Azure Functions applications from the .NET 6 In-Process model to Isolated Processes, follow these steps using Intent Architect:
- Open Intent Architect: Launch Intent Architect with your existing Azure Functions application.
- Manage Modules: Right-click on your application in the solution explorer and select Manage Modules.
- Update Modules: Ensure that the
Intent.AzureFunctionsmodules are updated to the latest versions available. - Open Visual Studio Designer: Access the Visual Studio designer for that same application.
- Select API Host Project: Find the API host project in the solution. Click on it to highlight it.
- Change .NET Version: Update the .NET version from 6 to 8 (or higher, if applicable) for the API host project.
- Change the Output Type: In the Output Type, select
Consoleto make the application an EXE. - Upgrade C# Projects: Confirm that all other C# projects in the solution are also upgraded from .NET 6 to .NET 8.
- Run the Software Factory: Execute the Software Factory process. As a result, your
Startup.csfile will be removed, and a newProgram.cswill be created. Additionally, all Azure Functions within your project will be updated to align with the Isolated Process model.
How-to topics
How to use Newtonsoft.Json instead of System.Text.Json for HttpTriggers
The Http Trigger Functions will be using the AzureFunctionHelper class to delegate the responsibility of deserializing the HTTP Payload to an incoming DTO.
To configure your Azure Functions to use Newtonsoft.Json follow these steps:
- Add the following package references to your
APIproject:<ItemGroup> <PackageReference Include="Microsoft.ApplicationInsights.WorkerService" Version="2.23.0" /> <PackageReference Include="Microsoft.AspNetCore.Mvc.NewtonsoftJson" Version="3.0.0" /> </ItemGroup> - Inside the
AzureFunctionHelperclass replace theSerializationSettingsandDeserializeJsonContentAsyncmembers:[IntentIgnore] private static readonly Newtonsoft.Json.JsonSerializerSettings SerializationSettings = new() { ContractResolver = new Newtonsoft.Json.Serialization.CamelCasePropertyNamesContractResolver() }; [IntentIgnore] public static async Task<T> DeserializeJsonContentAsync<T>(Stream jsonContentStream, CancellationToken cancellationToken) { var requestBody = await new StreamReader(jsonContentStream).ReadToEndAsync(cancellationToken); return Newtonsoft.Json.JsonConvert.DeserializeObject<T>(requestBody) ?? throw new FormatException("Unable to deserialize JSON content."); } - Update the
ConfigureFunctionsWebApplicationin yourProgram.csfile to configure the outbound JSON serialization:var host = new HostBuilder() .ConfigureFunctionsWebApplication((ctx, builder) => { //IntentIgnore builder.Services.AddControllers() .AddNewtonsoftJson(options => { options.SerializerSettings.ContractResolver = new CamelCasePropertyNamesContractResolver(); }); }) ...