Tutorial: Building an Application with Intent Architect
In this tutorial you will build a complete stand alone application, based roughly off of the Microsoft eShopOnContainers. As this tutorial is focused primarily on application building we will simplify the problem space to a single monolithic application, as opposed to the Microservice implementation that is eShopOnContainers.
The Tutorial is designed to improve your knowledge around:
- Working with Intent Architect
- Domain Modeling
- Service Modeling
This tutorial will take around 40 minutes.
Setting up your Intent Architect Solution
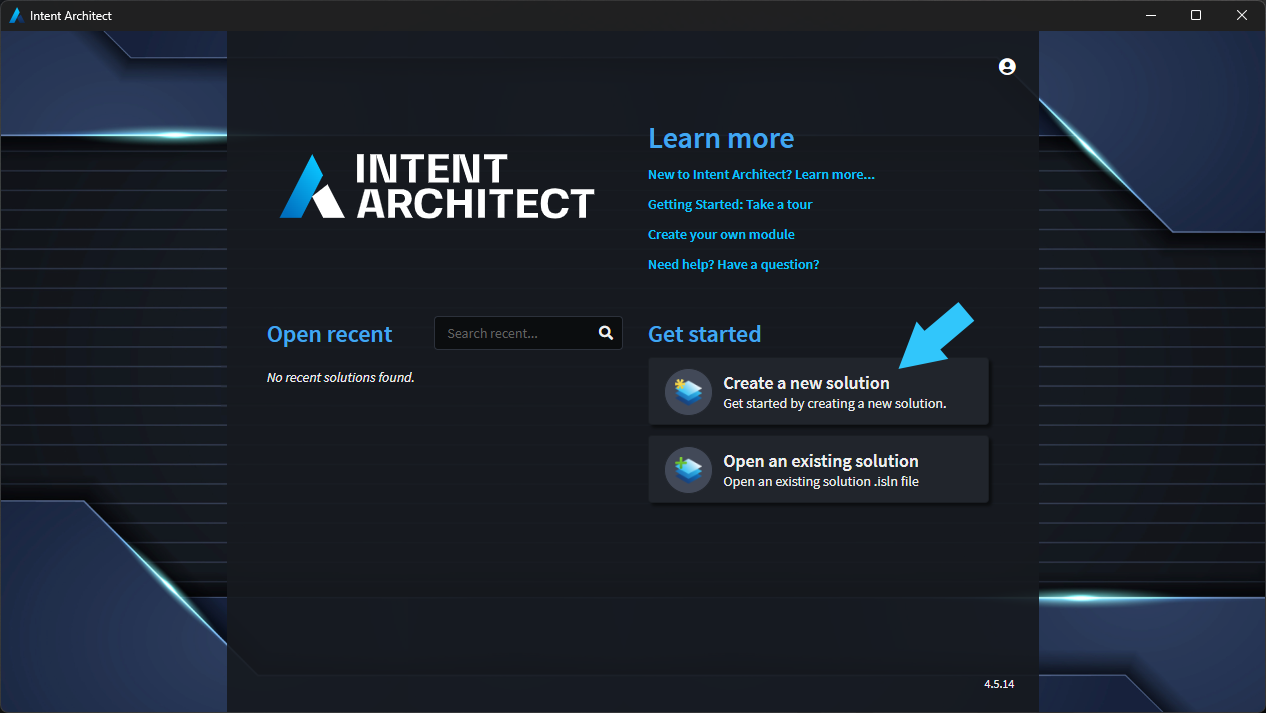
- Open Intent Architect.
- Click
Create a new solution.
On the first screen of the wizard you can select your desired architecture. For this tutorial use the ASP.NET Core - Clean Architecture option:
- Select the
ASP.NET Core - Clean Architectureapplication template.
Note
In this tutorial we will be using a .NET implementation of the Clean Architecture as explained by Robert C. Martin (aka "Uncle Bob"). This popular architecture promotes separation of concerns and the dependency rule to create systems that are modular, maintainable, and testable. If you are curious about the architecture of this solution, check out our Webinar on Clean Architecture in .NET.
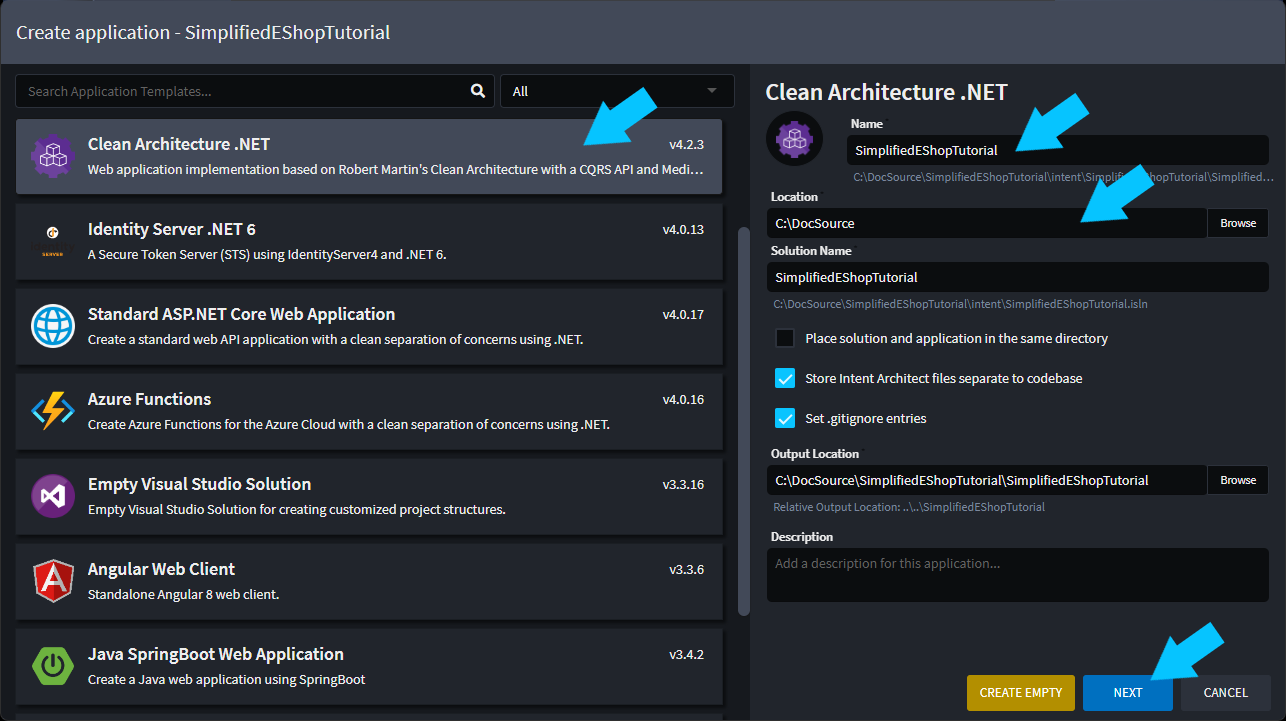
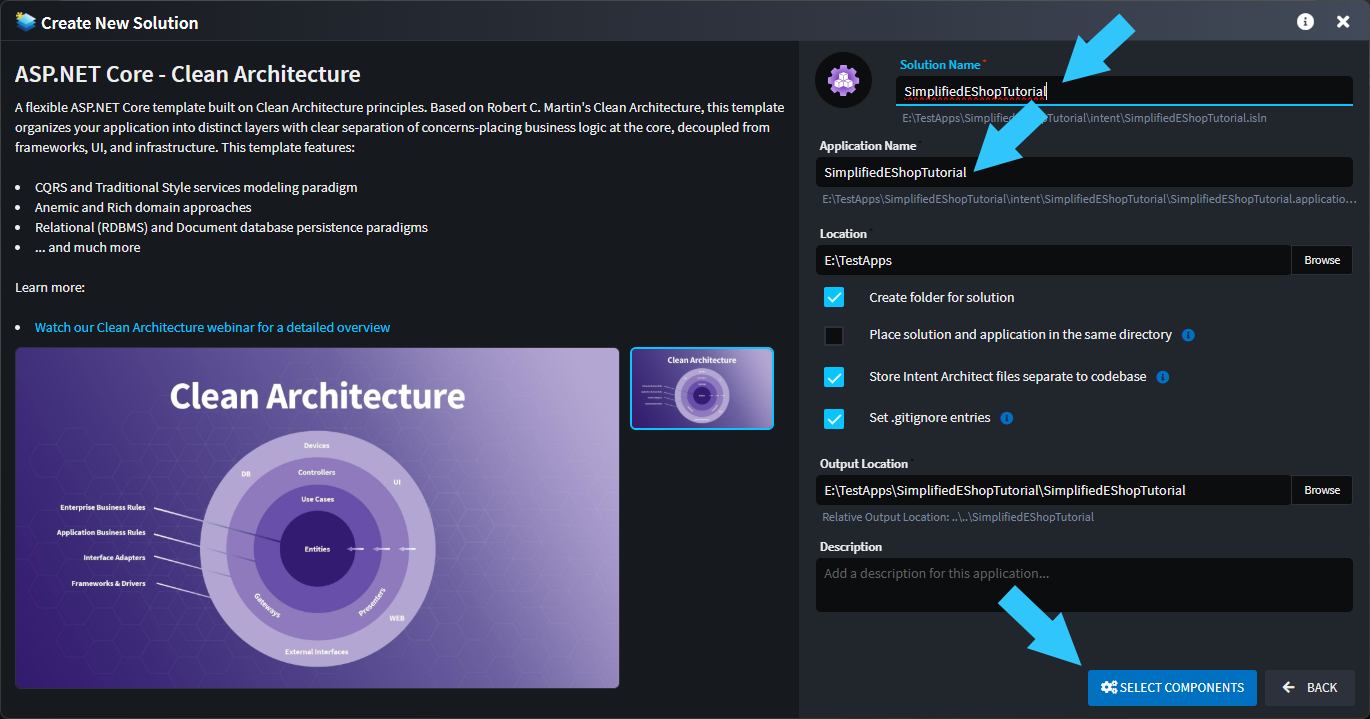
In the Create New Solution screen, give your solution and application the name SimplifiedEShopTutorial.
- Click
Select Components.
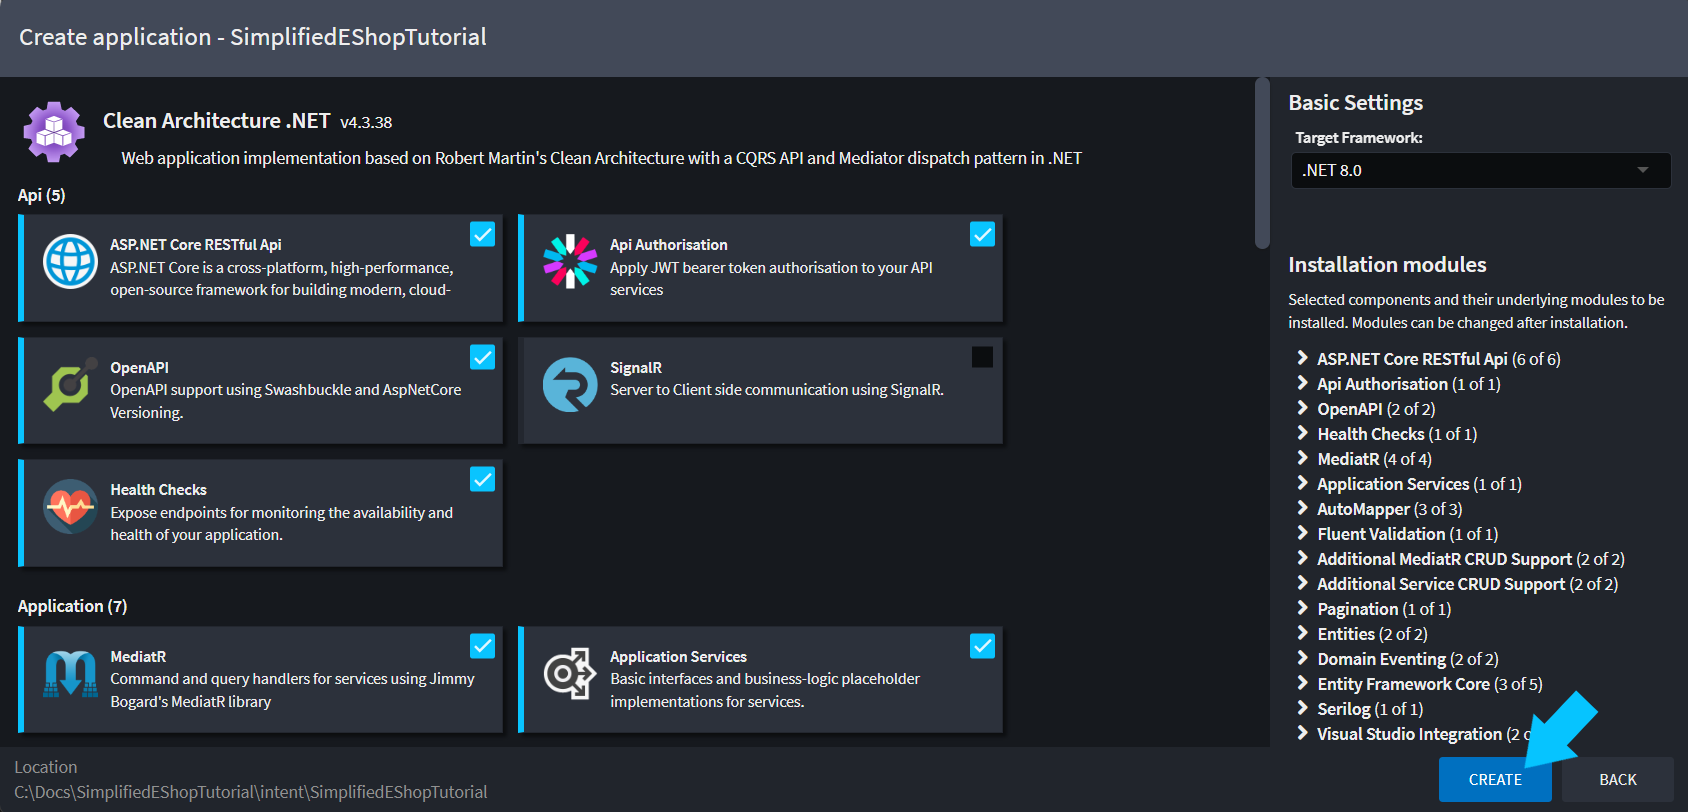
The next screen allows you to configure your selected Architecture, for this tutorial we will use the default configuration:
- Click
Create.
- Intent Architect will now configure your application based on your choices in the setup wizard.
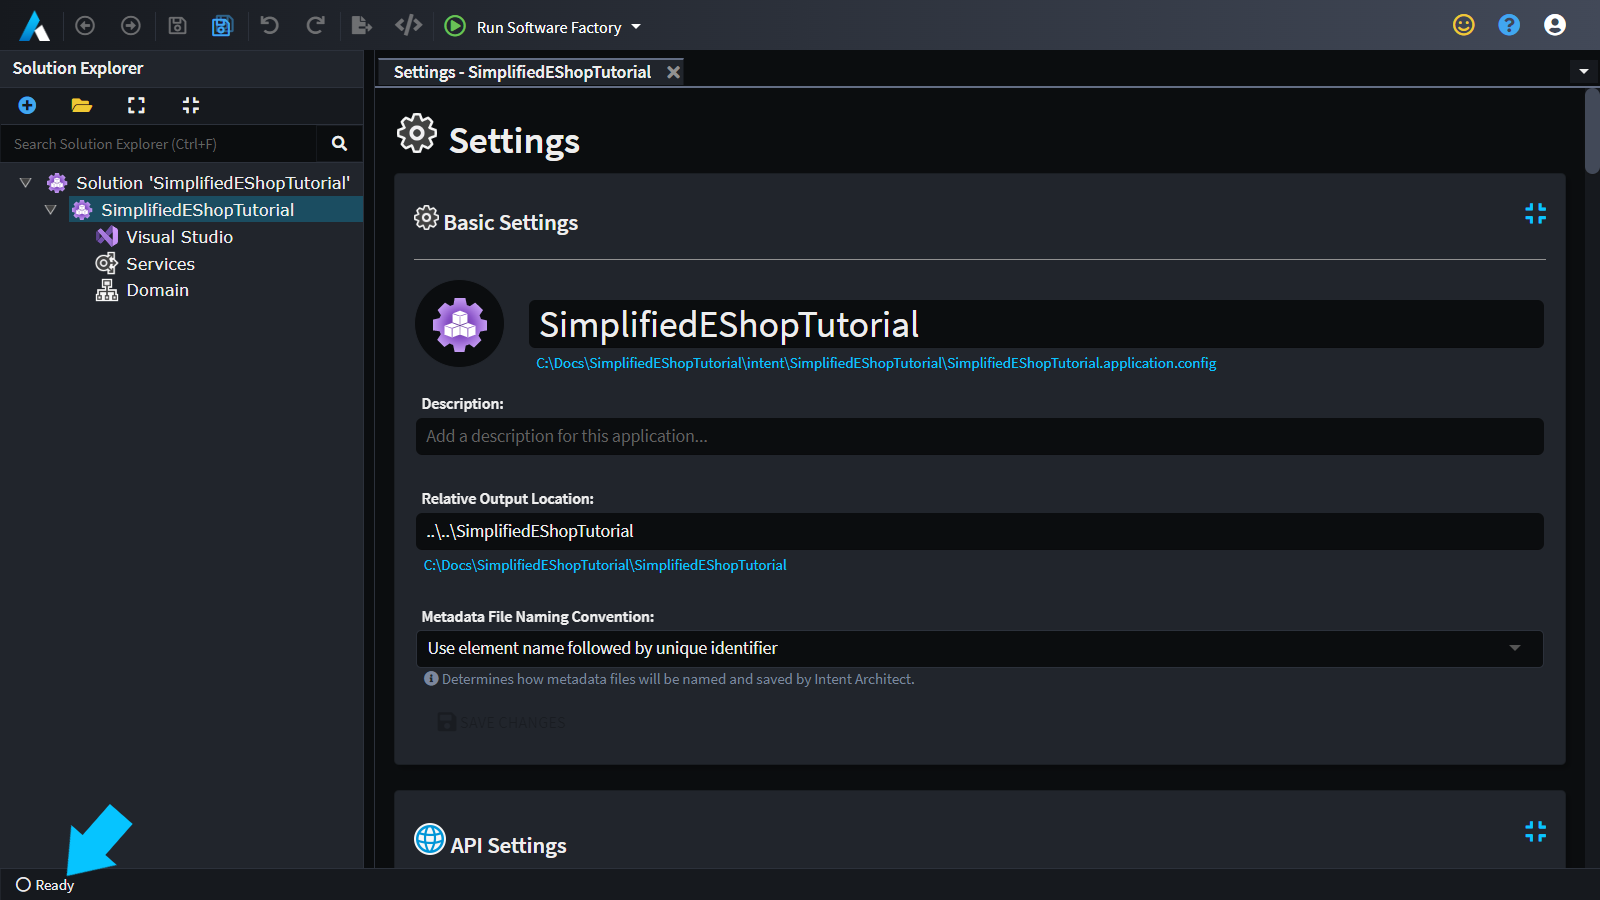
- You will be navigated to the Intent Architect Solution view.
- The Application's icon in the left pane is a spinner while Intent Architect downloads and installs Modules for it.
- When the process is complete the spinner will change to a static icon and the status at the bottom left of the UI will show
Ready.
You have successfully created an Intent Architect application.
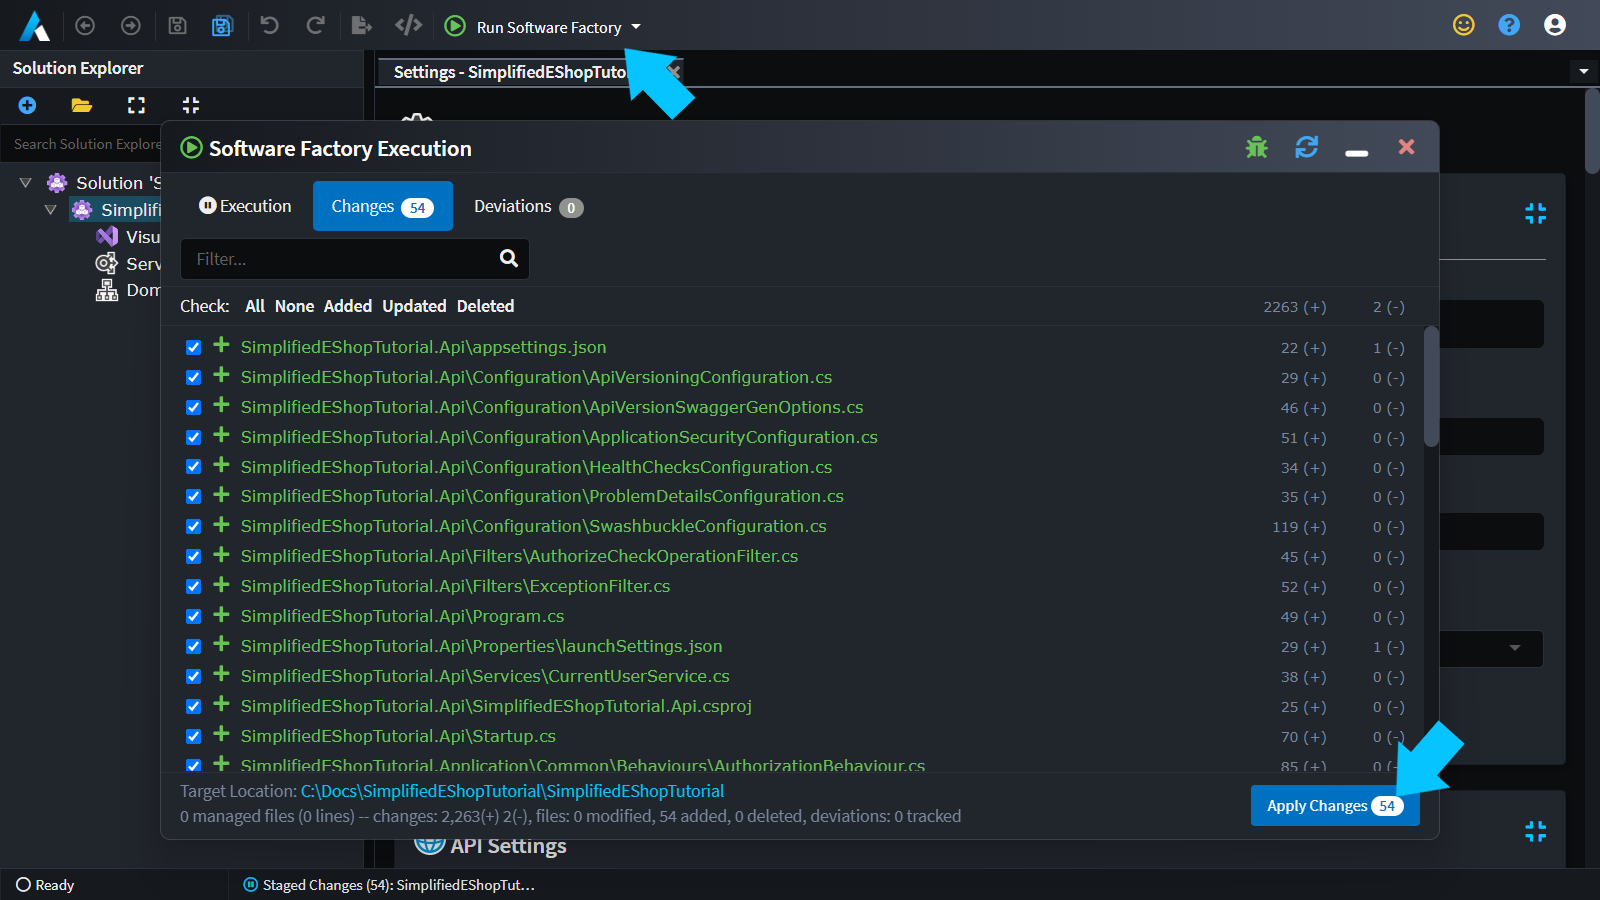
Before you start domain modeling, let's run the Software Factory so that later on when you're modeling you can see the impact of the modeling changes in isolation:
- Run the
Software Factory, either by pressingF5or the button in the tool bar. - Wait for the
Changesview to show. - Click
Apply Changes.
Modeling the domain
The Microsoft eShopOnContainers is an e-commerce web site where customers can browse products, adding them to a shopping cart, to eventually make a purchase. Our business domain is going to reflect the problem domain concepts, here are some of the high-level ones we are going to have to model:
- Product, an item for sale on the website.
- Basket, the Customer's shopping cart, to which they are adding items as they browse the site.
- Order, the Customer's finalized order, when they checkout their shopping cart.
Adding Entities
Let's start modeling out the domain:
- Open the
DomainDesigner. - Right-click on the grid and select
New Entity. - Type in the name,
Basket.

Tip
You can dramatically speed up your modeling through the use of keyboard shortcuts:
Ctrl+Shift+C- Create a new entity (focus must be on the Diagram).Ctrl+Shift+A- Add a new attribute (focus must be on the Entity).Ctrl+Enter- Create a new "whatever I have selected".Esc- Shift focus up a level (Attribute -> Entity -> Diagram).Ctrl+.- Full list of shortcuts currently available (these are context specific).
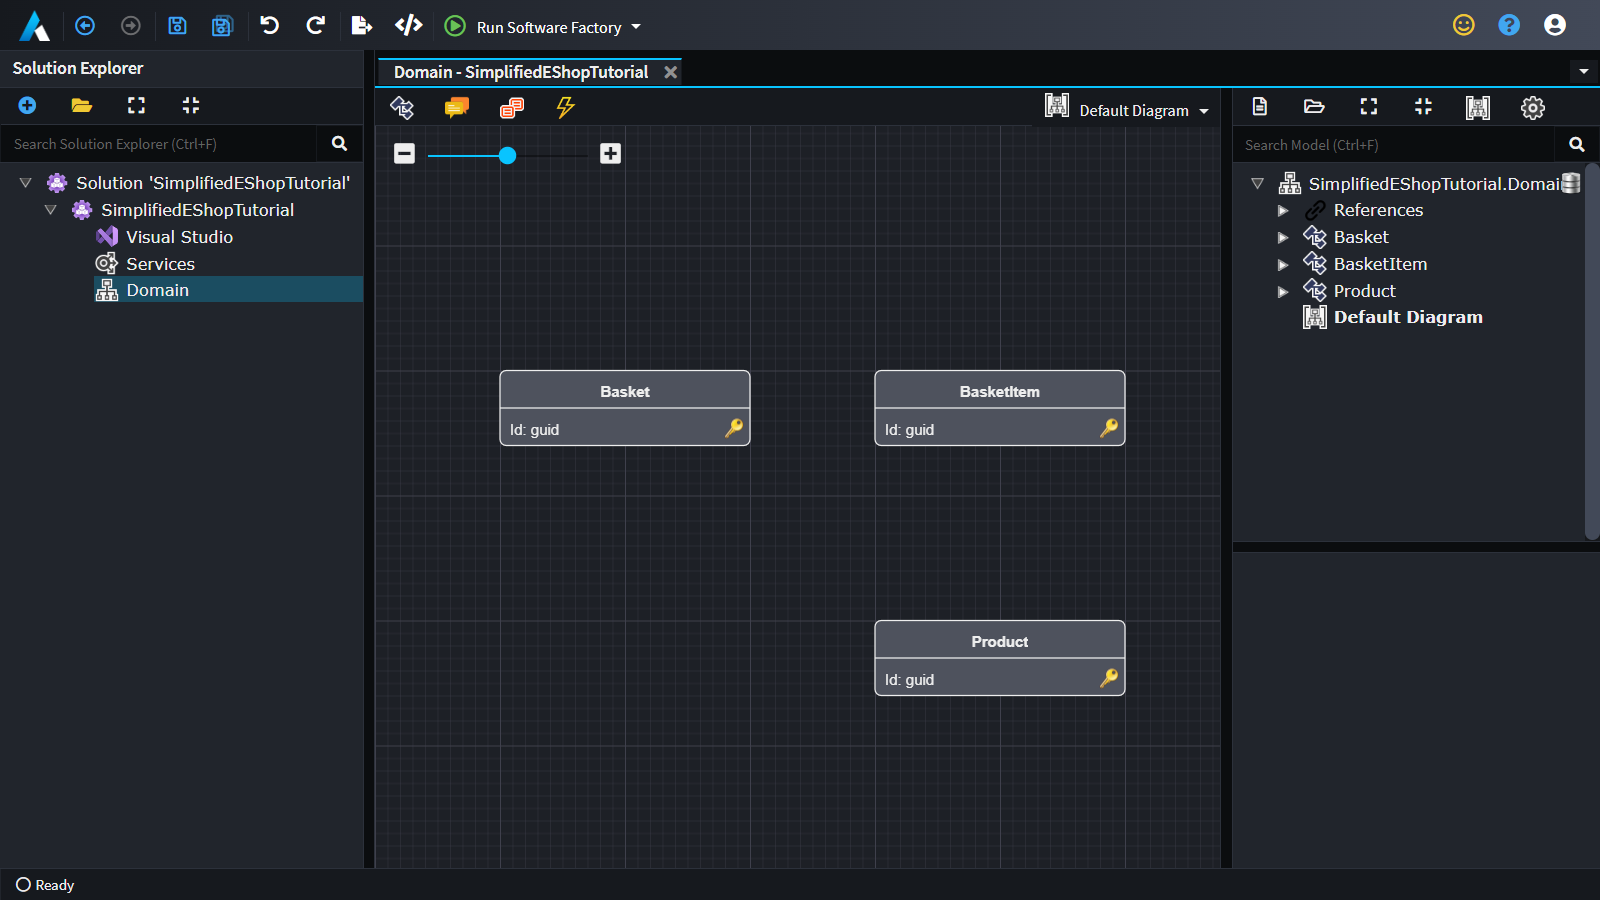
Adding more Entitys:
- With
Basketselected pressCtrl+Enter. - Type
BasketItemas your new entity's name. - Press
Ctrl+Enter. - Type
Productas your new entity's name. - Click and drag your entities to lay them out.
Modeling Relationships
Now you will model the relationships between these entities:
- Right-click on the
Basketentity, and hover overNew Associationand selectOne to Many. - Click on
BasketItem.
Note
In the older versions of Intent Architect you will need to configure the association manually.
When you right click on the Basket entity, and select New Association:
- In the
Propertiespane, on the lower right, - Check
Is Collectionin theTarget Endsection. - Uncheck
Is Collectionin theSource Endsection.
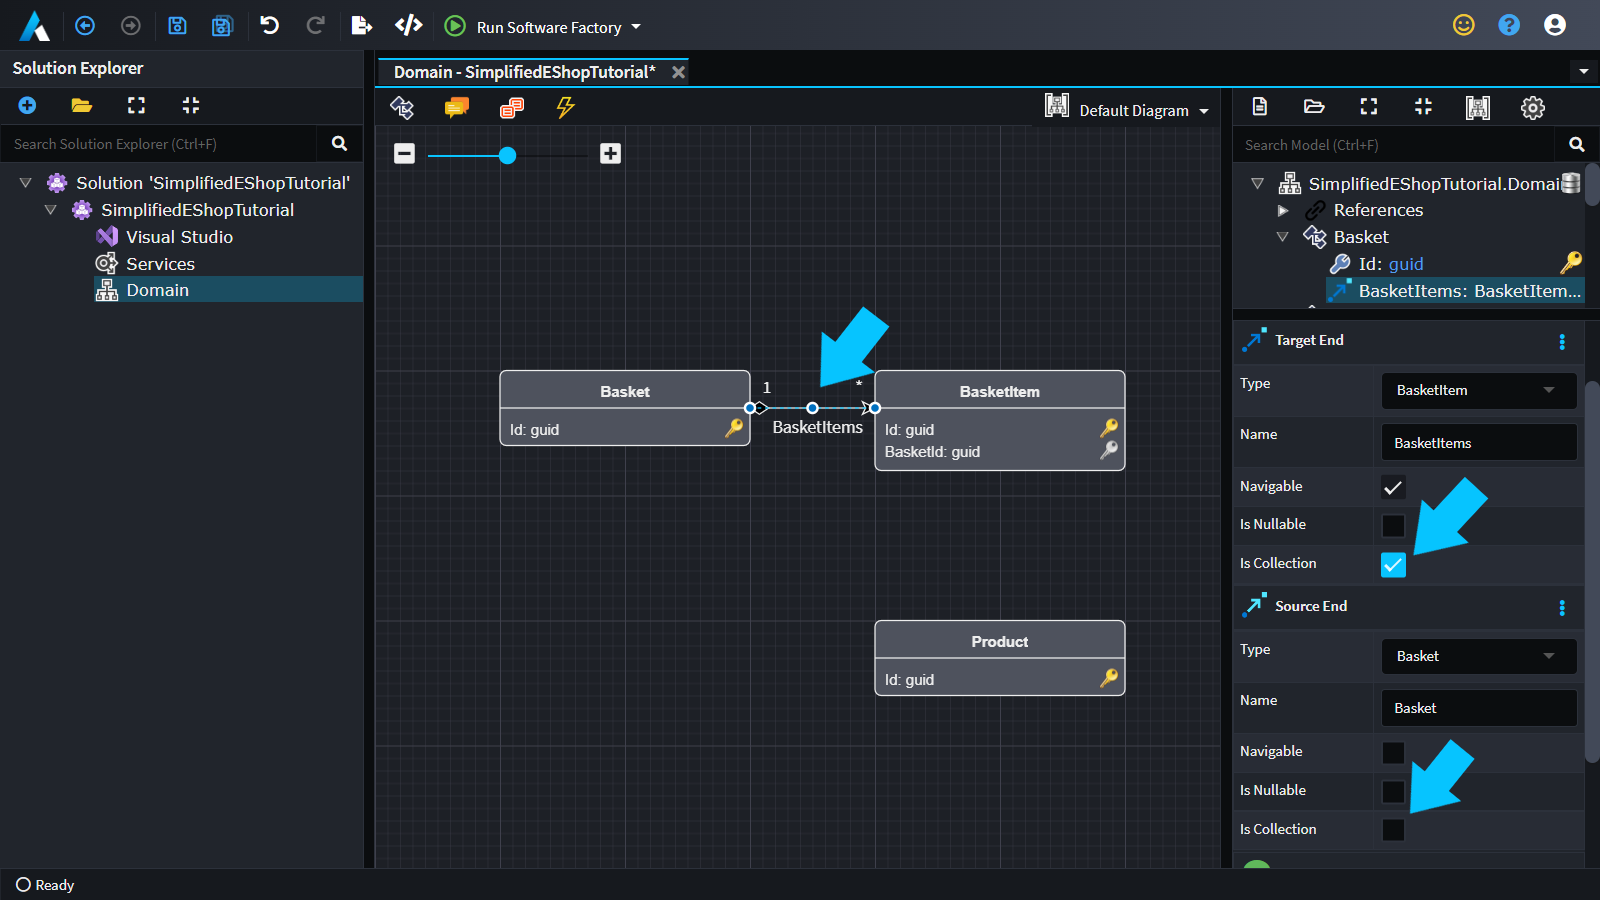
You have configured a one-to-many relationship, i.e. a Basket has many BasketItems and a BasketItem belongs to one Basket.
Next let's map the association between BasketItem and Product:
- Right-click on the
BasketItementity, and selectNew Association. - Click on
Product.
You have configured a many-to-one relationship, i.e. a BasketItem has one Product and a Product can be associated with many BasketItems.
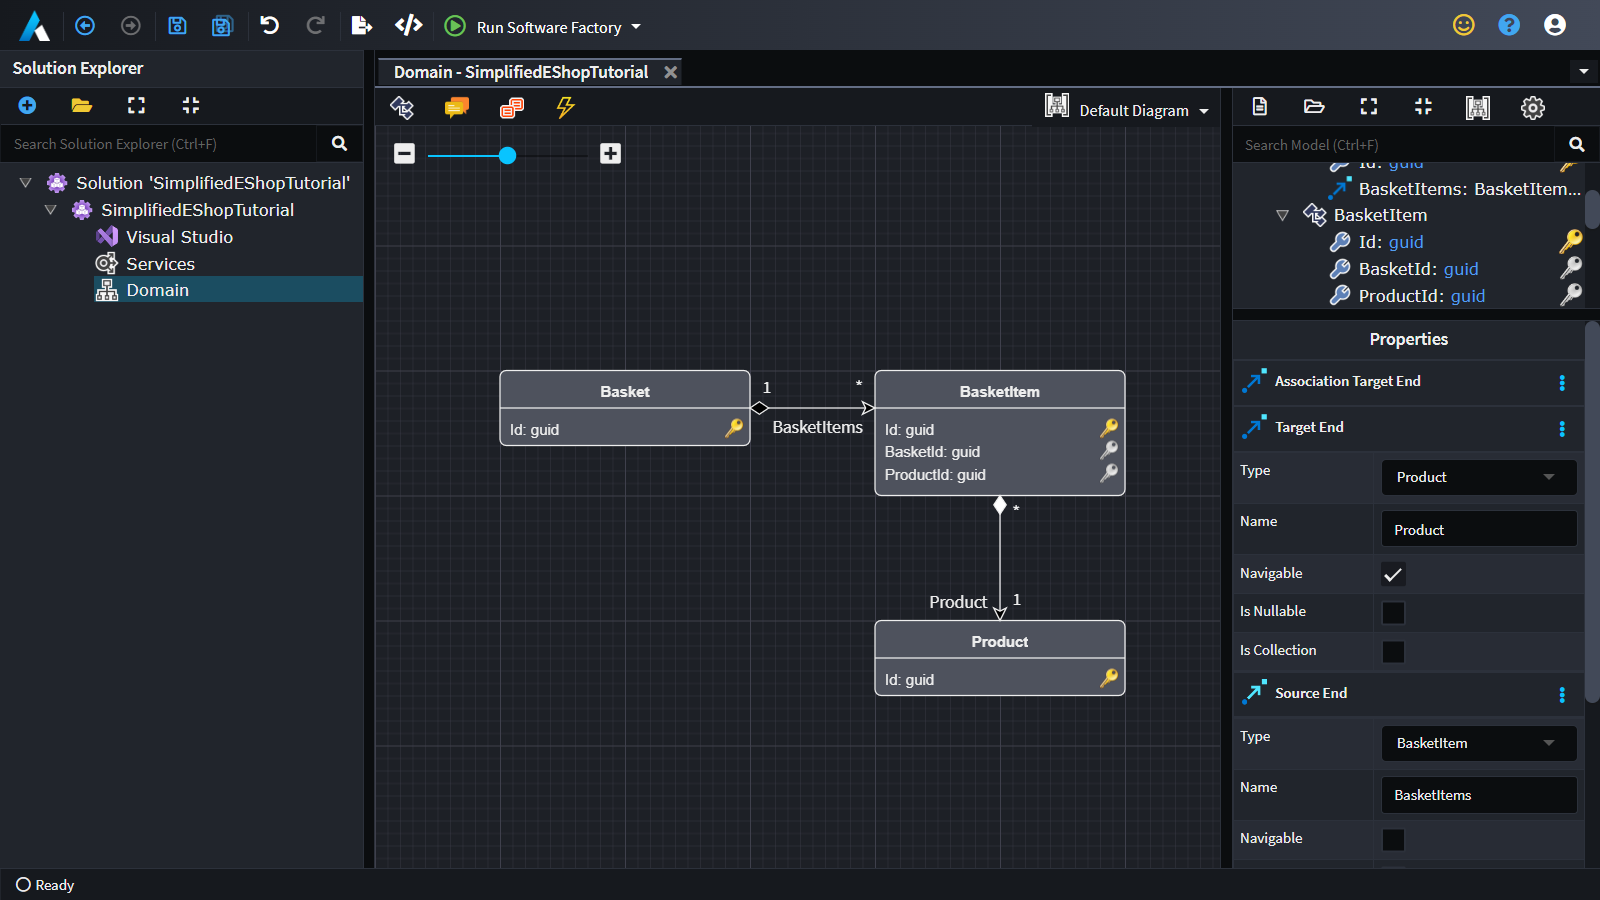
Note
BasketItem is taking on a darker shade color than Basket to visually represent a composite relationship meaning that BasketItem cannot exist independently from Basket.
Modeling Data
To finish these entities up, you will now model their data.
Model the Product:
- Right-click on the
Productentity and selectAdd Attribute. - Type
Name, as the default type isstringyou can just press enter. - To add another attribute, press
Ctrl+Enter. - Type
Descriptionof typestring. - Again, add another attribute, press
Ctrl+Enter. - Type
Price, pressTab, start typingdecimaland whendecimalis highlighted in the drop down box, pressEnterto apply it.
Tip
You can use the F2 shortcut to rename things like Entitys and Attributes. In the case of Attributes it also allows you to change the Attribute's type.
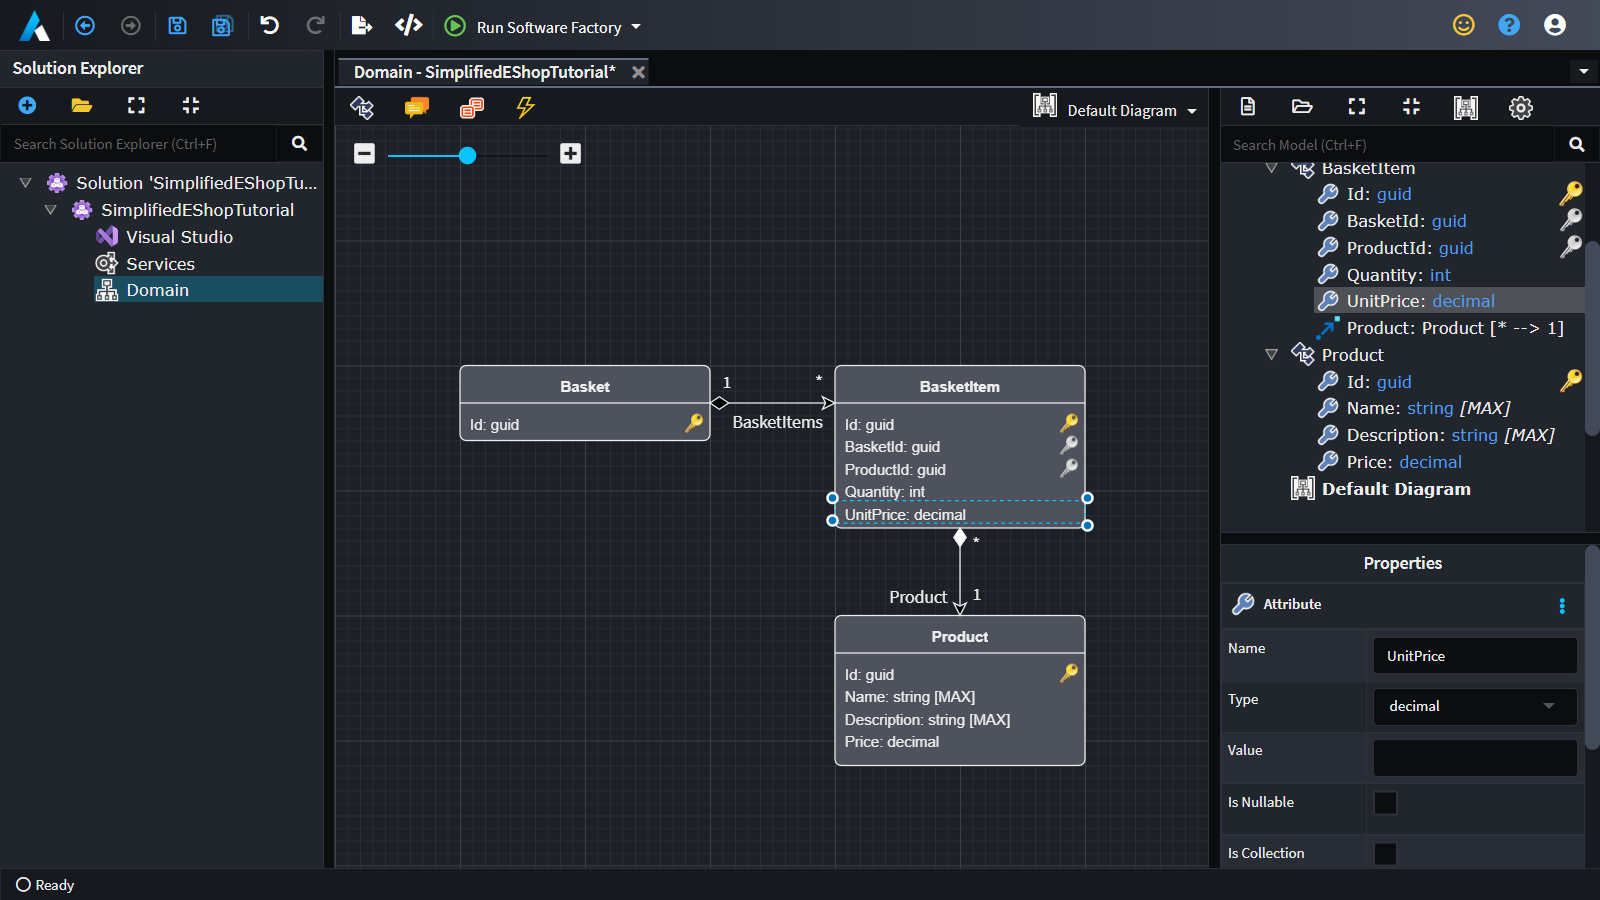
Model the BasketItem:
- Right-click on the
BasketItementity and selectAdd Attribute. - Type
Quantity, of typeint. - Add another attribute, press
Ctrl+Enter. - Type
UnitPrice, pressTaband select thedecimaltype.
Tip
Some other shortcuts you might find useful while modeling:
Ctrl+S- Save changes in you current DesignerCtrl+Z- UndoCtrl+Y- Redo
Model out the rest of the design
You can go ahead and model out the rest of the domain in the same way you just modeled out the first three entities, here is what your domain should look like when you are complete:
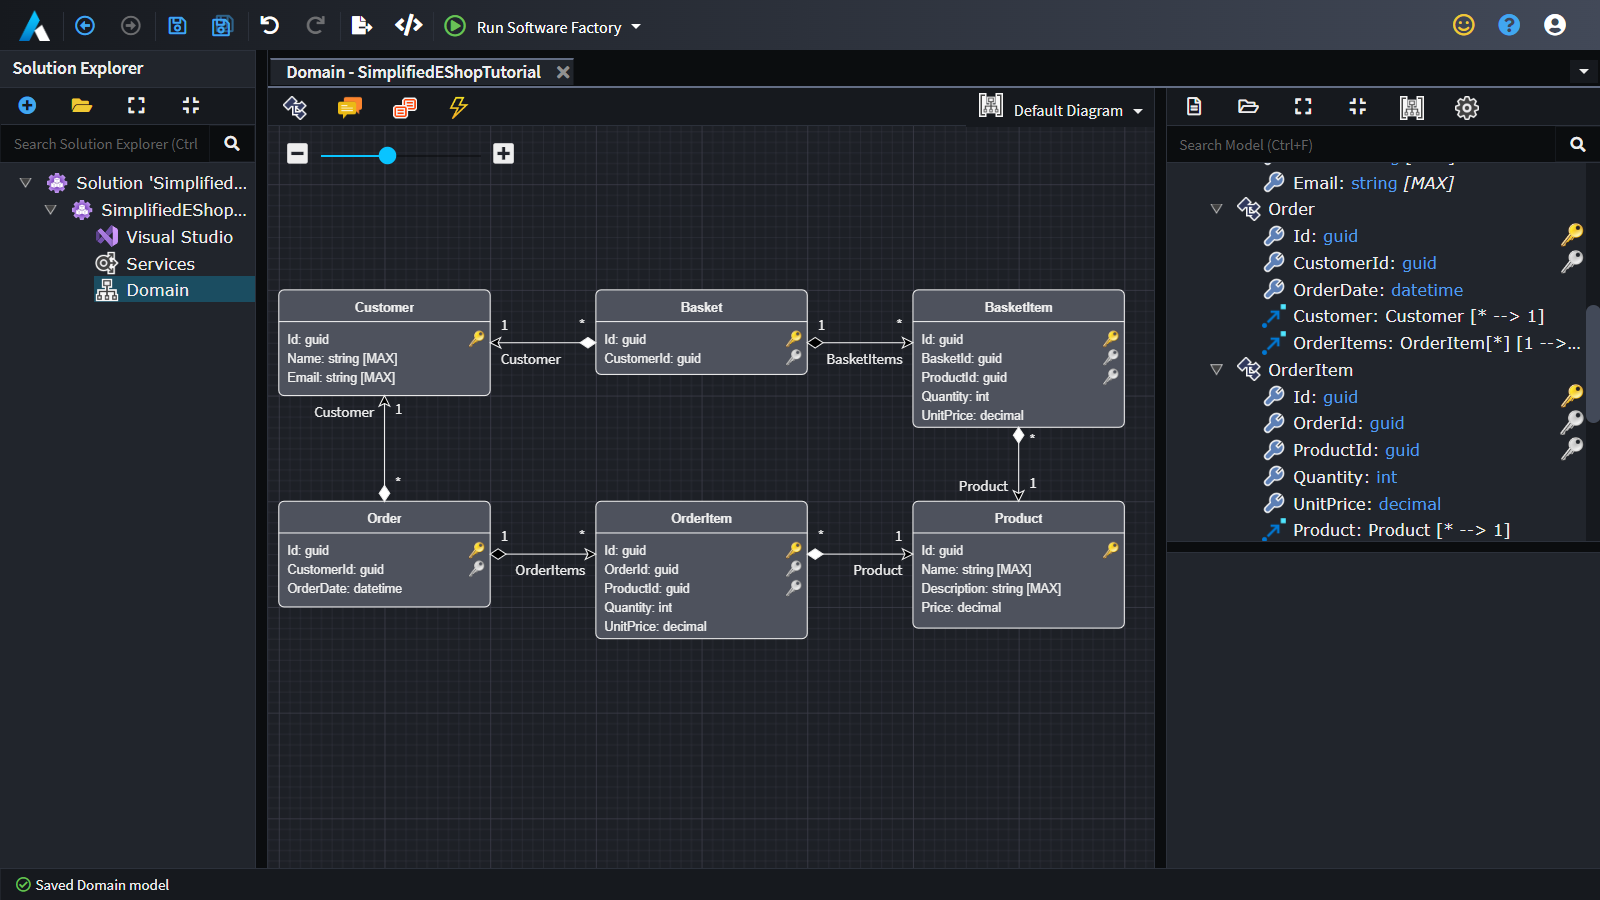
Note
Even in this simple domain, there are many perfectly valid ways to model this domain. For example, Basket could be associated with Order. Here we are trying to keep the model as close to the original design where these tables are in completely separate applications and data stores.
The last thing to add to the model will be a Status on the order, so that our customer can see what is happening with their order.
Add an OrderStatus Enum to the model:
- Right click anywhere on the background of the diagram and select
New Enum. - Type in
OrderStatusas its name. - Right-click on
OrderStatusand selectAdd Literal. - Type
Submitted, press tab and type1(this will add a literal calledSubmittedwith its ordinal value of1). - Add two more statuses:
Shipped=2.Cancelled=3.
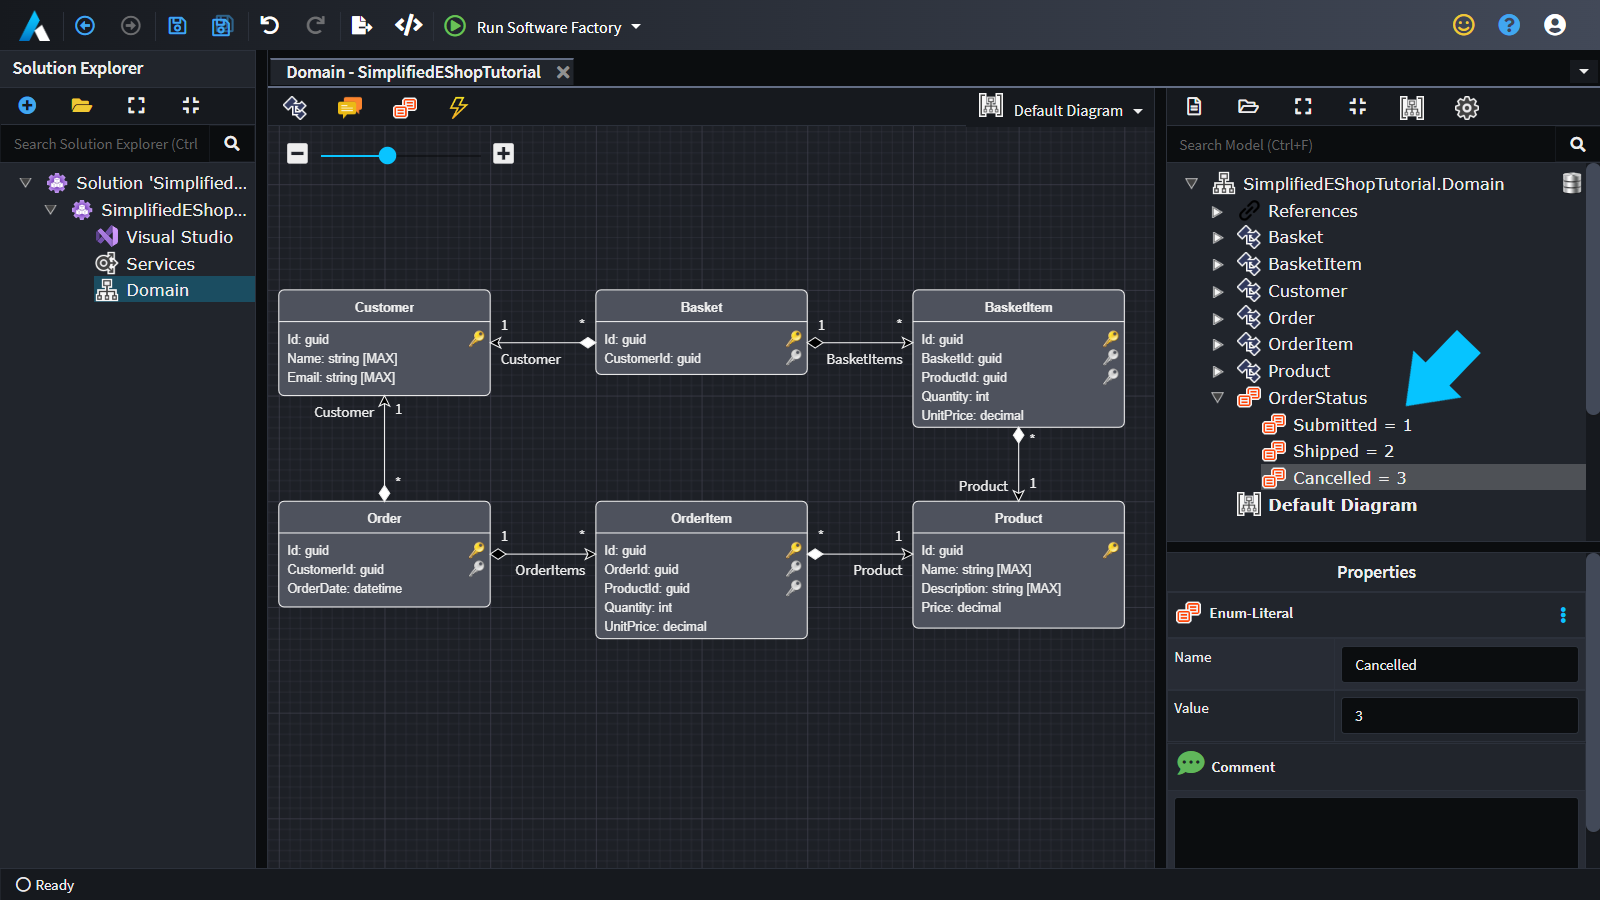
Tip
Starting your Enum literal values from 1, as opposed to 0, is a good practice to catch "default initialization bugs" as uninitialized enums will have a value of 0.
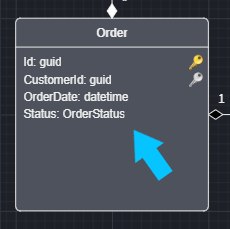
Add a Status attribute to the Order:
- On your
Orderentity, add an attribute namedStatusof typeOrderStatus.
You can now apply your modeling changes to your codebase:
- Save your Modeling (
Ctrl+S). - Run the
Software Factory(F5) this will generate all the code related to your Domain Modeling. - Feel free to review / explore the changes in the
Software FactoryChanges dialog. - If you double-click on any of the Changes file entries, the proposed file change will be opened in the configured diff tool (by default Visual Studio Code will be used, if not installed then it will try use Visual Studio).
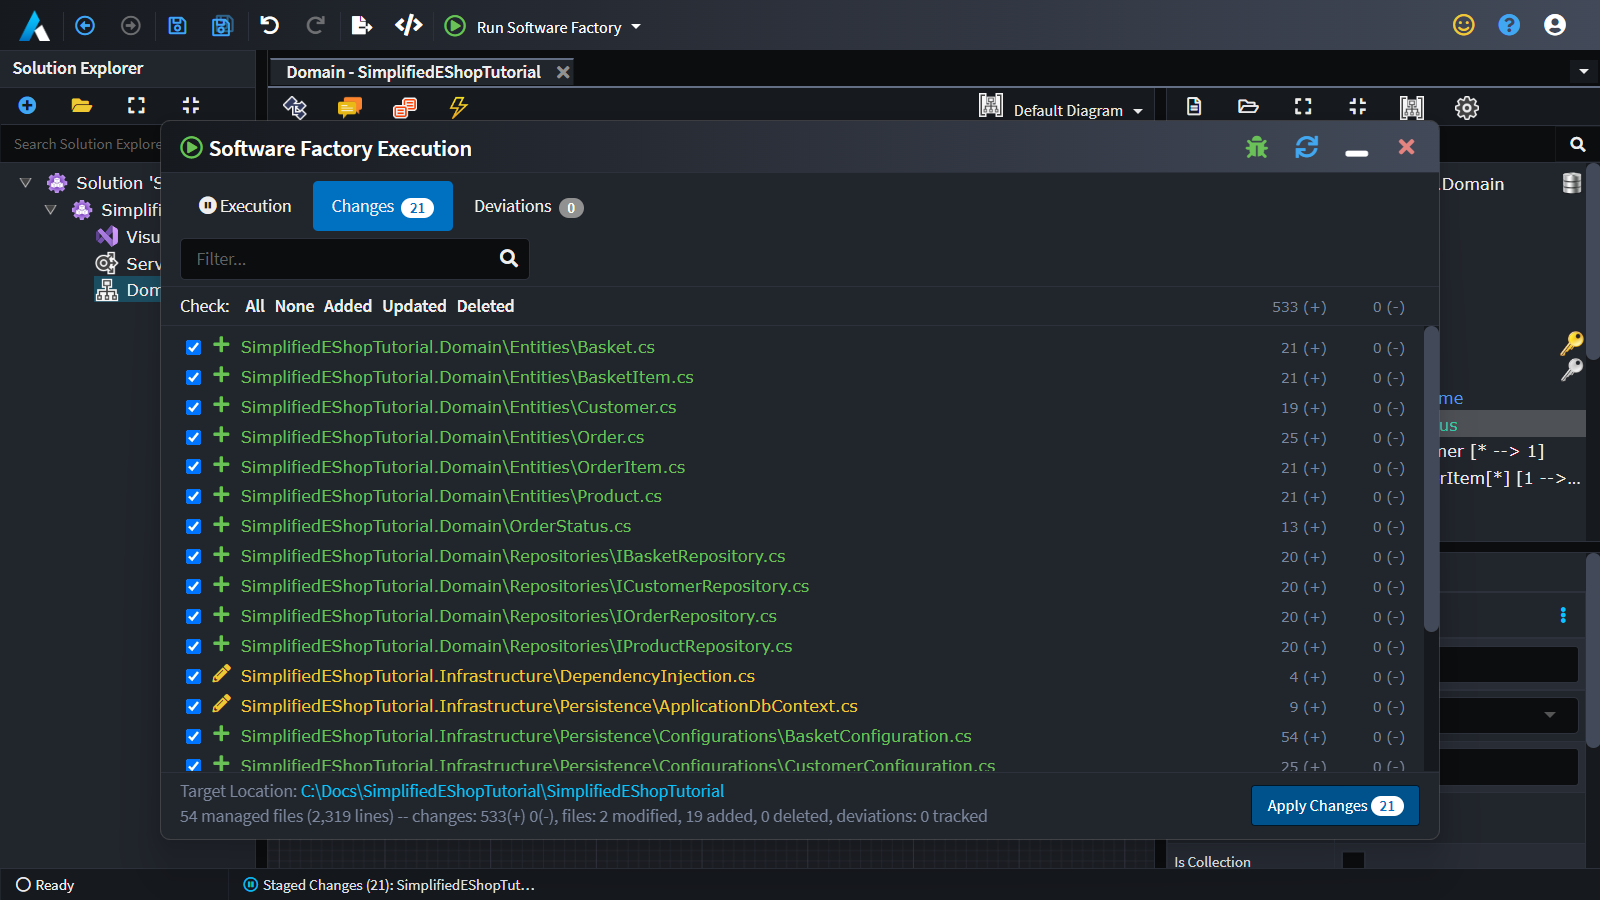
Apply the Changes:
- Click
Apply Changes.
You have successfully modelled the domain.
Configuring your database
When the ASP.NET Core - Clean Architecture application template was used to create your application, by default it configured it to use Entity Framework Core for persistence and defaulted the Database Provider to In Memory. Although still useful for testing during development, the In Memory Database Provider has the limitation that all persisted data is lost each time the application is stopped.
In this section you will change the application's Database Provider to SQL Server and then cover using Entity Framework Core tooling to create your application's schema in a SQL Server instance.
Note
- This section is optional as the tutorial will work with the
Entity Framework Core'sIn Memorydatabase provider by default. - You will need a SQL Server instance to complete this section of the tutorial.
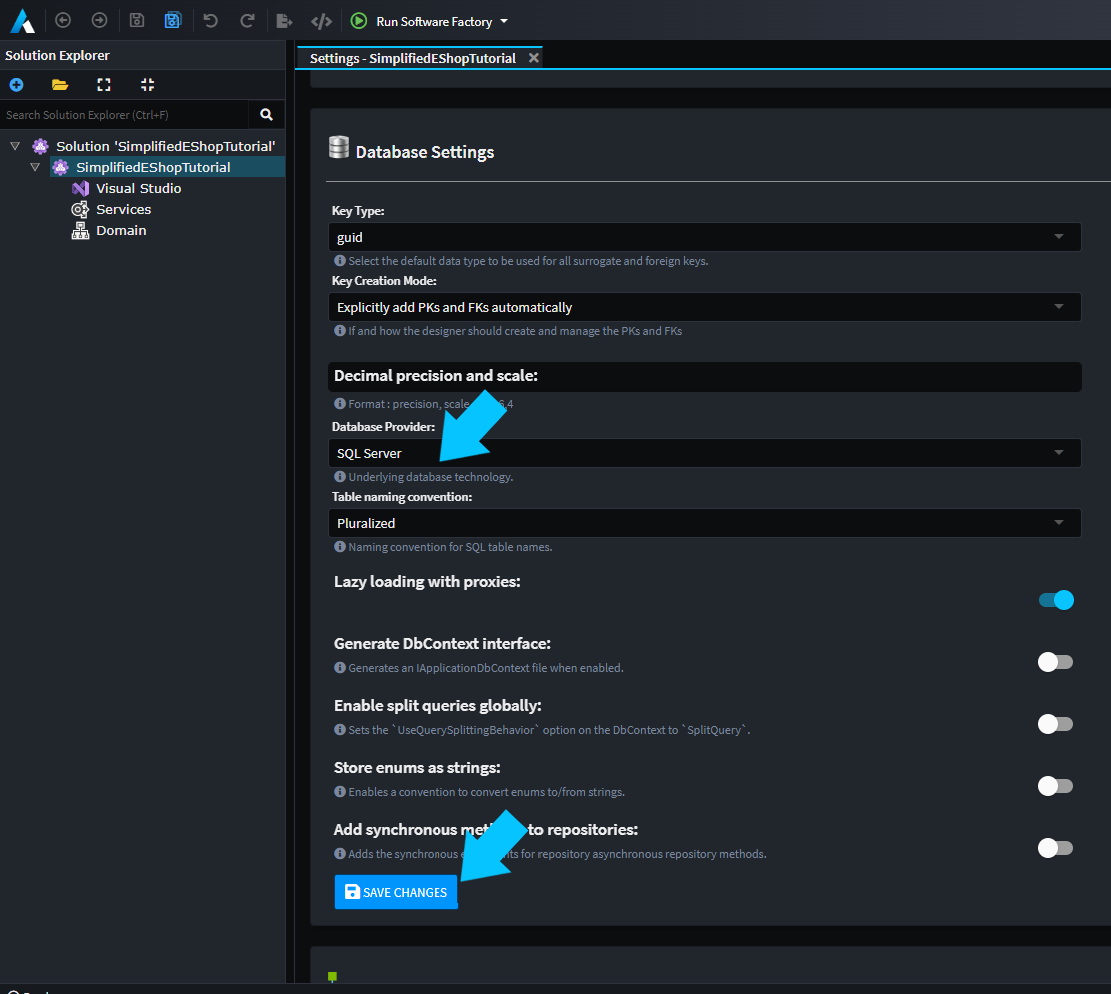
Let's start by changing your Database Provider:
- Open the application setting tab by right-clicking on the Application in the
Solution Explorerand selectingSettings. - Scroll down to the
Database Settingssection (click to expand). - Change
Database ProvidertoSQL Server. - Press
CTRL+Sto save.
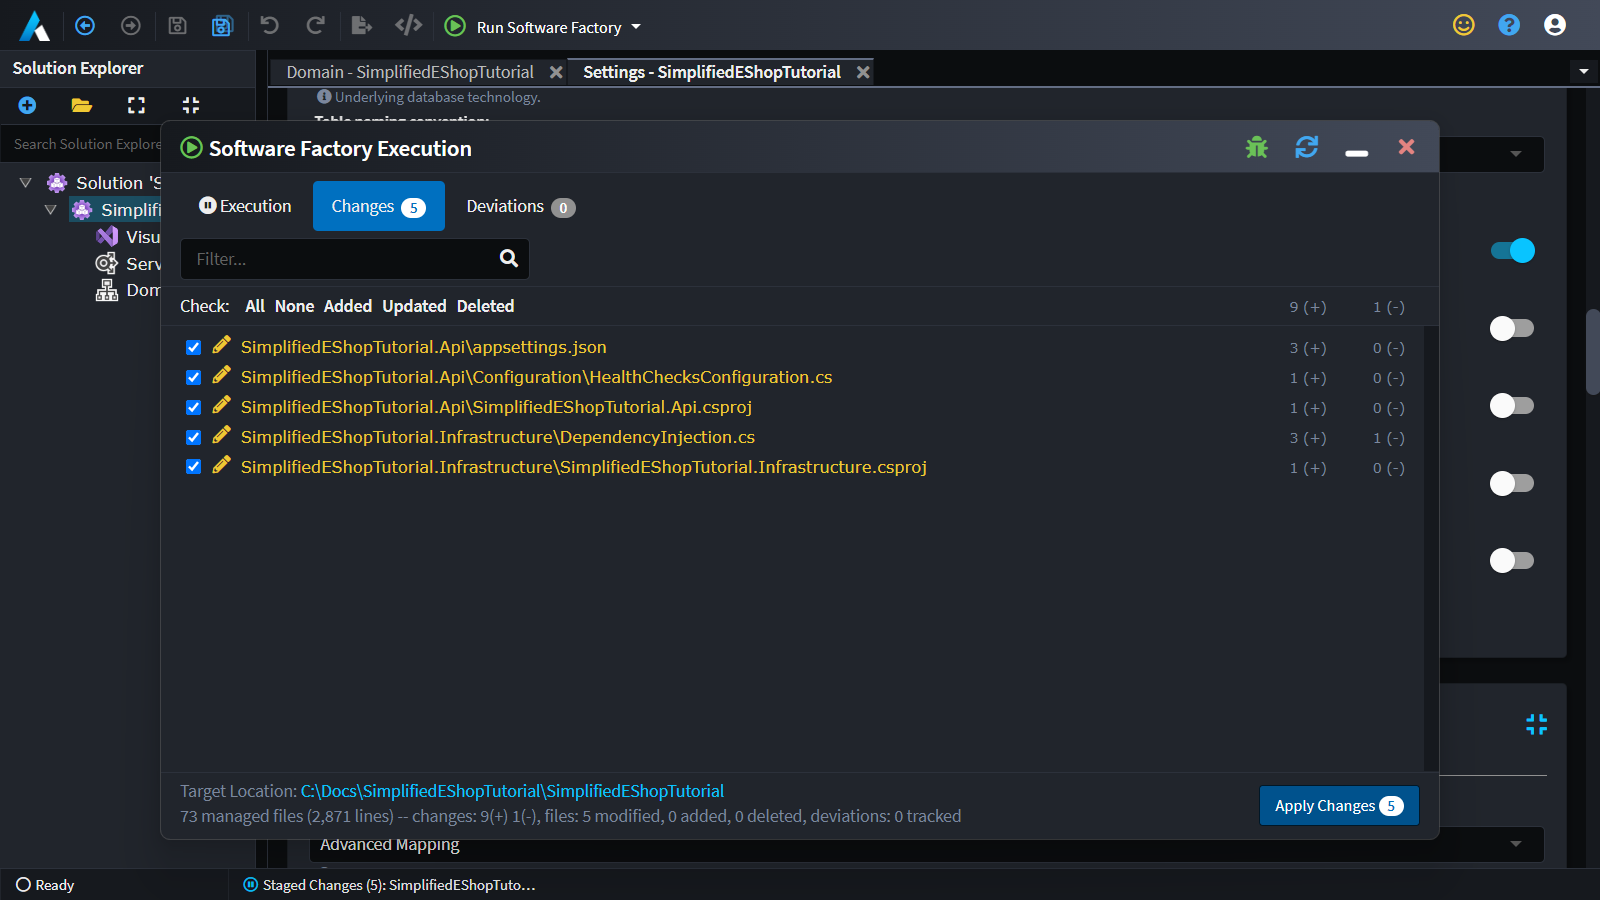
Run the Software Factory to apply these changes:
- Run the Software Factory (
F5).
The changes should appear as follows:
Take a look at the changes to appsettings.json, you will see that Intent Architect has added a default connection string for the database as follows:
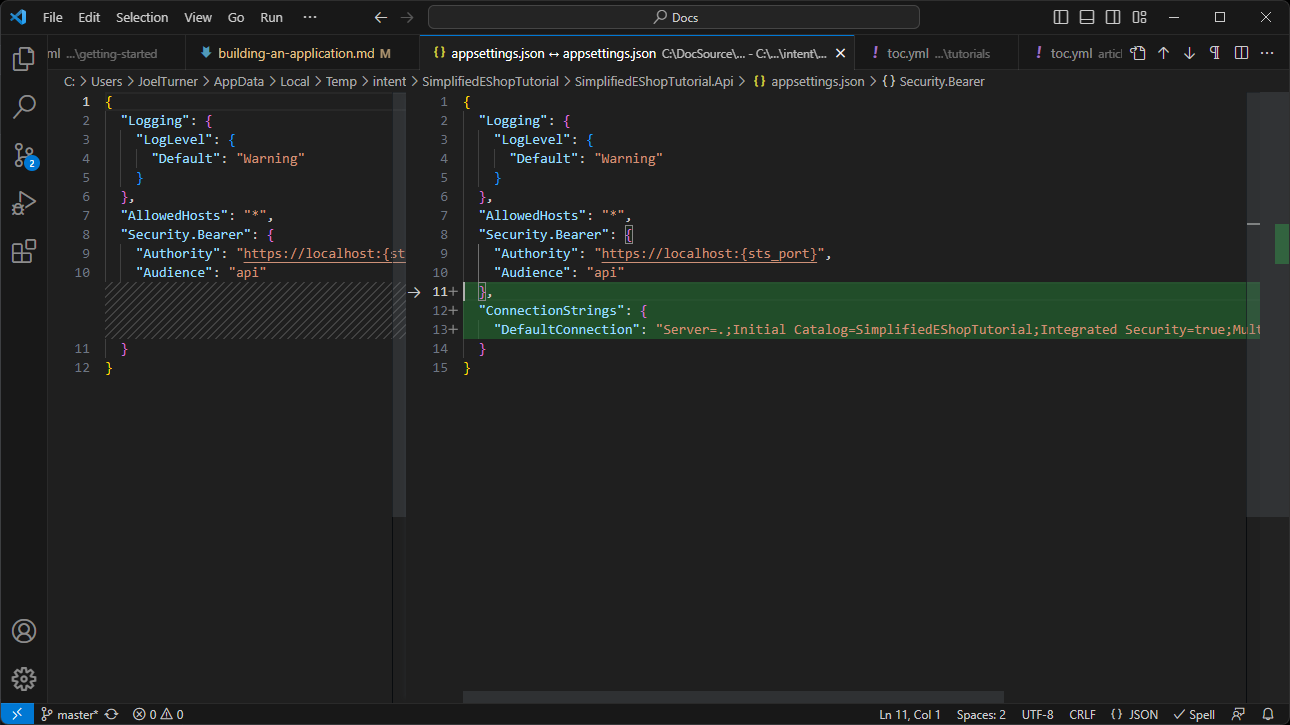
Note
This connection string may need to be modified depending on your specific SQL Server set up. You can freely edit the connection string as required. The database name has been defaulted to your application name.
Apply these changes to your codebase.
- Click
Apply Changes.
The next step is to create your application's database. To achieve this you are going to use Entity Framework Core's migration system. Switch to the codebase in your C# IDE, then:
- Navigate to the
SimplifiedEShopTutorial.Infrastructureproject. - Expand the
Migrationsfolder. - Open the
README.mdfile.
Note
If you have an older version of the Intent.EntityFrameworkCore module installed (before version 5.0.28) you will need to locate the MIGRATION_README.txt file in the SimplifiedEShopTutorial.Infrastructure project's Persistence folder.
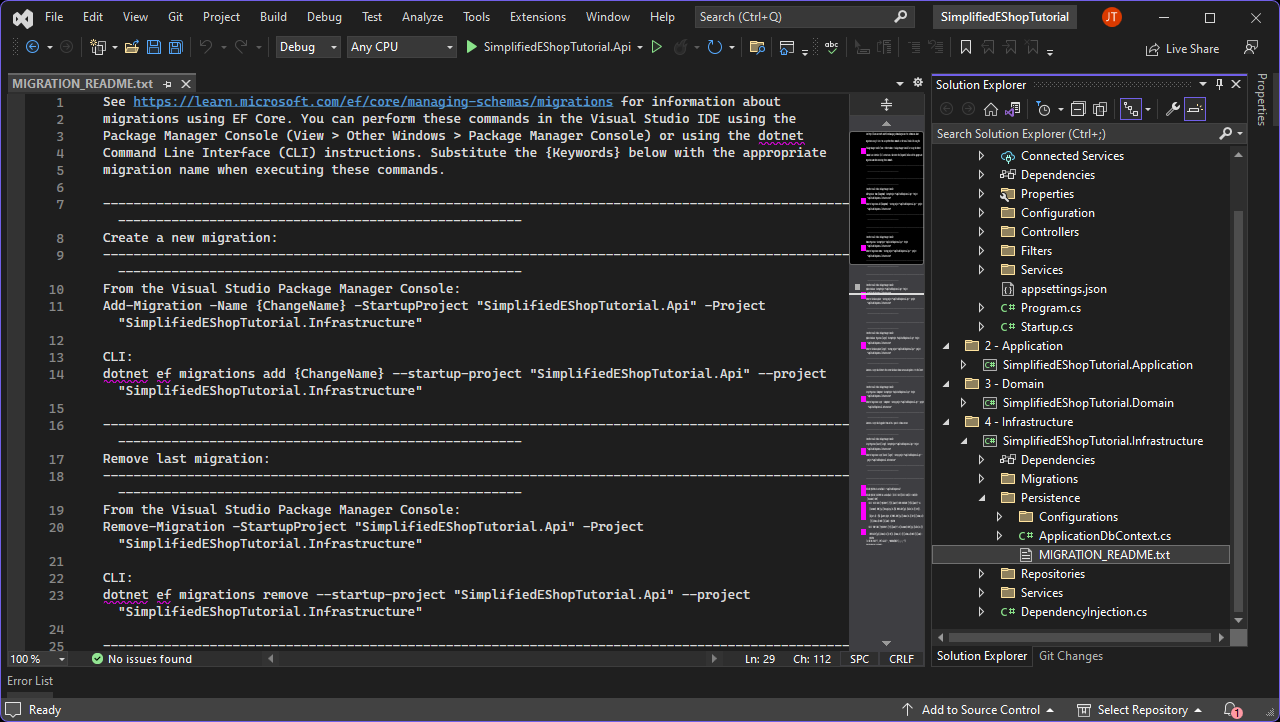
This file is an easy-to-use reference of commonly needed migration commands, pre-configured for this C# solution. Your first step will be to create a new migration:
- Find the
Create a new migrationsection. - Run the migration command, changing
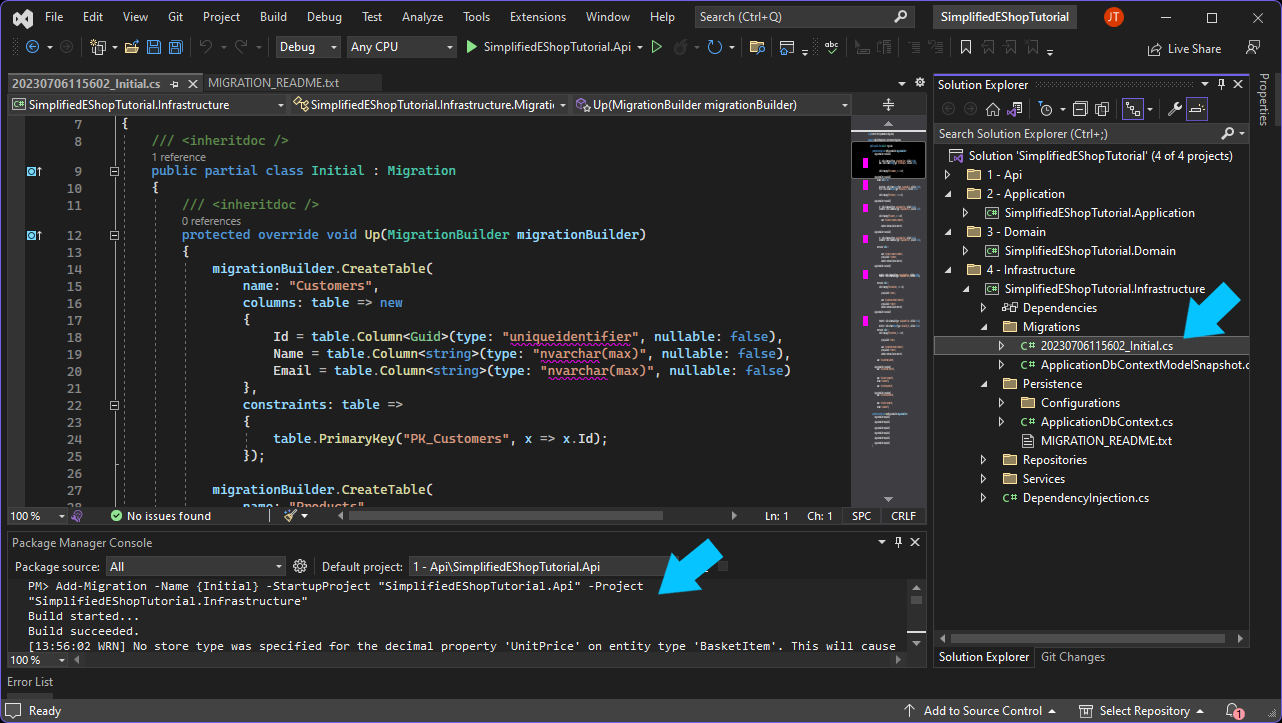
{ChangeName}toInitial(as EF Core's tooling ignores curly braces,{Initial}will also work).- If you are using Visual Studio, open the
Package Manager Console(View > Other Windows > Package Manager Console). For any other IDE, you can use the.NET CLIcommands instead. - Paste the Command into the console:
Add-Migration -Name {ChangeName} -StartupProject "SimplifiedEShopTutorial.Api" -Project "SimplifiedEShopTutorial.Infrastructure". - Change
{ChangeName}toInitial. - Press
Enter.
- If you are using Visual Studio, open the
At this point the Entity Framework Core tooling will produce the following migration code file:
Now you can use another command to apply the migrations which will create/update the application's database schema for you:
- Find the
Update schema to the latest versionsection. - Run the migration command:
- Again, from the
Package Manager Console. (View > Other Windows > Package Manager Console) - Paste the Command onto the console:
Update-Database -StartupProject "SimplifiedEShopTutorial.Api" -Project "SimplifiedEShopTutorial.Infrastructure". - Press
Enter.
- Again, from the
At this point the Entity Framework Core tooling will connect to your SQL Server, create the database and update the schema accordingly. Using a tool like SQL Server Management Studio to inspect the database you will see the following:
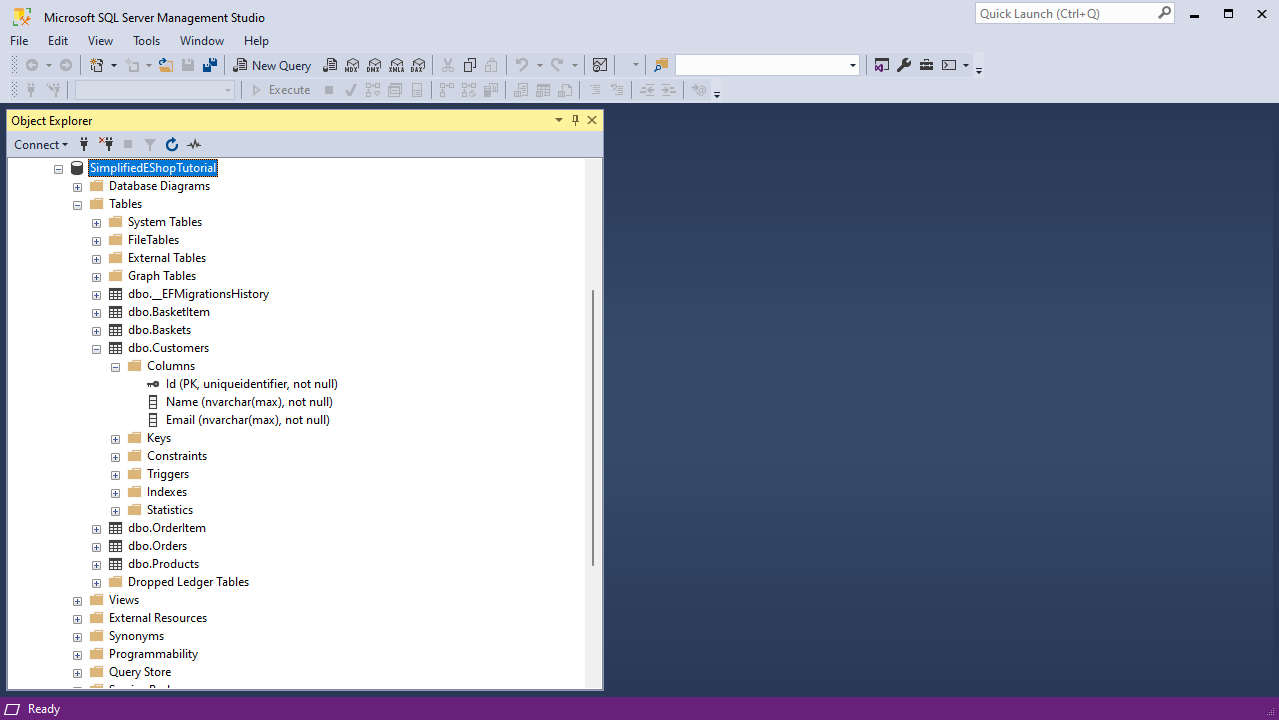
Note
If you are unable to successfully run the Update-Database command, check that your connection string is correct and that the account being used has the required permissions. You may need specific permissions on the SQL Server instance to create a database and alter schemas. You can alternatively use the Generate a script which detects the current database schema version and updates it to the latest command which will generate a SQL script. The generated script can then be manually applied to the SQL Server instance using an account with the required permissions.
You have now created a SQL Server database which is based on your modeled design and configured your application to use it.
Tip
For more information on Entity Framework Core migrations, check out the official documentation.
Modeling the services
Next up you are going to model the services of your application. Looking at the domain, Customers and Products are really just supporting data for Baskets and Orders. Given that, you can easily use Intent Architect to create CRUD services for these:
- Open the
ServicesDesigner. - Anywhere on the diagram, right-click and select
Create CRUD CQRS Operations. - The
CRUD Creation Optionsdialog will appear. SelectCustomerin theEntity for CRUD operationsdrop down. - Click
Done.
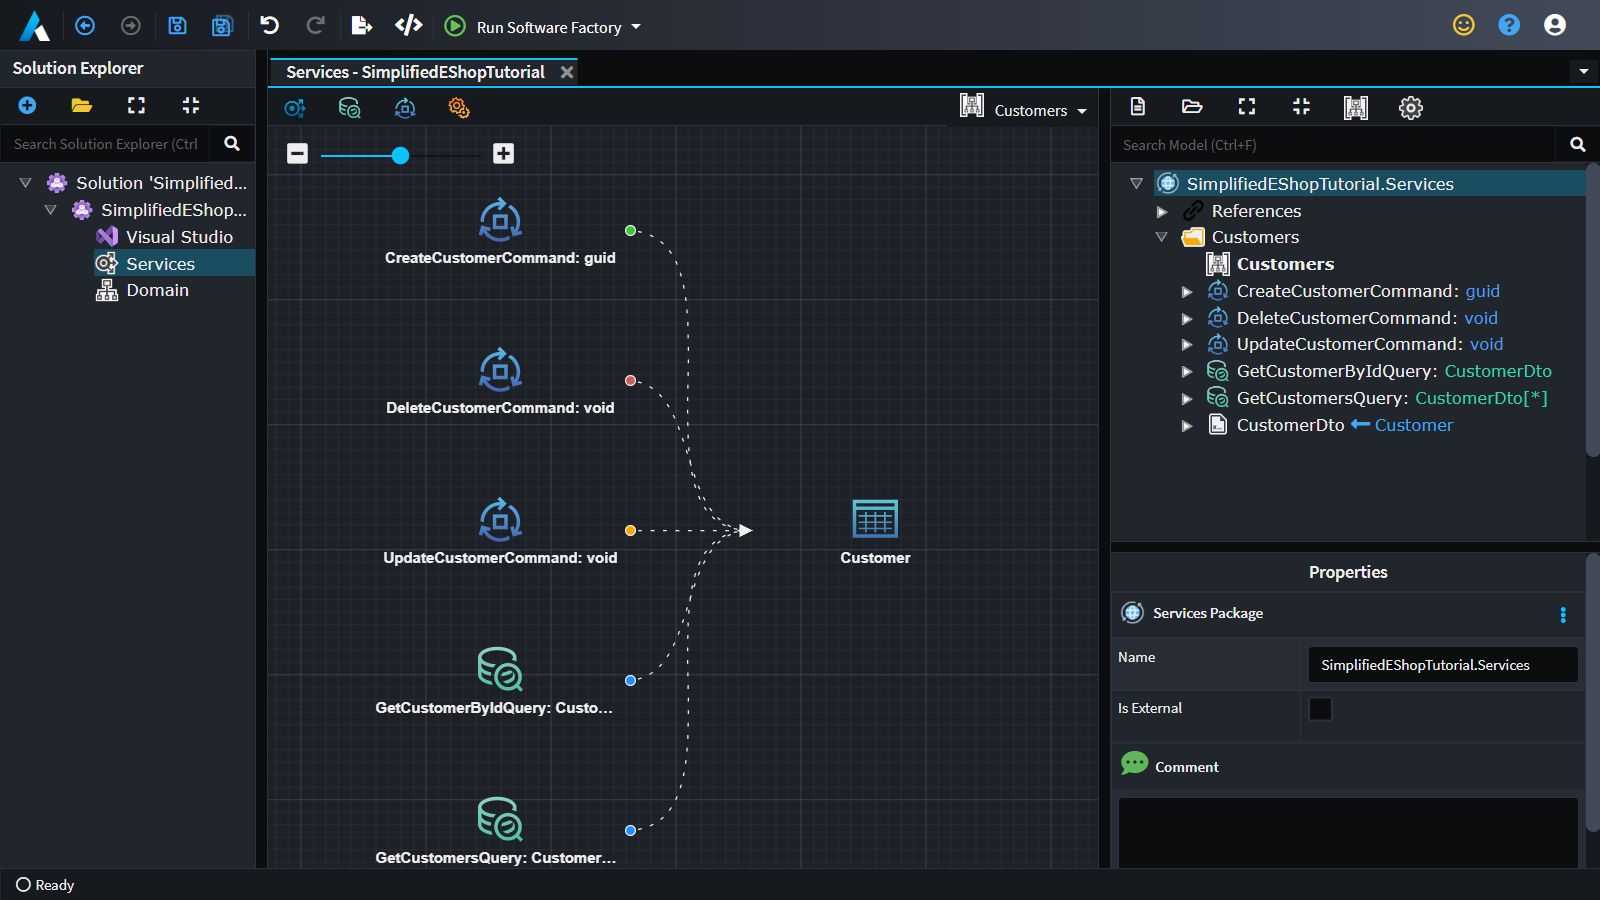
The Customer service has been created in a CQRS style. Intent Architect has added all the basic CRUD operations by default.
Note
Simplifying it a bit, the CQRS paradigm is about separating server instructions into two groups:
Commands, these mutate / change the server's state.Querys, these only read state, never changing it.
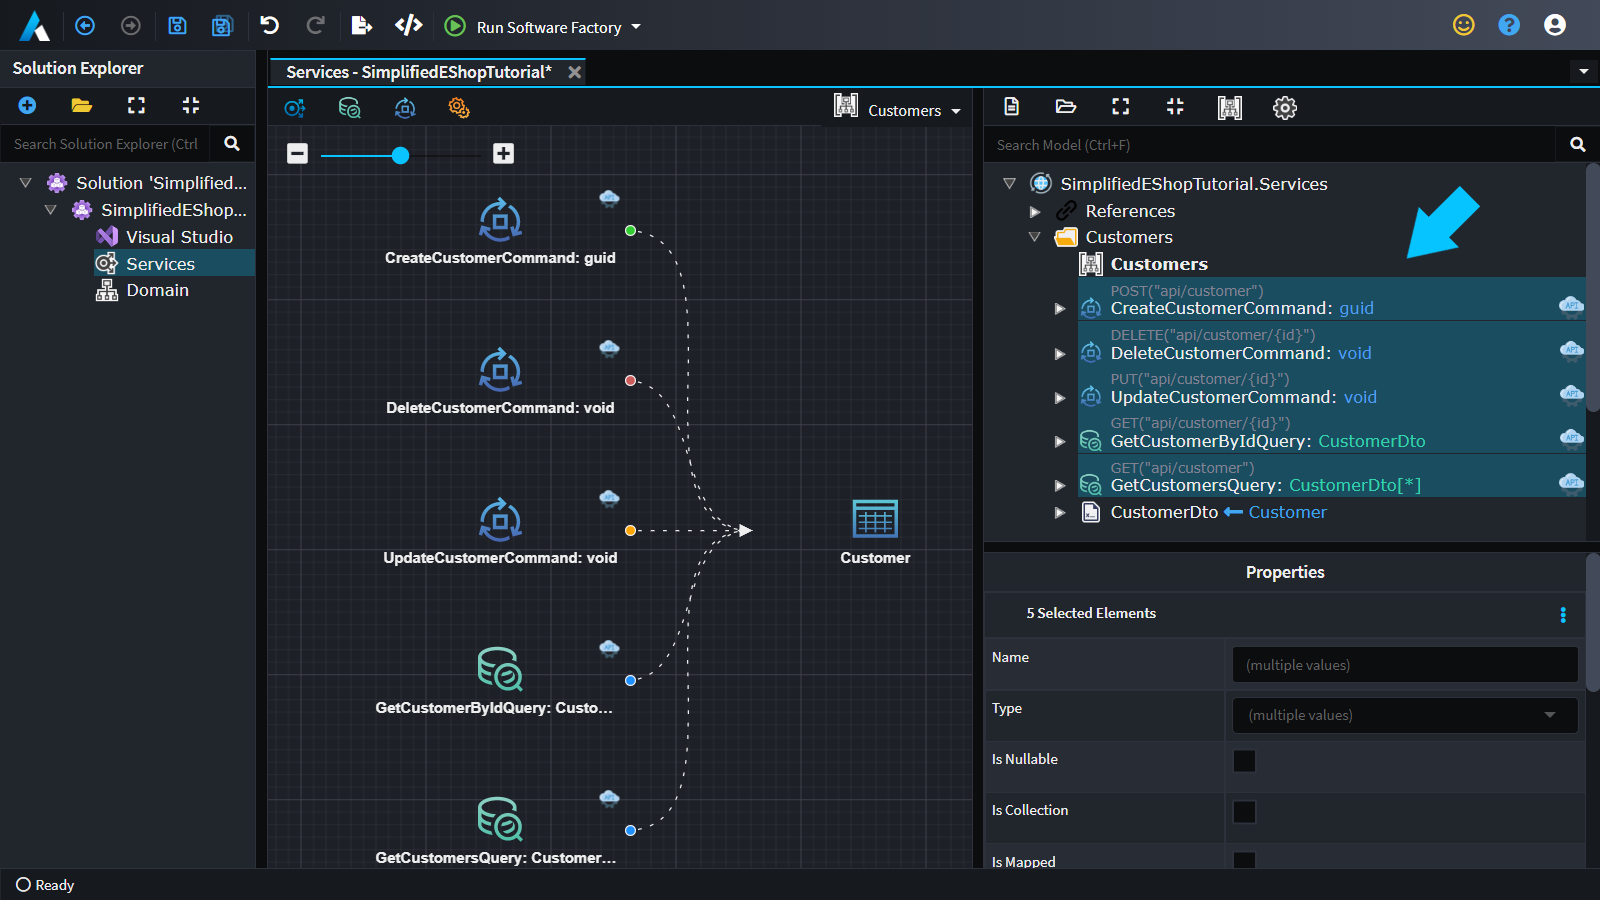
Your next action is to expose these commands and queries as REST endpoints:
- Click on
CreateCustomerCommand. - Hold down
Shift. - Click on
GetCustomersQuery. - You should have all the
Commands andQuerys highlighted - Right-click on any of the highlighted items and select
Expose as Http Endpoint.
Tip
When modeling services in Intent Architect you are modeling application level services, i.e. they are not necessarily available for remote access. In this tutorial you have chosen to expose your services as HTTP REST endpoints.
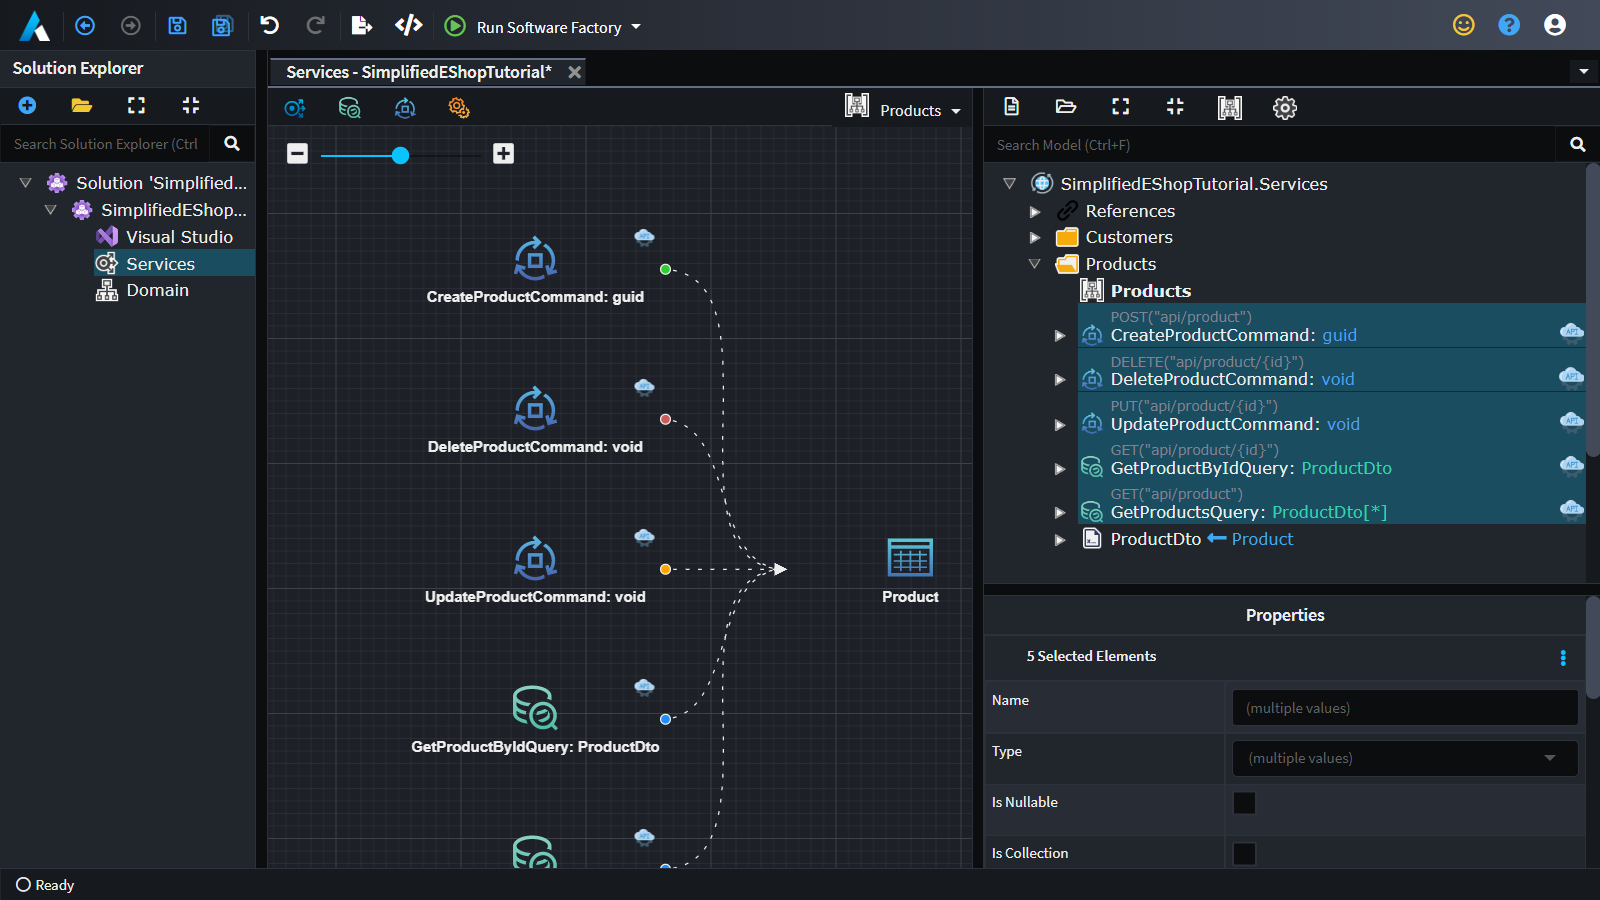
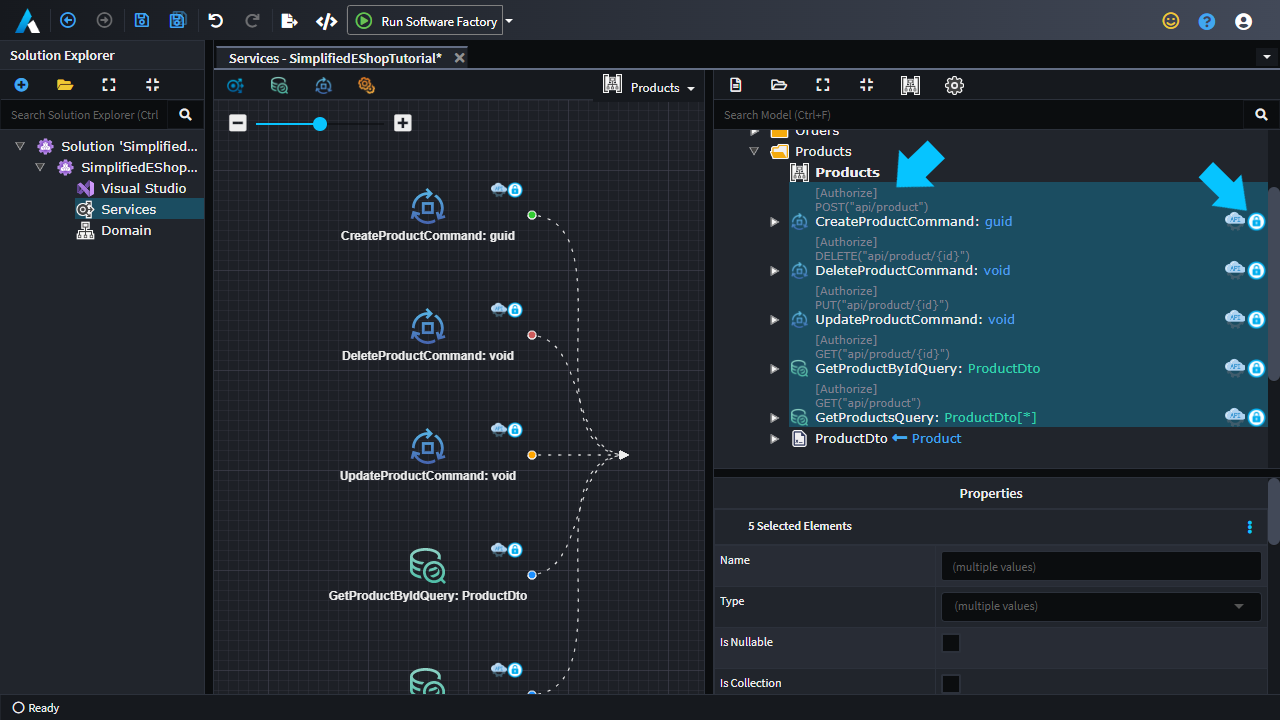
To create services for the Product entities we will add them to a different folder and diagram altogether:
- Right-click on the
SimplifiedEShopTutorial.Servicespackage located in the tree-view on the right-hand side of your screen. - Select
Create CRUD CQRS Operations. - In the
Entity for CRUD Operationsdropdown, selectProduct. - In the
Add to Diagramdrop-down, selectCreate New Diagram. - Click on
Done. - Make sure to expose those endpoints too by selecting them, right-clicking and selecting
Expose as Http Endpoint.
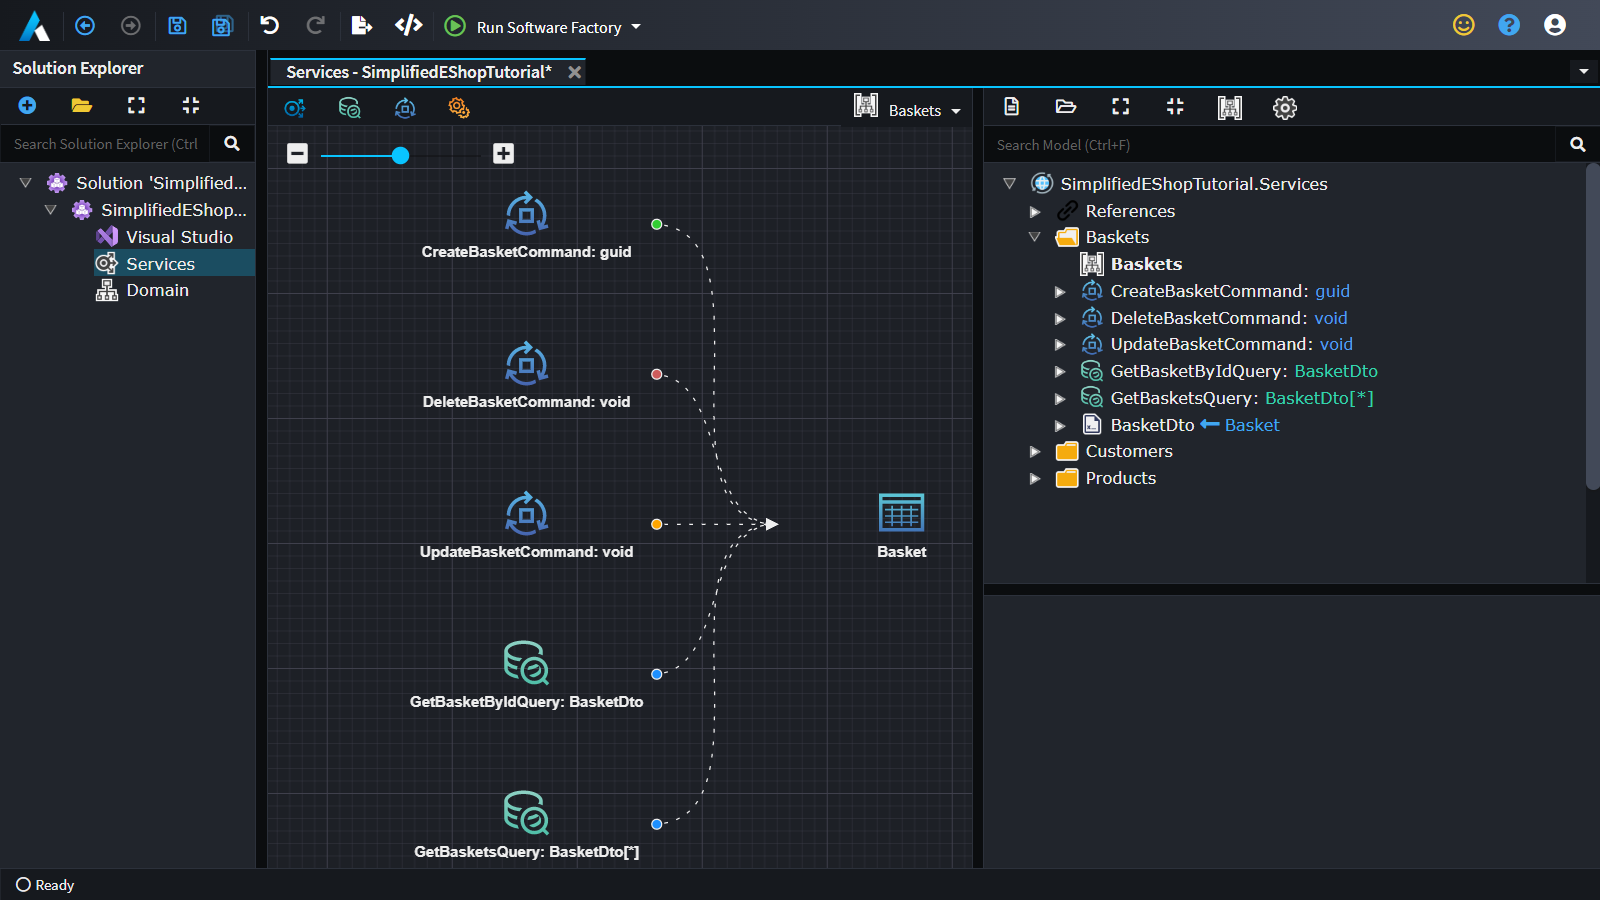
The Services Designer should now look as follows:
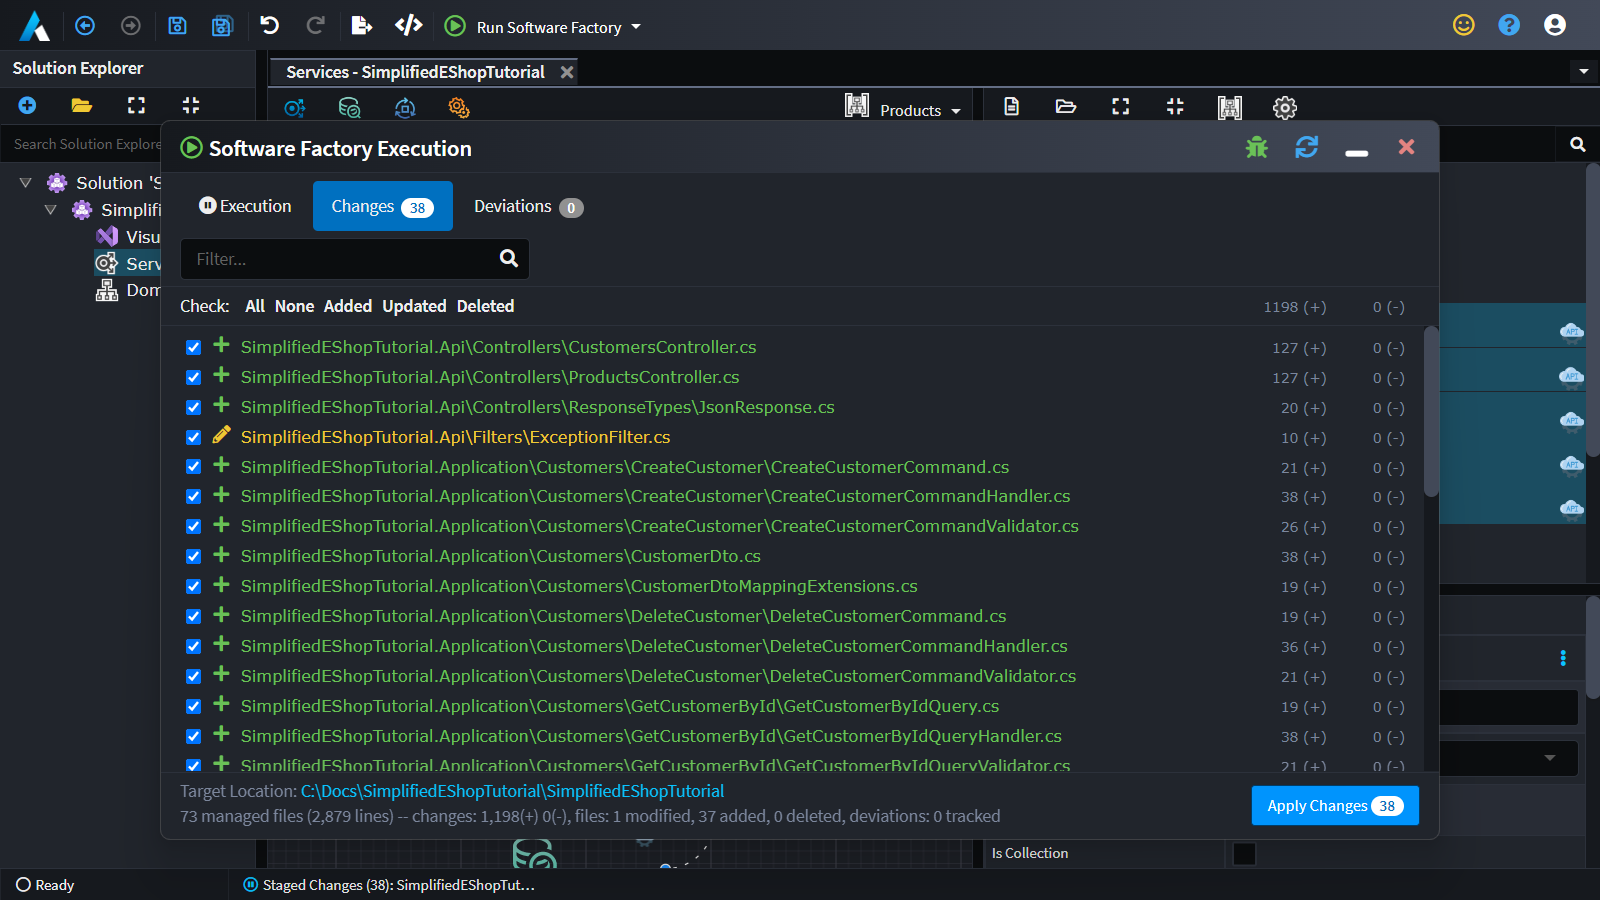
At this point, you can apply these changes and see how your modeling is translating into code:
- Save your Modeling (
Ctrl+S). - Run the
Software Factory(F5) this will produce all the code for the two services you just modeled. - Feel free to review / explore the changes in the
Software Factorydialog. - Click
Apply Changes.
Tip
Using Intent Architect's CRUD modules to create services can be a great productivity boost whether you are using them as-is or as a starting point to extend.
Now let's look at our Basket service. You can use the Intent Architect's CRUD module to create the service and then tailor it to the specific needs.
As before using the Create CQRS CRUD Operations, but on the Basket this time.
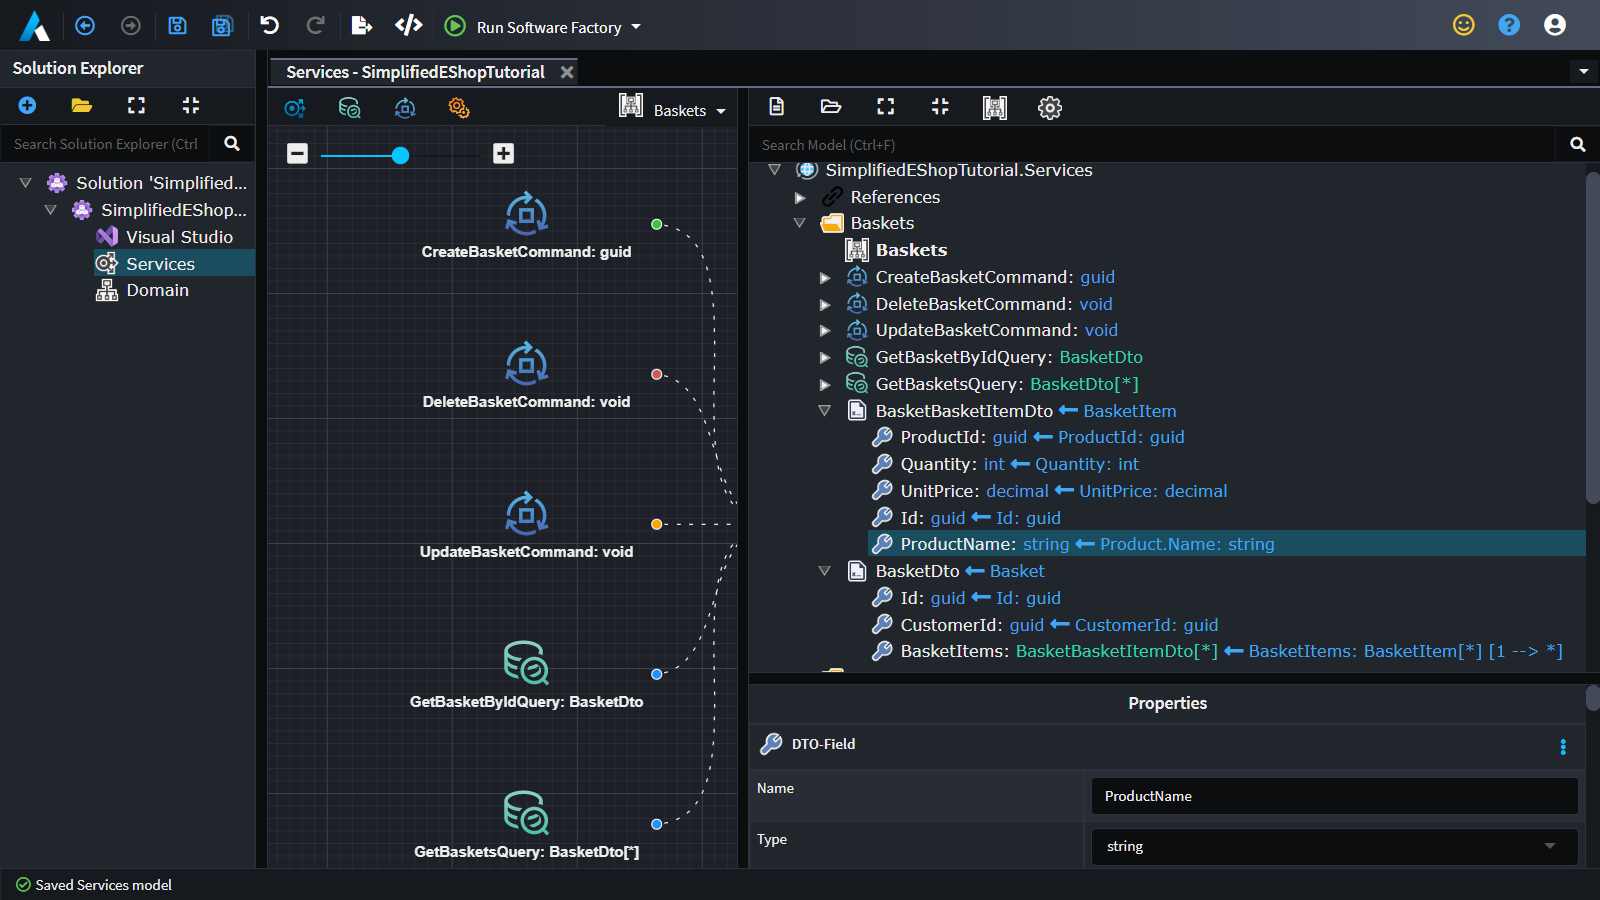
Before we look at the Commands, let's update the BasketDto to better reflect our needs :
- Right-click on the
BasketDtoand selectMap from Domain. - In the tree-view check
BasketItemsnode. - Click
Done. - Right-click on the
BasketBasketItemDtoand selectMap from Domain. - You can uncheck
BasketId. - Expand the
Productnode and checkName. - Click
Done.
Tip
By clicking on the Toggle between diagram and tree views button 🔍 you can change between having the diagram or tree-view in the middle of the screen.
Proceed to model the Commands. Most of the current Commands meet your requirements and you can use them as-is. The next steps will cover the following:
- Deleting the
GetBasketsQuery- we won't need it. - Replacing the
UpdateBasketCommandwith a newAddItemToBasketCommand, this feels more aligned to how a customer would interact with theBasket. - Add a
CheckoutCommandfor the customer to place their order.
Let's start by removing the unwanted Commands and Querys:
- Select
GetBasketsQueryandUpdateBasketCommand(you can use theCtrlkey to select/de-select multiple nodes ones by one). - Press
Delete.
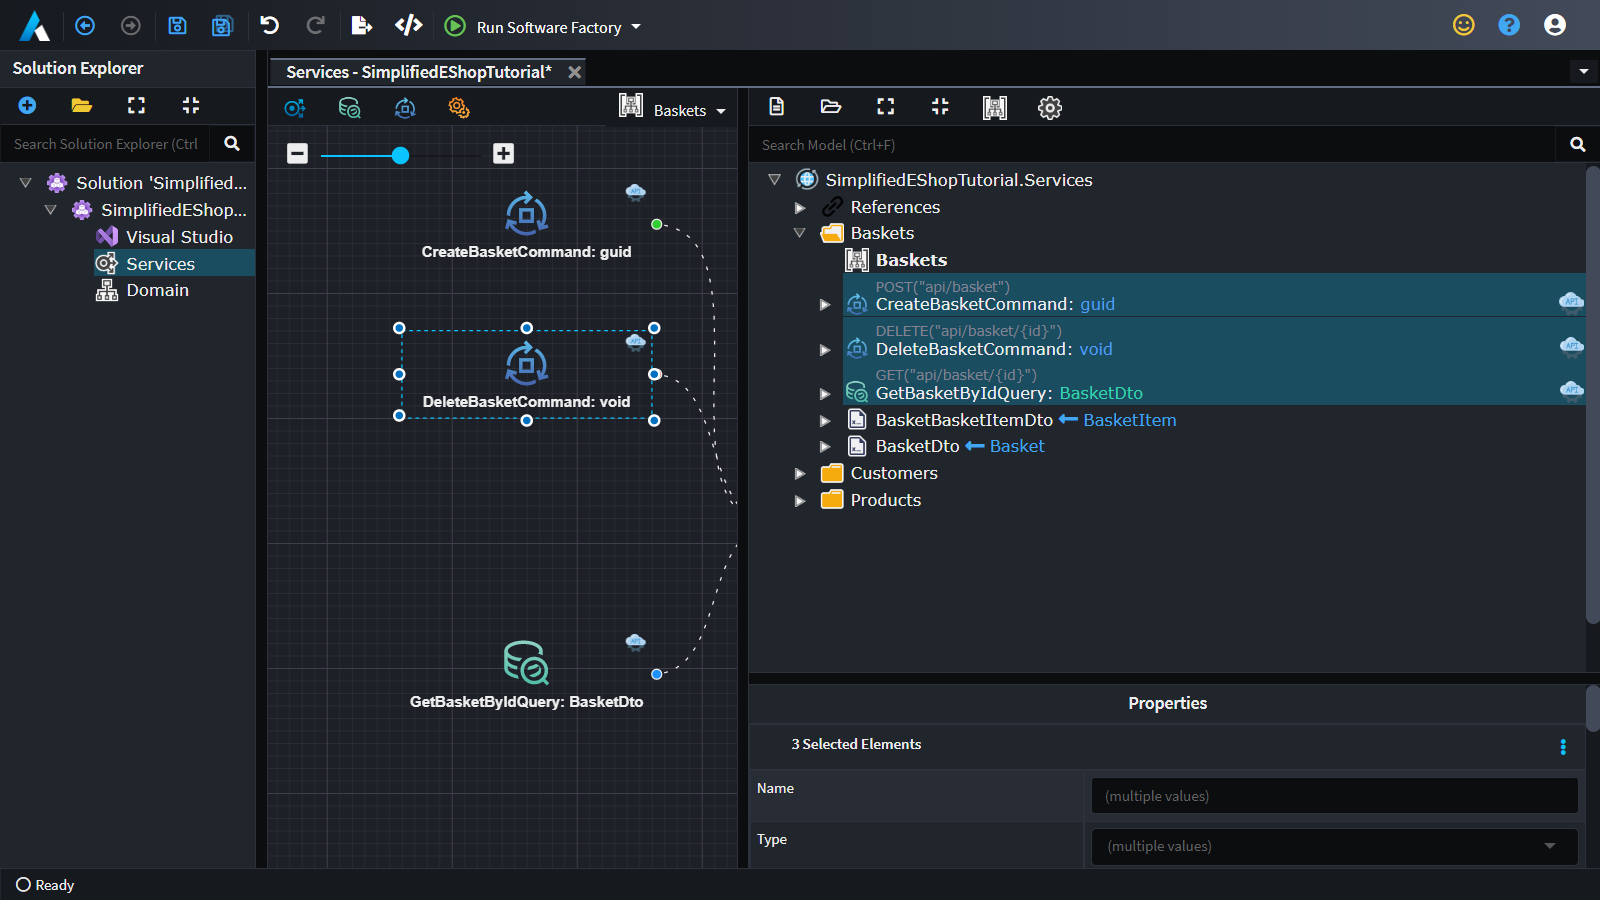
Expose the remaining Commands and Querys as REST Endpoints:
- Select
CreateBasketCommand,DeleteBasketCommandandGetBasketByIdQuery. - Right-click on any of the highlighted items and select
Expose as Http Endpoint.
Next you are going to model the AddToBasketCommand command:
- Right-click on the
Basketsfolder and selectNew Command. - Name the command
AddToBasketCommandand return aGuidwhich will be theIdof the newly addedBasketItem. - Right-click on
AddToBasketCommandand selectCreate Entity.- configure type to create to be
BasketItem
- configure type to create to be

- A Mapping dialog will open up as follows:
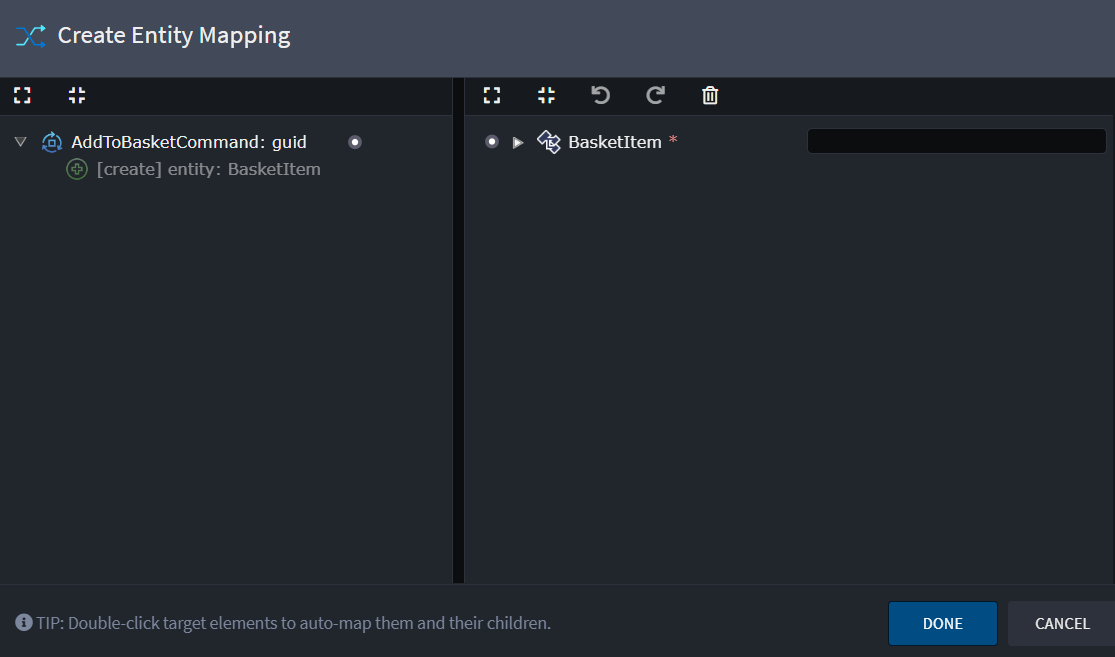
- Double-click on the
BasketItem- You will see a purple-dotted arrow linking the Dto and the Entity.
- Double-click on the
BasketItemagain- This will add all the entity data fields to the Dto contract and map them.
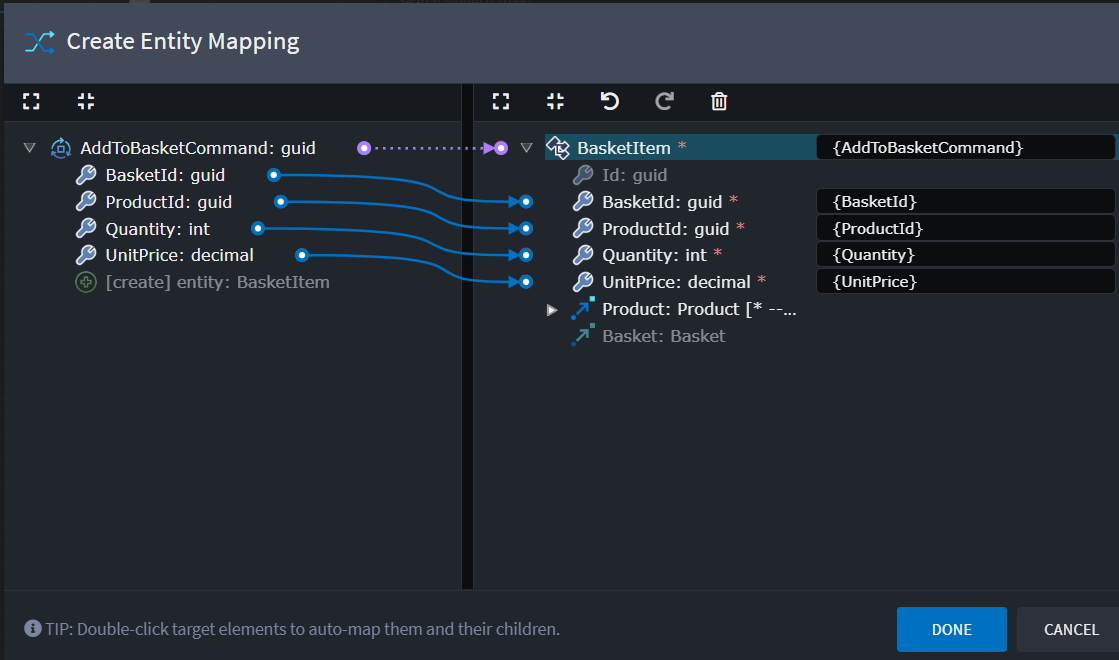
- Click
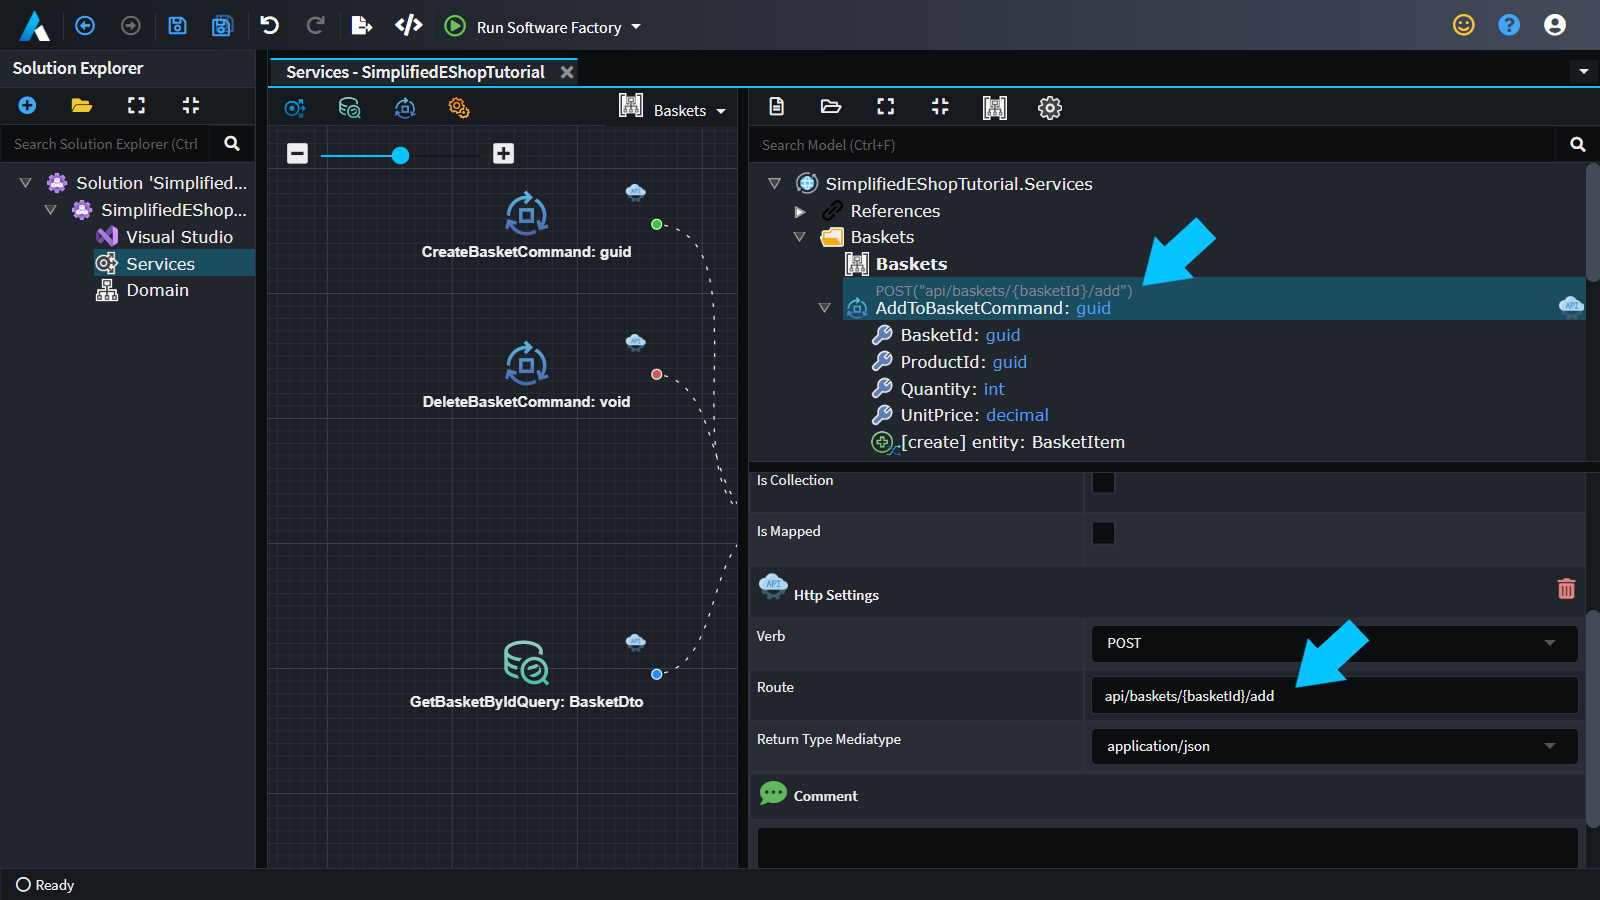
Done. - Right-click on
AddToBasketCommand, and selectExpose as Http Endpoint. - In the
Propertiespane, in theHttp Settingssection:- Change the
Routetoapi/baskets/{basketId}/add.
- Change the
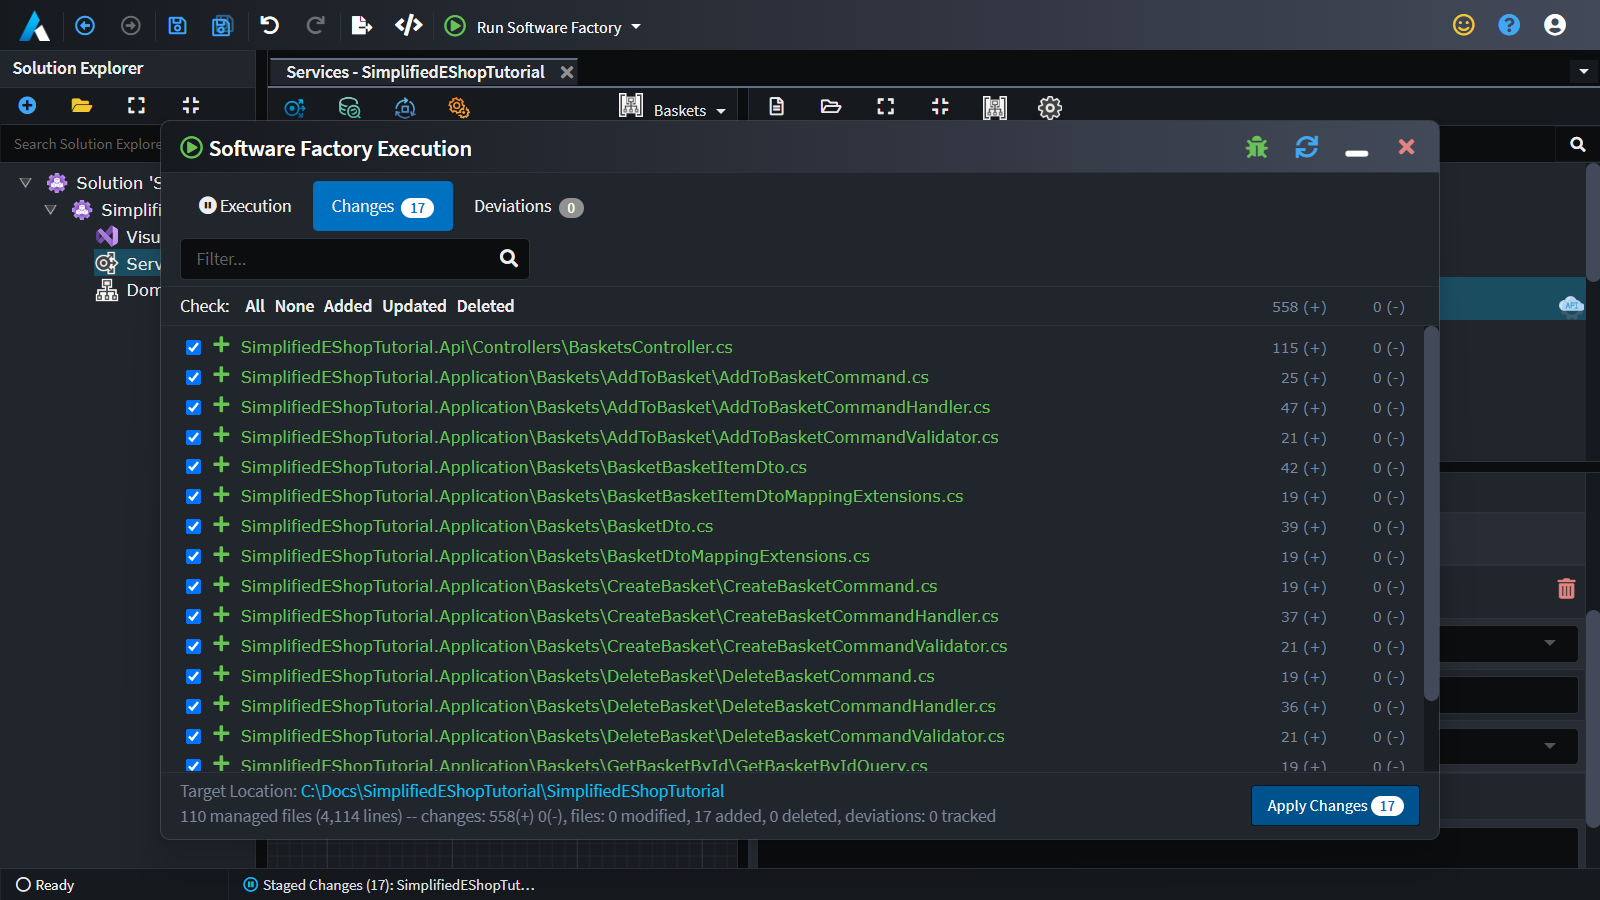
Again, let's look at the results of your modeling:
- Save (
Ctrl+S). - Run the
Software Factory(F5).
Locate the change to AddToBasketCommandHandler. Inspect its changes by double-clicking on the file. It has been fully implemented as the CRUD module used the mapping information that was done in the previous step and generated a full implementation that knows how to create a new BasketItem. Since the BasketItem is a composite entity of Basket it knew that the Basket has to be fetched first.
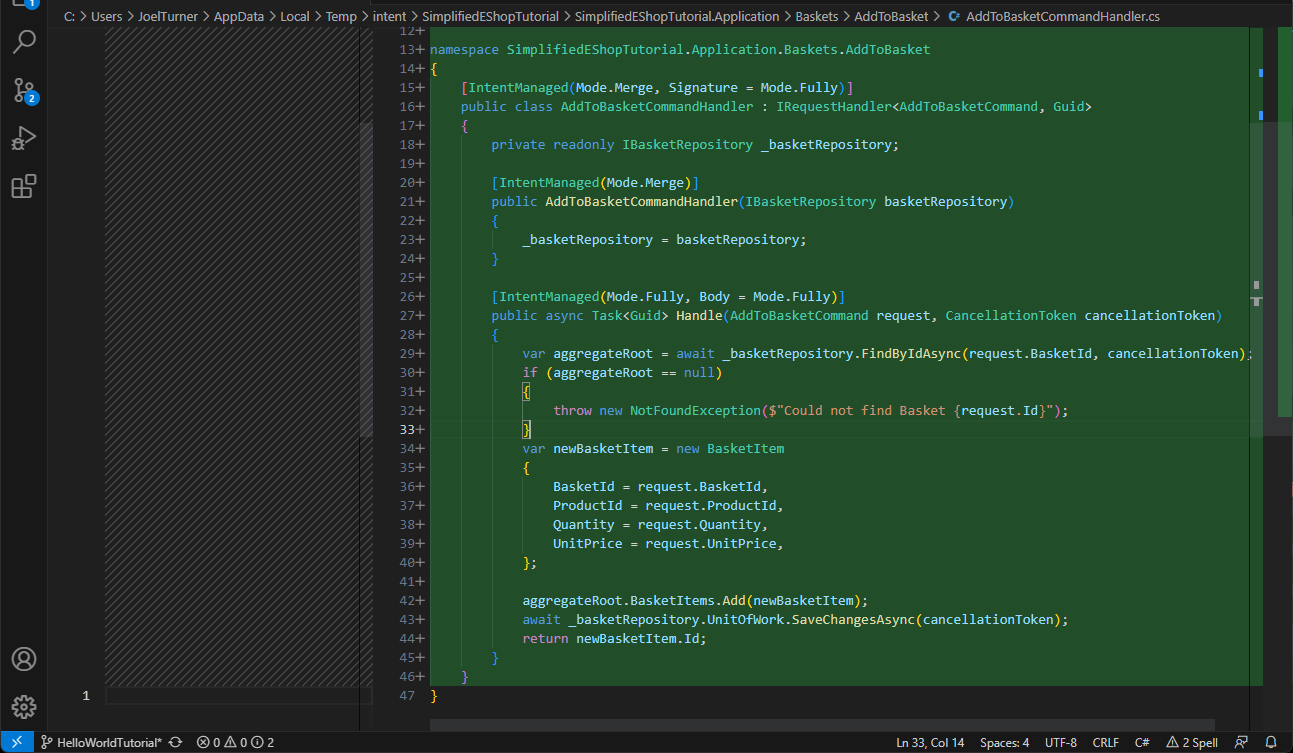
Tip
If you were not happy with the convention-based CRUD implementation there are several ways you could opt-out. One way to do this after applying the changes is to open the file in your IDE, adjust the IntentManged attribute above the Handle method and change Body = Mode.Fully to Body = Mode.Ignore. This will instruct the Software Factory's Code Management algorithms to "Ignore" the body of the method, allowing you to change the implementation. See Code Management for more details.
Accept all the changes:
- Click
Apply Changes.
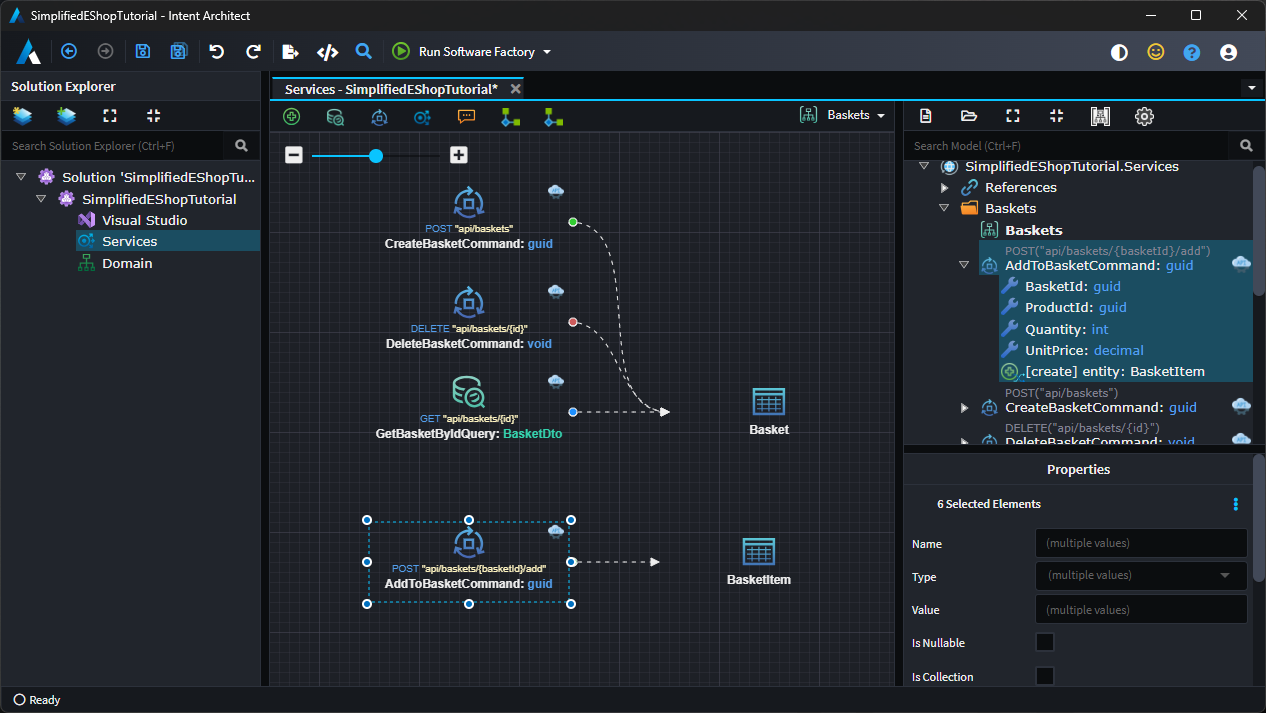
Before we proceed to create a Basket service, let's introduce the AddToBasketCommand to the Baskets diagram.
- Double-click on
Baskets(which has the green-graph-like icon). - Expand the
AddToBasketCommandand shift-select the Command including its Attributes and Actions. - Drag it onto the diagram below the
Basketservices.
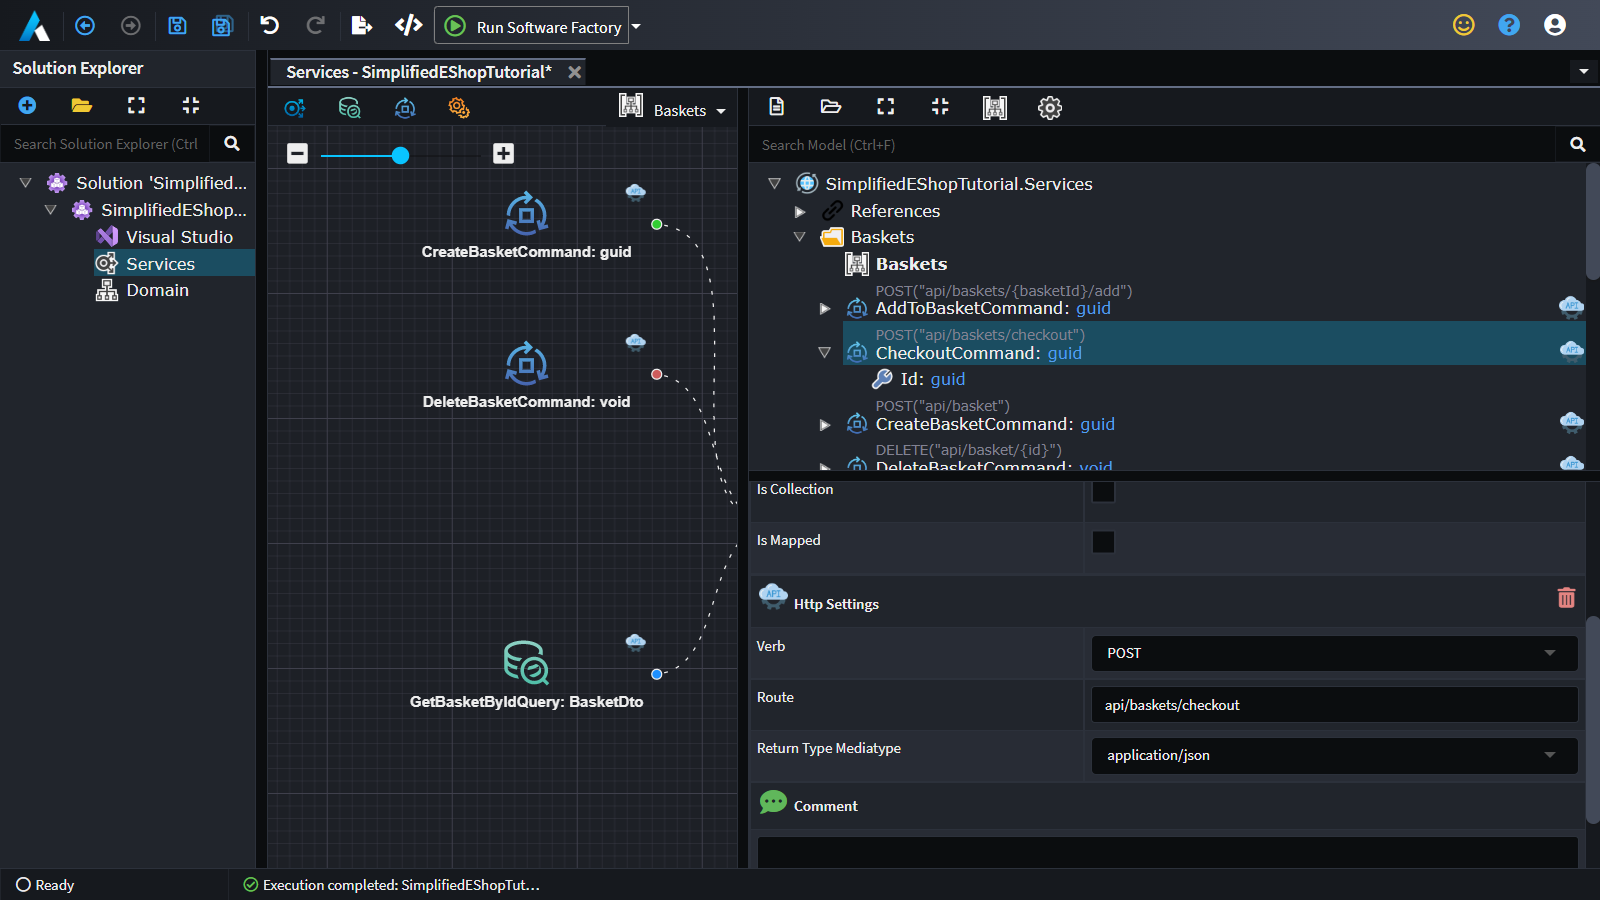
Now create the CheckoutCommand:
- Right-click anywhere on the diagram and select
New Command(it will be created inside theBasketsfolder in the tree-view). - Name the command
CheckoutCommandand return aguidwhich will be the identifier of the newly addedOrder. - Right-click on
CheckoutCommandand selectAdd Property- Name the property
Idof typeguid
- Name the property
- Right-click on
CheckoutCommandand selectExpose as Http Endpoint - In the
Propertiespane, in theHttp Settingssection:- Change the
VerbtoPOST. - Change the route to be
api/baskets/{id}/checkout.
- Change the
Generate the outputs:
- Save (
Ctrl+S). - Run the Software Factory (
F5).
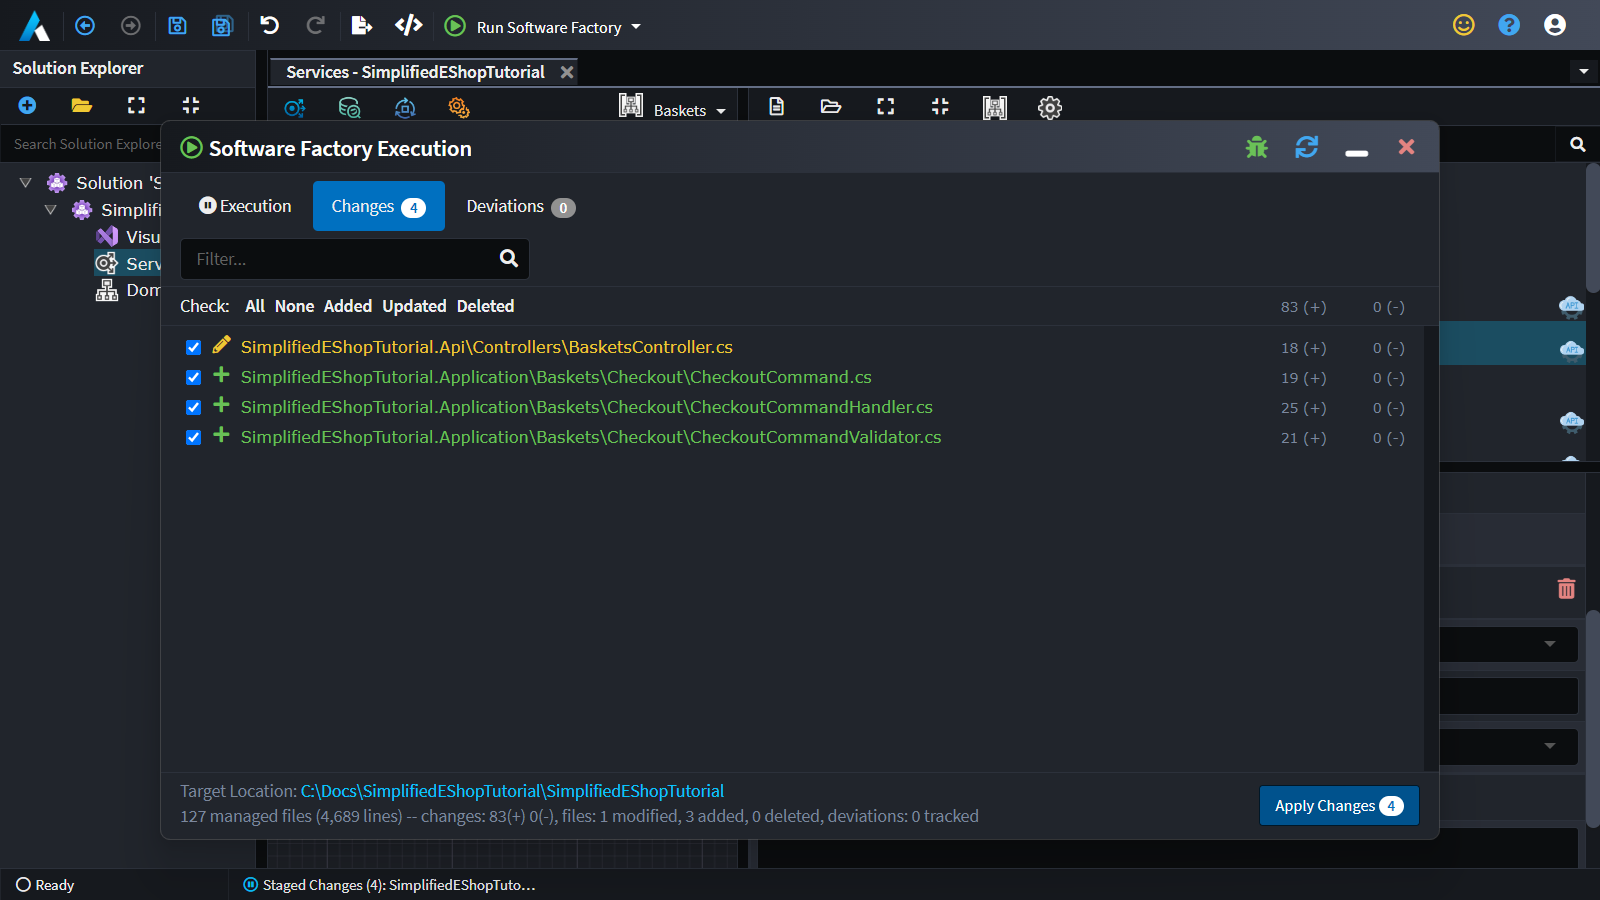
If you double-click the CheckoutCommandHandler, you will notice that this class needs to be implemented and that's what you will tackle next:
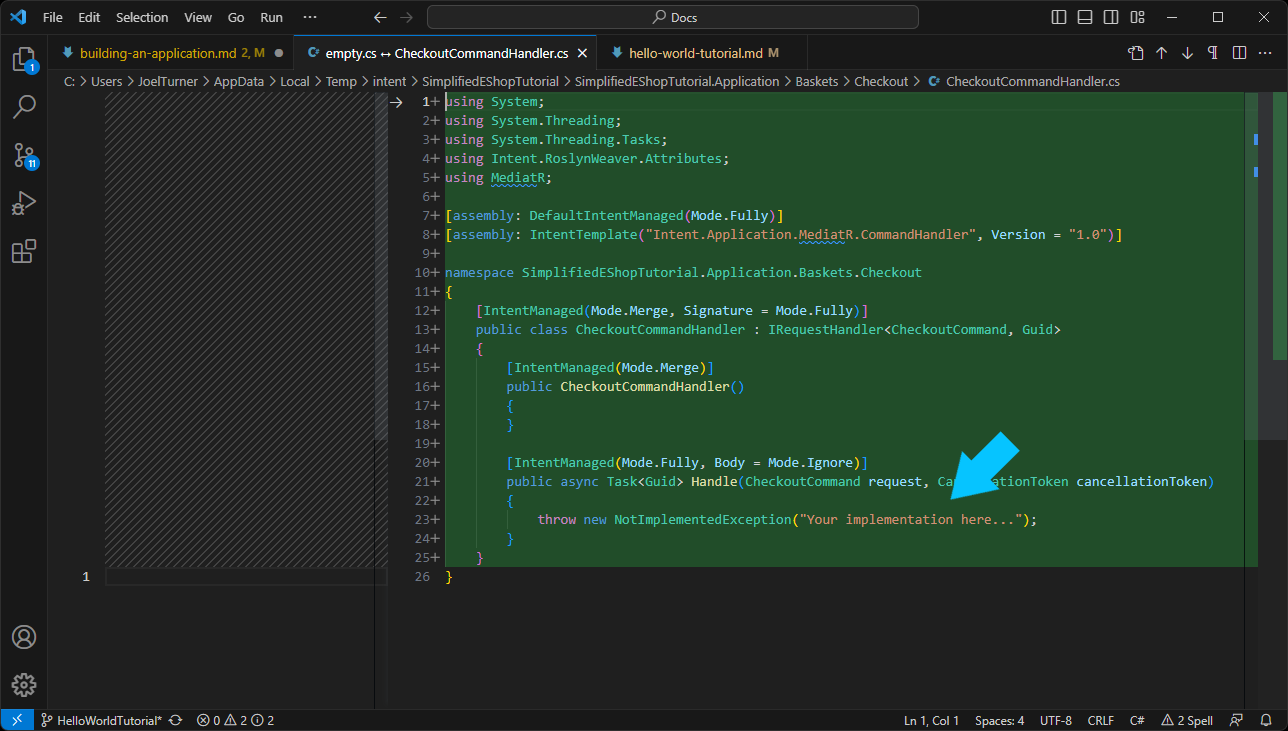
- Click
Apply Changes. Close the Software Factory dialog. - Right-click on the
CheckoutCommandelement in theServicesdesigner that was just created. - Hover over
Open in IDE, then select theCheckoutCommandHandler.cs. - It will signal to
Visual Studioto open that source file.
Tip
Using the Open in IDE feature is convenient when you are still learning to familiarize yourself with the generated architecture.
Implementing the CommandHandler should create a new Order based on the Basket Id. The service should also clear out the customers Basket, once the order is created:
- Update the code as follows:
using System;
using System.Linq;
using System.Threading;
using System.Threading.Tasks;
using Intent.RoslynWeaver.Attributes;
using MediatR;
using SimplifiedEShopTutorial.Domain.Common.Exceptions;
using SimplifiedEShopTutorial.Domain.Entities;
using SimplifiedEShopTutorial.Domain.Repositories;

[assembly: DefaultIntentManaged(Mode.Fully)]
[assembly: IntentTemplate("Intent.Application.MediatR.CommandHandler", Version = "2.0")]

namespace SimplifiedEShopTutorial.Application.Baskets.Checkout
{
    [IntentManaged(Mode.Merge, Signature = Mode.Fully)]
    public class CheckoutCommandHandler : IRequestHandler<CheckoutCommand, Guid>
    {
        private readonly IBasketRepository _basketRepository;
        private readonly IOrderRepository _orderRepository;

        [IntentManaged(Mode.Merge)]
        public CheckoutCommandHandler(IBasketRepository basketRepository, IOrderRepository orderRepository)
        {
            _basketRepository = basketRepository;
            _orderRepository = orderRepository;
        }

        [IntentManaged(Mode.Fully, Body = Mode.Ignore)]
        public async Task<Guid> Handle(CheckoutCommand request, CancellationToken cancellationToken)
        {
            var basket = await _basketRepository.FindByIdAsync(request.Id, cancellationToken);
            if (basket == null)
            {
                throw new NotFoundException($"Could not find Basket {request.Id}");
            }

            var order = new Order
            {
                CustomerId = basket.CustomerId,
                OrderDate = DateTime.Now,
                OrderItems = basket.BasketItems.Select(CreateOrderItem).ToList(),
                Status = Domain.OrderStatus.Submitted
            };

            _orderRepository.Add(order);
            _basketRepository.Remove(basket);

            await _orderRepository.UnitOfWork.SaveChangesAsync(cancellationToken);

            return order.Id;
        }

        private static OrderItem CreateOrderItem(BasketItem basketItem)
        {
            return new OrderItem
            {
                ProductId = basketItem.ProductId,
                Quantity = basketItem.Quantity,
                UnitPrice = basketItem.UnitPrice,
            };
        }
    }
}
Lastly an Order service will be created which will allow customers to view their orders. It will be created from scratch.
- In the tree-view in the center pane, right-click on the root node (
SimplifiedEShopTutorial.Services) and clickNew Folder. - Name the folder
Orders. - Right-click on the
Ordersfolder and selectNew Query. - Name the query
GetMyOrdersQuery.
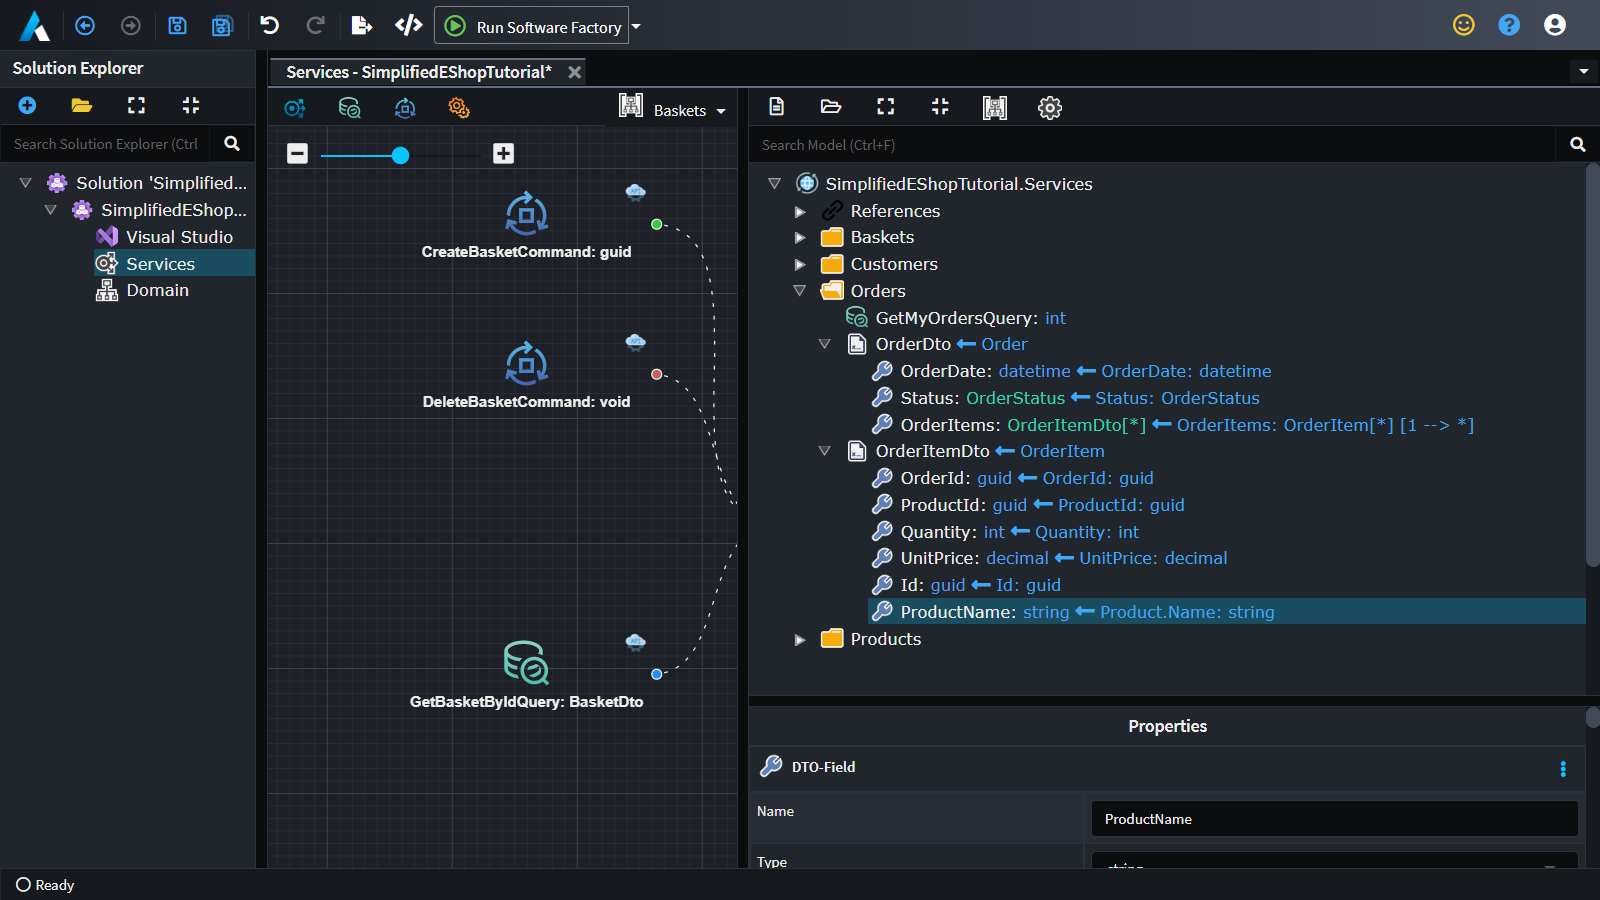
Now, model the DTO that this Query returns:
- Right-click on the
Ordersfolder and selectNew DTO. - Name the DTO
OrderDto. - Right-click on the
OrderDtoand selectMap from Domain. - Select
Orderfrom the expanded dropdown. - Check the following fields:
OrderDateStatusOrderItems
- Click
Done. - Right-click on the
OrderItemDtoand selectMap from Domain. - Expand the
Productnode, checkName. - Click
Done.
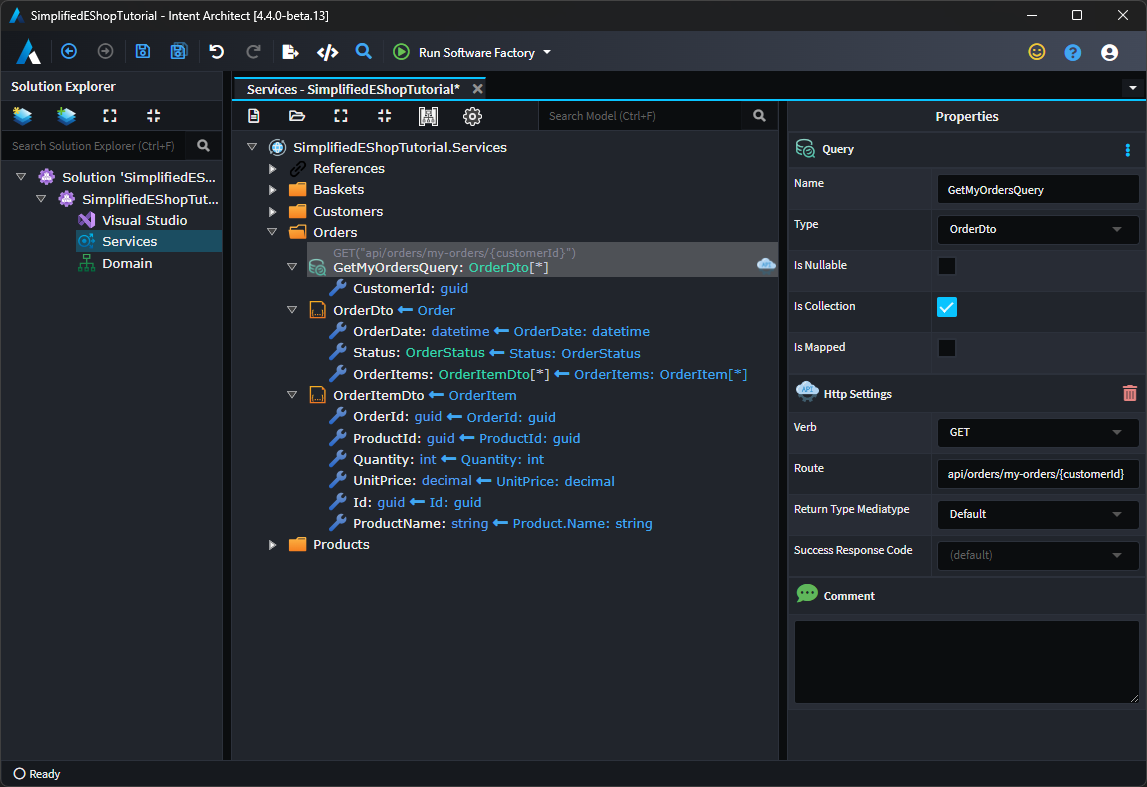
- Select
GetMyOrdersQuery. - In the
Propertypane change.TypetoOrderDto.- Check
Is Collection.
- Right-click on
GetMyOrdersQueryand selectAdd Property. - Name it
CustomerIdof typeguid. - Right-click on
GetMyOrdersQuery, and selectExpose as Http Endpoint. - In the
Propertiespane, in theHttp Settingssection:- Change the
Routetoapi/orders/my-orders/{customerId}.
- Change the
Run the Software Factory:
- Save (
Ctrl+S). - Run the Software Factory (
F5).
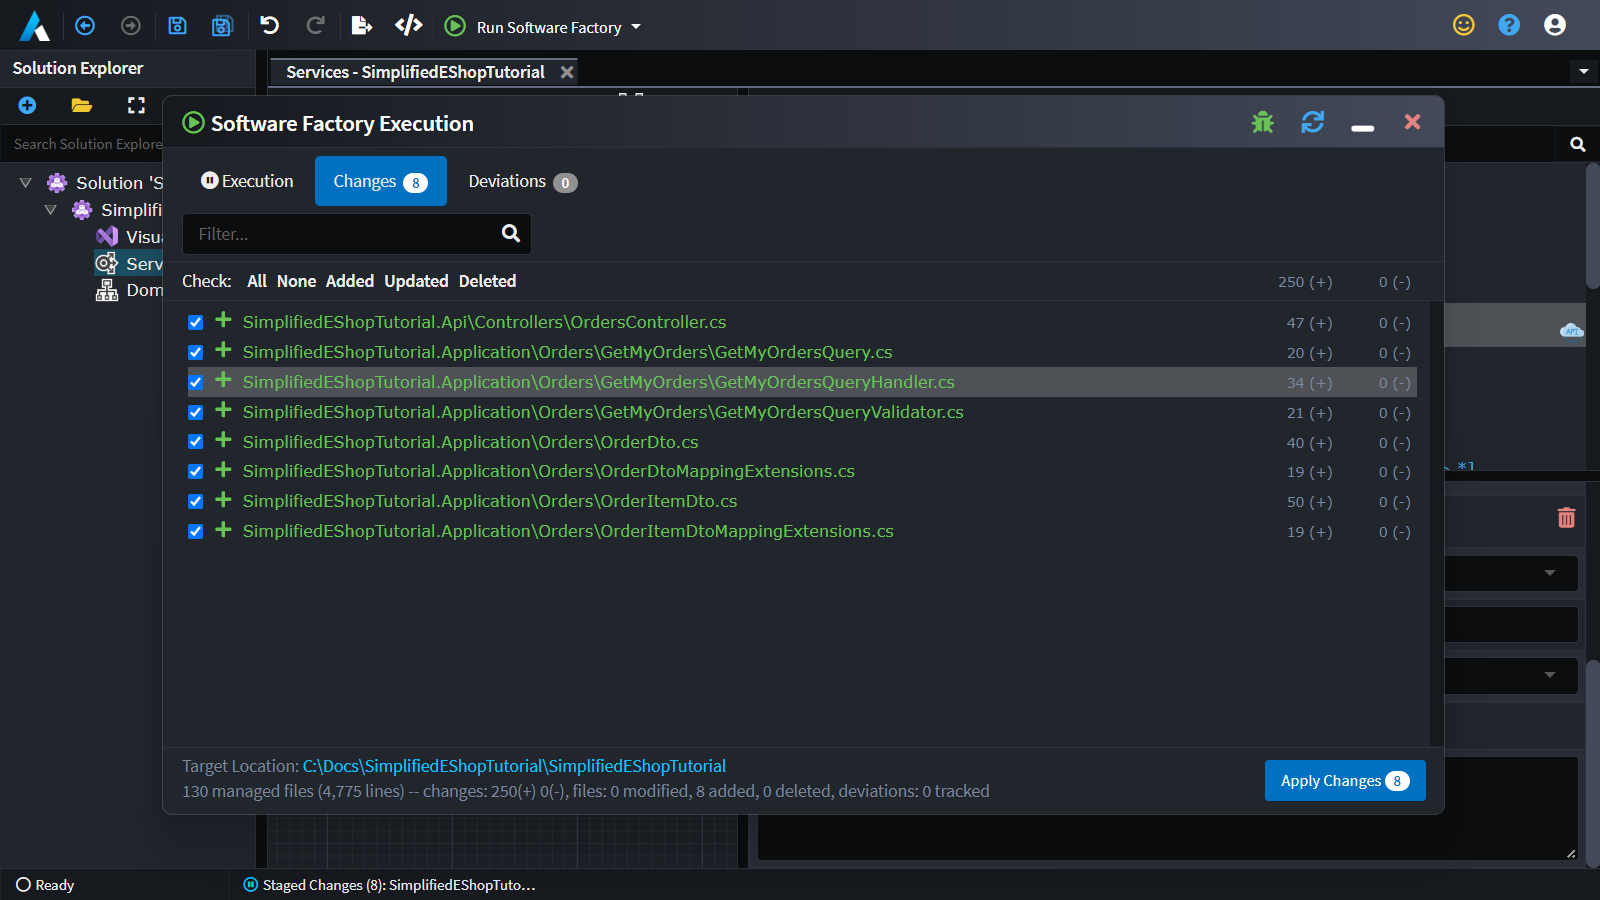
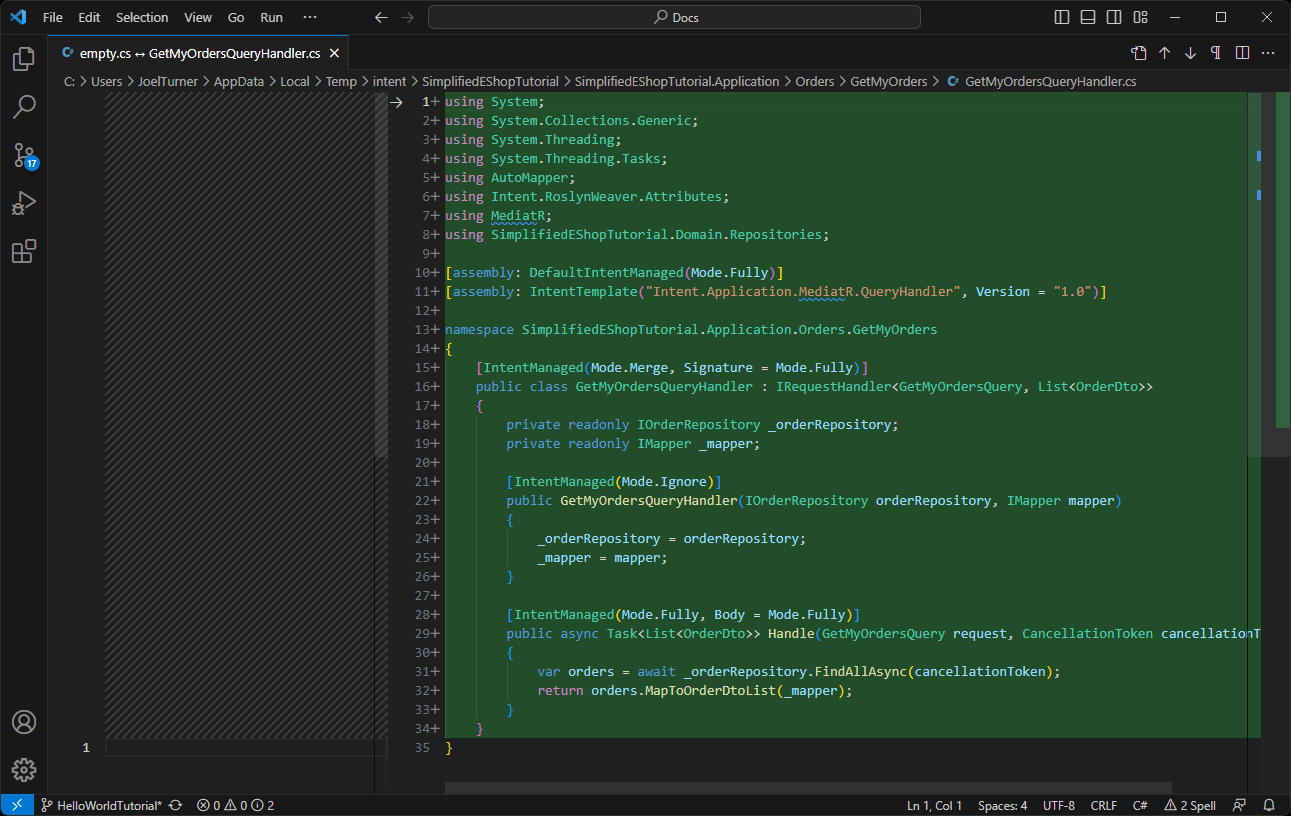
Double-click on the GetMyOrdersQueryCommandHandler.cs file. It will have a default implementation that will fetch all orders from the database. This will not suit us as we need to use the CustomerId to look-up orders for a customer.
- Click
Apply Changes. - Right-click on
GetMyOrdersQueryand hover overOpen in IDEand select theGetMyOrdersQueryCommandHandler.csfile. - Update the code as follows:
using System;
using System.Collections.Generic;
using System.Threading;
using System.Threading.Tasks;
using AutoMapper;
using Intent.RoslynWeaver.Attributes;
using MediatR;
using SimplifiedEShopTutorial.Domain.Repositories;

[assembly: DefaultIntentManaged(Mode.Fully)]
[assembly: IntentTemplate("Intent.Application.MediatR.QueryHandler", Version = "1.0")]

namespace SimplifiedEShopTutorial.Application.Orders.GetMyOrders
{
    [IntentManaged(Mode.Merge, Signature = Mode.Fully)]
    public class GetMyOrdersQueryHandler : IRequestHandler<GetMyOrdersQuery, List<OrderDto>>
    {
        private readonly IOrderRepository _orderRepository;
        private readonly IMapper _mapper;

        [IntentManaged(Mode.Ignore)]
        public GetMyOrdersQueryHandler(IOrderRepository orderRepository, IMapper mapper)
        {
            _orderRepository = orderRepository;
            _mapper = mapper;
        }

        [IntentManaged(Mode.Fully, Body = Mode.Ignore)]
        public async Task<List<OrderDto>> Handle(GetMyOrdersQuery request, CancellationToken cancellationToken)
        {
            var orders = await _orderRepository.FindAllAsync(order => order.CustomerId == request.CustomerId, cancellationToken);
            return orders.MapToOrderDtoList(_mapper);
        }
    }
}
Running the Application
At this point you are done coding and you can see your application in action:
- Run the application in your C# IDE (
F5in Visual Studio).
You should be presented with a Swagger UI as follows:

Take a look at all the endpoints, you should see all the services you designed in Intent Architect.
First thing you need to do is create a Customer:
- Click on the
POST /api/customersrow in the Customers section. - Click the
Try it outbutton on the right hand side. - In the
Request BodyJSON fill in:
{
  "name": "Customer1",
  "email": "[email protected]"
}
- Click the big blue
Executebutton.
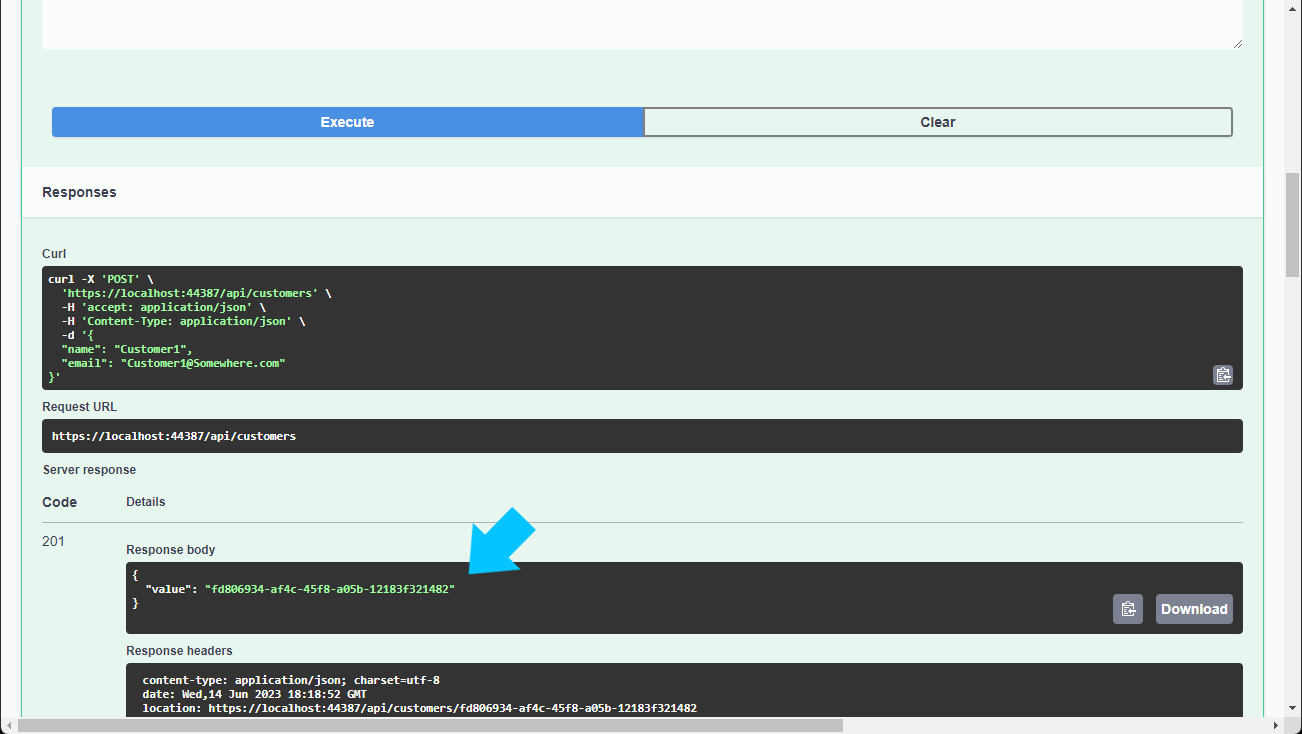
- Record the
CustomerIdresponse as you will need it later.
In a similar fashion you can create a Product using the POST /api/products row in the Products section. Don't forget to record your ProductId so you can use it later.
Next let's create the customer's shopping cart:
- Click on the
POST /api/basketsrow in the Baskets section. - Click the
Try it outbutton on the right hand side. - In the
Request BodyJSON fill in (replacing{CustomerId}with your customer's Id ):
{
  "customerId": "{CustomerId}",
}
- Click the big blue
Executebutton. - Record the
BasketIdresponse as you will need it later.
Let's add an item to the basket:
- Click on the
POST /api/baskets/{basketId}/addrow in the Baskets section. - Click the
Try it outbutton on the right hand side. - Fill in your
BasketIdin theBasketIdfield. - In the
Request BodyJSON fill in (replacing the relevant Ids):
{
  "basketId": "{BasketId}",
  "productId": "{ProductId}",
  "quantity": 3,
  "unitPrice": 150
}
- Click the big blue
Executebutton.
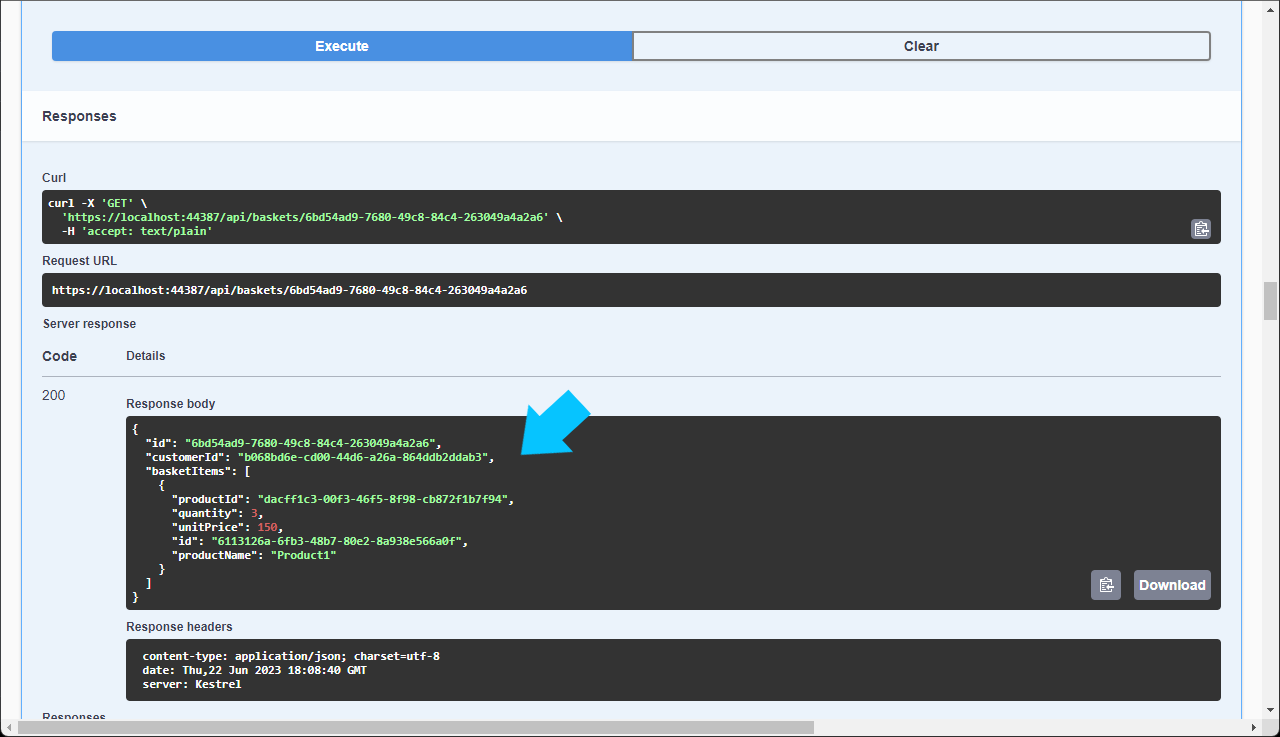
Let's check the Basket has updated:
- Click on the
GET /api/baskets/{id}row in the Baskets section. - Click the
Try it outbutton on the right hand side. - Fill in your
BasketIdin theIdfield. - Click the big blue
Executebutton.
You should get a result similar to this:
Now you can Checkout your Basket:
- Click on the
POST /api/baskets/{id}/checkoutrow in the Orders section. - Click the
Try it outbutton on the right hand side. - Fill in your
BasketIdin theidfield. - Click the big blue
Executebutton.
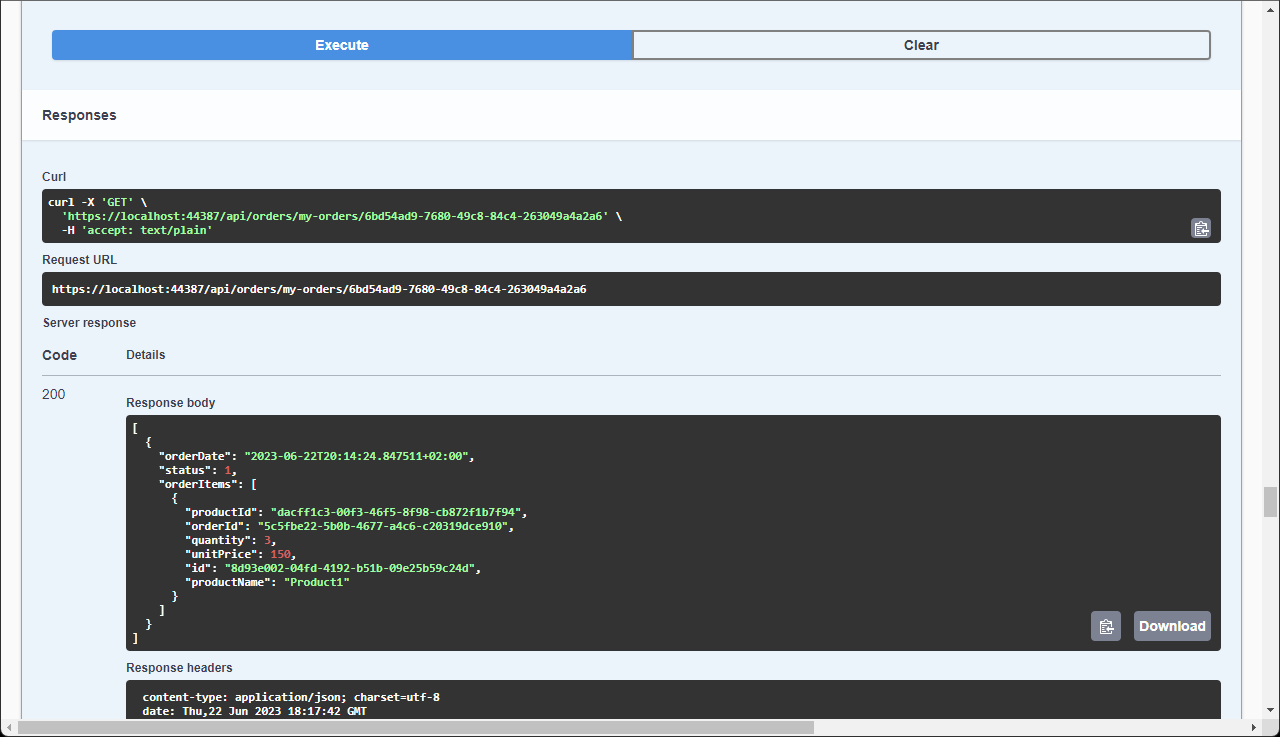
Query the customer's Orders to confirm it's been placed:
- Click on the
GET /api/orders/my-orders/{customerId}row in the Orders section. - Click the
Try it outbutton on the right hand side. - Fill in your
CustomerIdin thecustomerIdfield - Click the big blue
Executebutton
You should get a result similar to this:
Securing your services
Configuring security on your services is next on the list, for the purposes of the tutorial we'll just look at securing the Product endpoints, but these principles should be applied throughout your application as required.
From inside of Intent Architect:
- Open up the
Services Designerand expand theProductsfolder. - Select all the
Commands andQuerys (CreateProductCommand,DeleteProductCommand, etc.). - Right-click and select
Apply Stereotype(F3). - In the dialog window, choose the
SecuredStereotype.
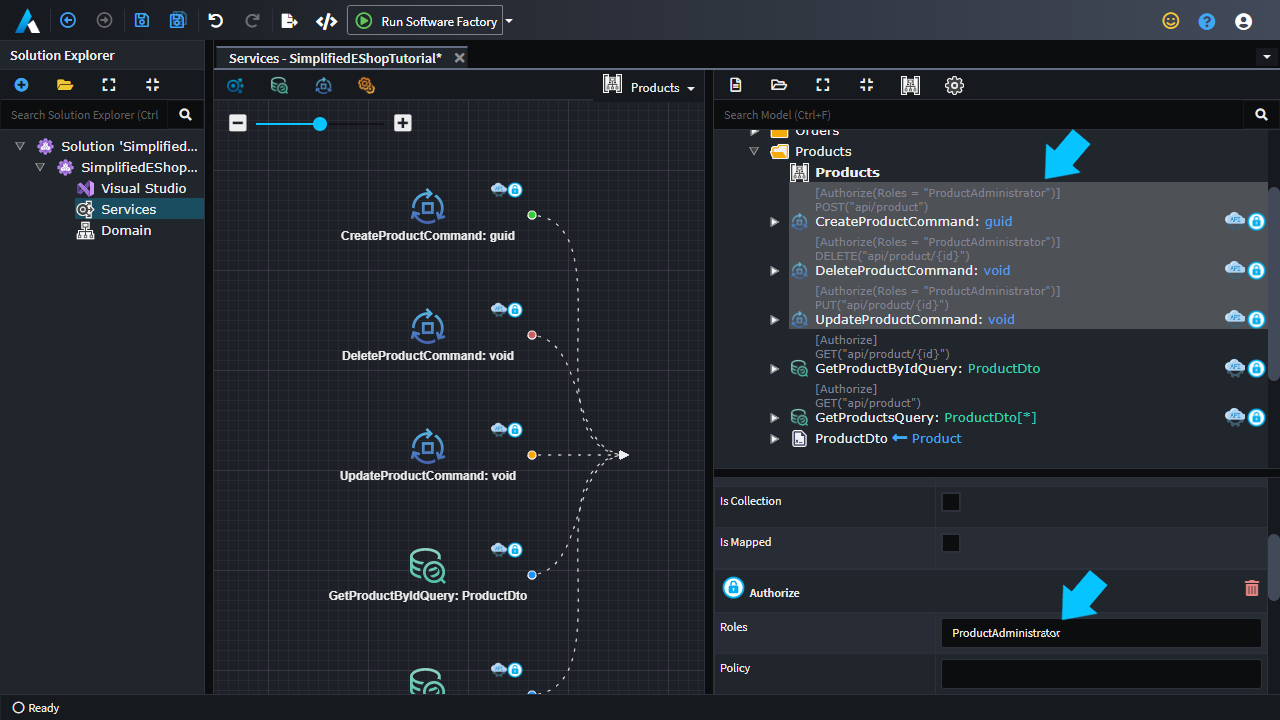
Note the Visual indicators in the Service Designer indicating which service endpoints are secured.
These services will be created as secured endpoints, that is to say they can only be accessed with a valid JSON Web Token (JWT). We can also apply more fine grained security or authorization through the use of roles. Let's lock down the Commands so that only product administrators can access these endpoints:
- Select all the product
Commands (CreateProductCommand,DeleteProductCommandandUpdateProductCommand). - In the
Propertiespane on the right hand side, in theSecuredsection, set Roles toProductAdministrator. - Save (
ctrl+s).
Tip
You can specify multiple roles as a comma separated list.
The Command endpoints now not only require consumers to have a valid JWT, but the token must contain the appropriate role for the request to succeed.
Let's apply the changes and see how it affects the code base:
- Run the Software Factory (
F5).
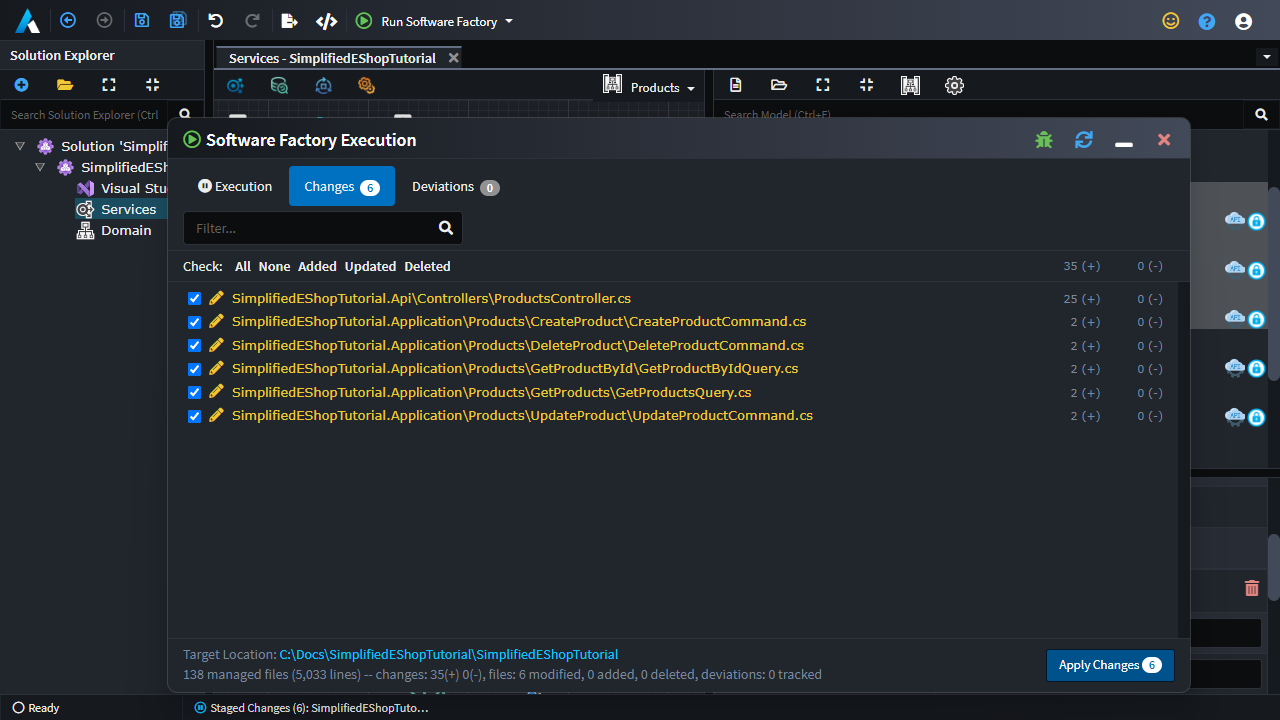
Let's take a closer look at the ProductsController changes:
- Double-click on the
ProductsController.
Here you can see the standard ASP.NET Core Authorize attributes being applied to the controller actions as per your modelled design. Also note that the controller actions are now being decorated with the appropriate attributes to indicate that they can now return 401 and 403 HTTP error codes.
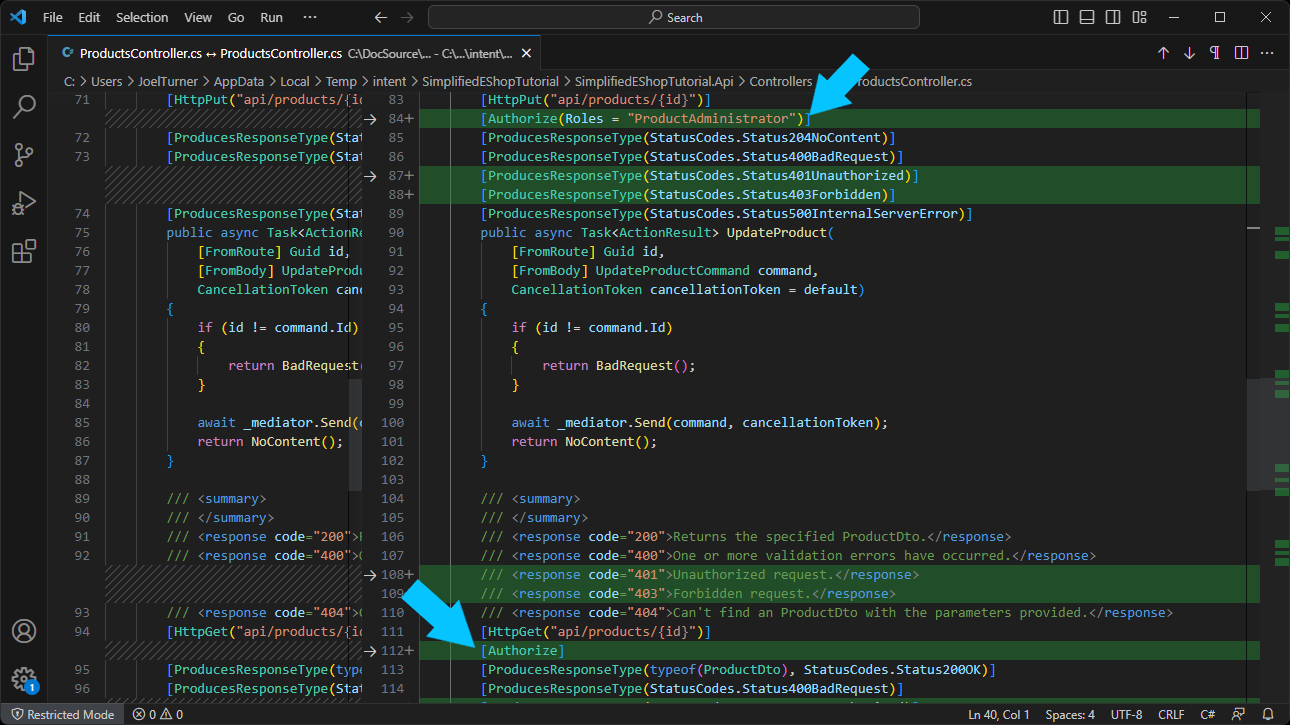
Separately the actual role names are kept in the Permissions.cs so that they can be referenced in a type-safe way.

- Click
Apply Changes.
Note
You may have noticed in the code that the Authorize attributes are not only applied to the Controllers, but also to the Commands and Querys themselves. Security checks are applied at both the Controller and the MediatR pipeline entry points. This means that any Commands and Querys processed through the MediatR pipeline have the appropriate security applied, even if they do not originate from the Controllers.
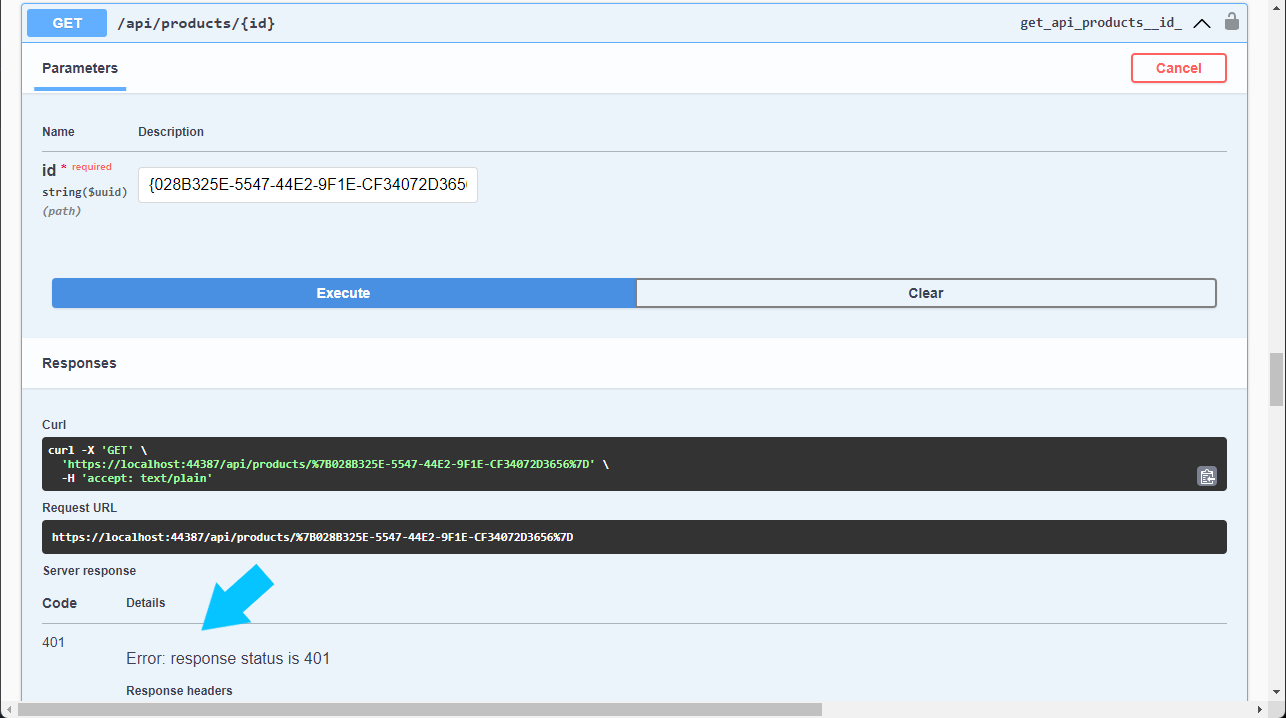
Attempting to access these endpoints through the Swagger UI without providing a valid JWT will result in the following:
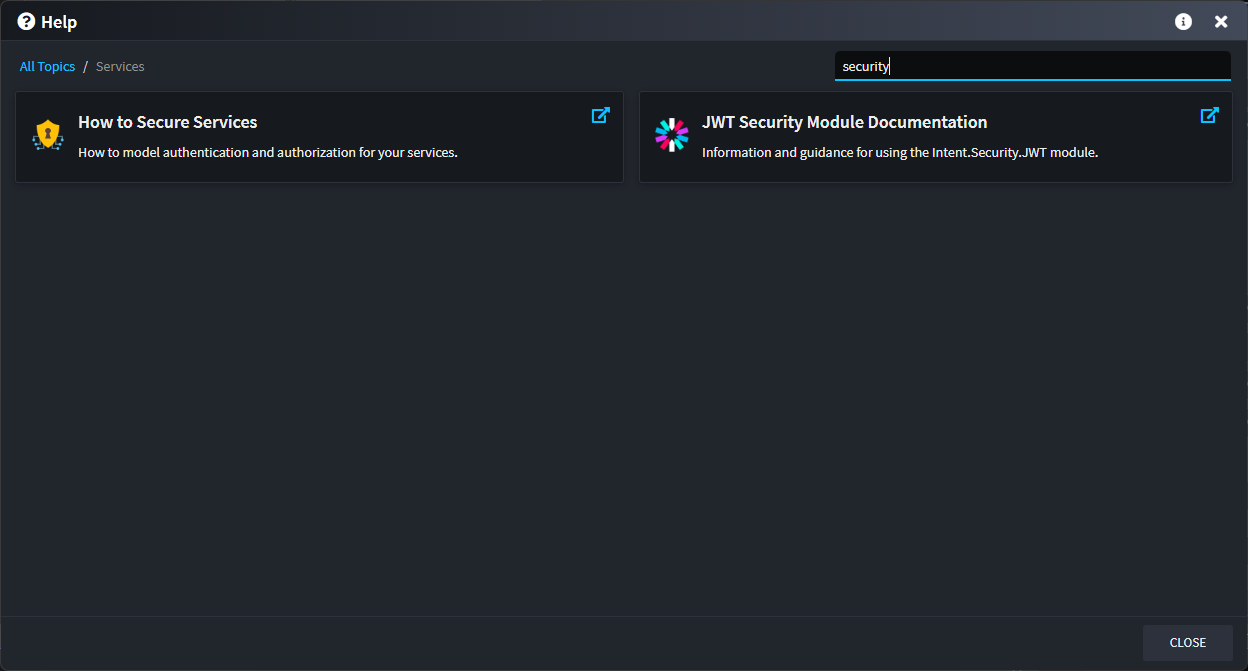
Tip
Click on the ? button at the top-right corner of Intent Architect (or press F1) to perform keyword searches to learn more (or revise any steps in this tutorial) through the use of help topics.
Next steps
Congratulations, you have built an application using Intent Architect!
We will have more Tutorials like these out in the future.
We also have a series of webinars covering various many facets of Intent Architect.