Blazor UI Modeling with AI
This article will show you how you can use Intent Architect to rapidly build professional-looking UIs, using a combination of both deterministic (pattern reuse) and non-deterministic (LLMs driven by Intent Architect) code generation techniques.
How this works at a high level is as follows:
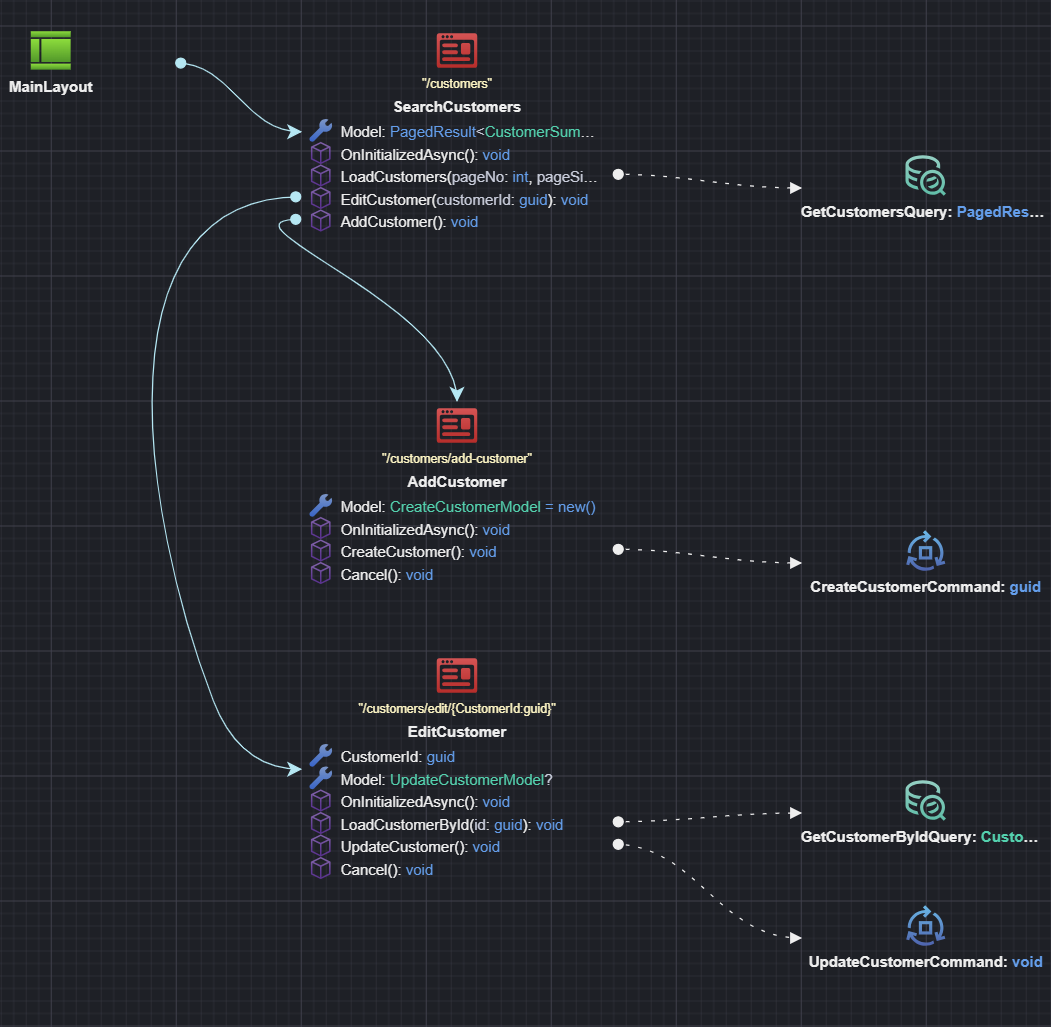
Design and generate your View Models. This includes aspects like which Services to interact with and where UI navigations are going.
Use our "Implement with AI" accelerator to get the LLM of your choice to build the View in a "prompt-less" fashion. Intent Architect handles the context engineering and manages the LLM interactions on your behalf. The results can be reviewed as a code diff of what the LLM proposes, similar to a regular Software Factory execution.
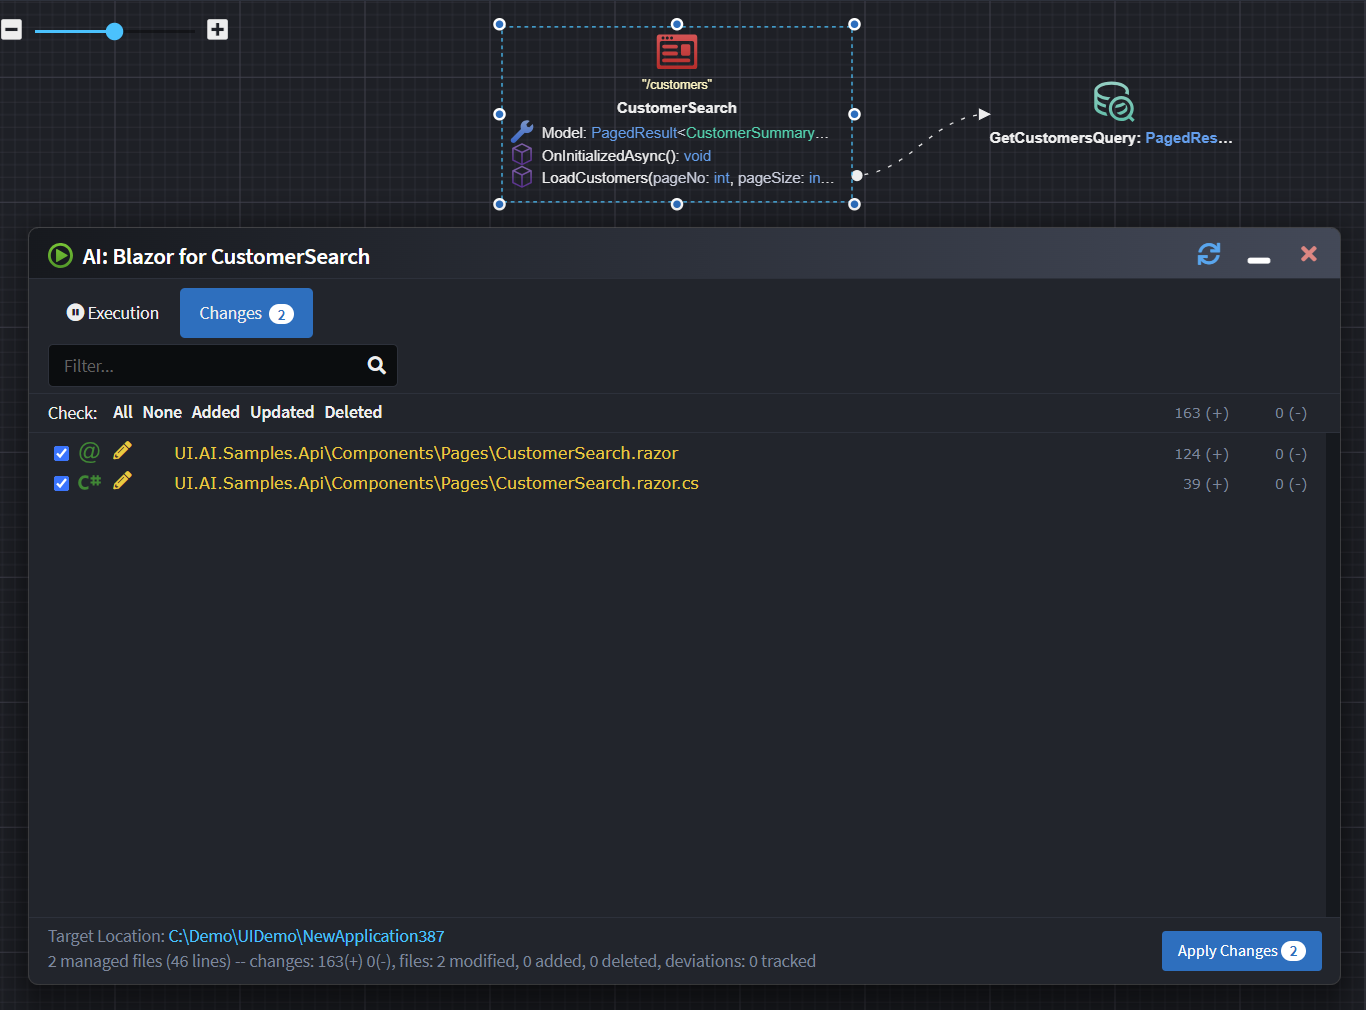
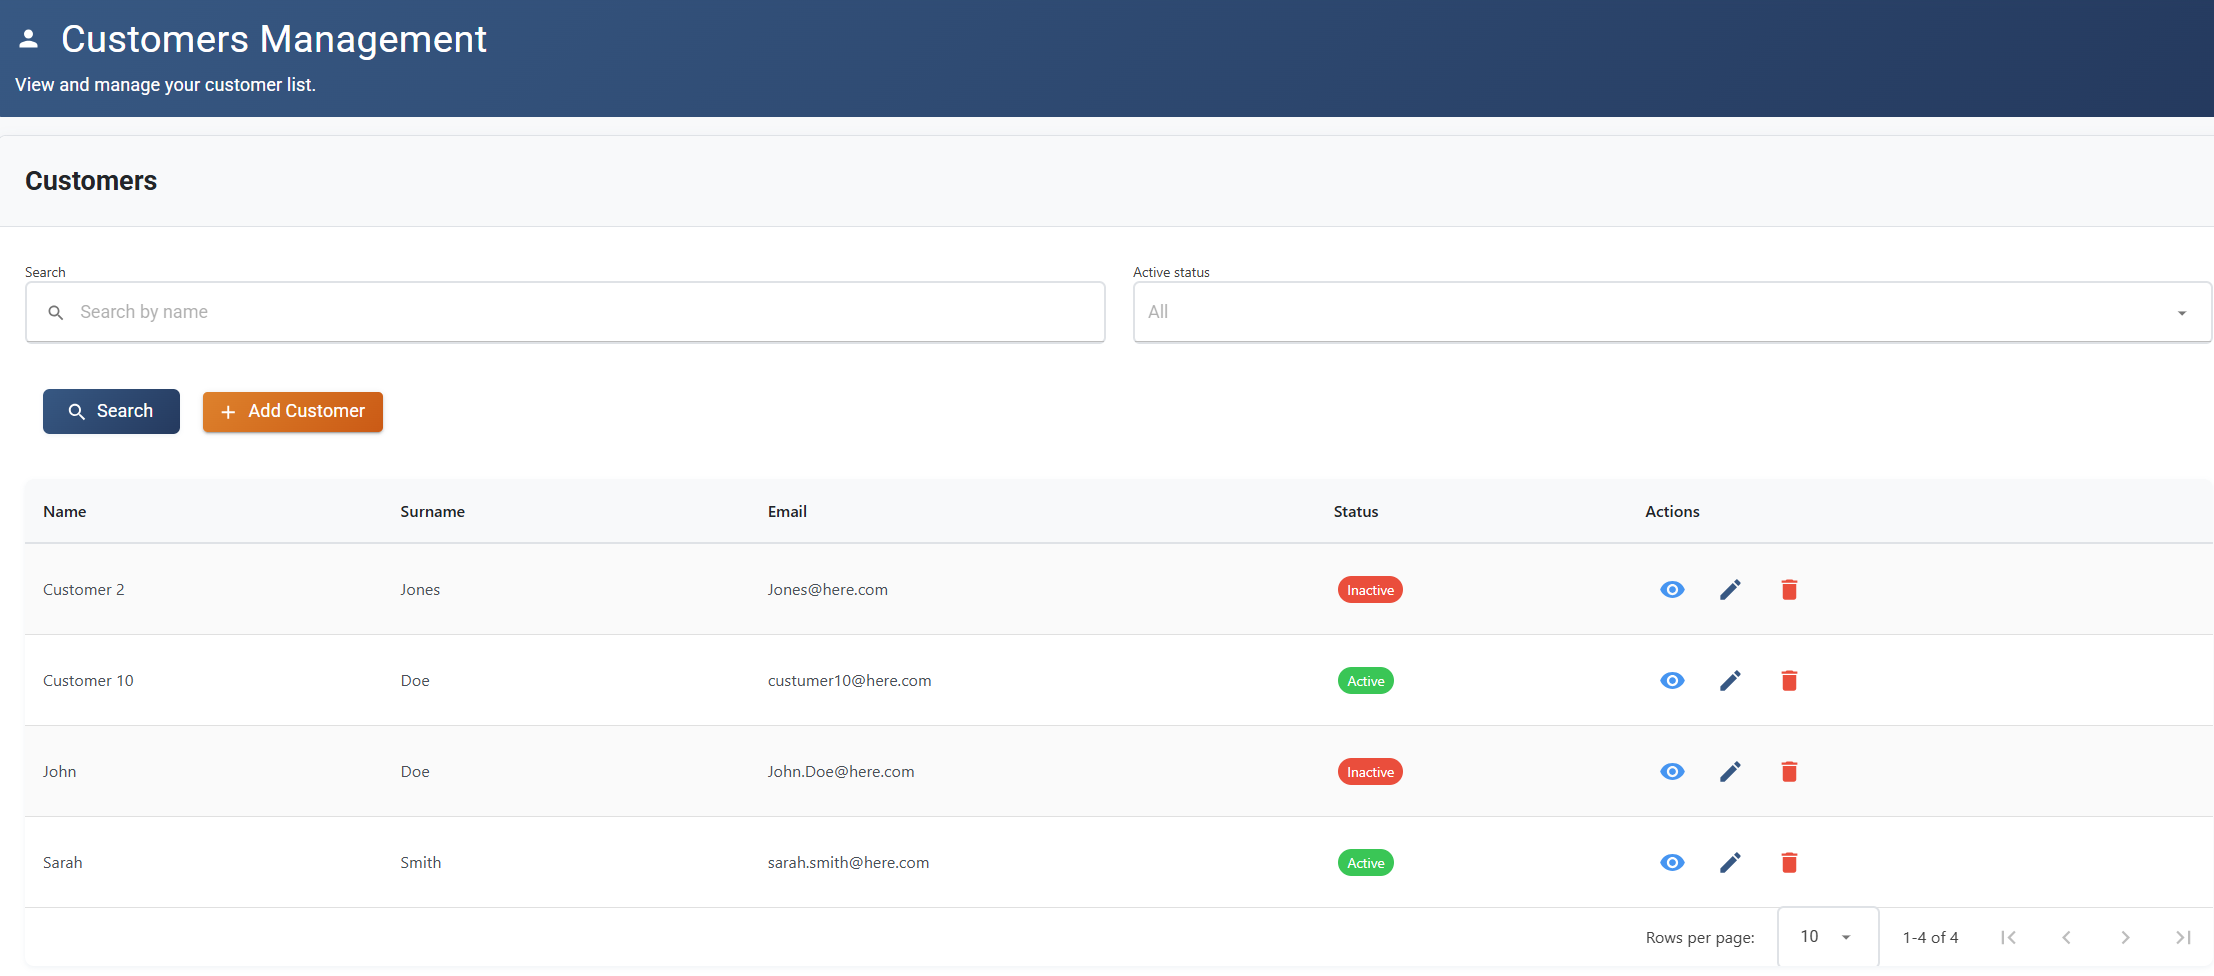
Review and validate the code. As always when dealing with LLMs, you will want to review and validate the code. By their nature LLMs are non-deterministic, but with a little bit of luck you should end up with a screen similar to this:
Note
While the samples here use MudBlazor, there is nothing inherently MudBlazor-specific about the implementation, and you can adjust the configuration for other component libraries.
Design and Generate Your View Model
To start, create a Blazor Application in Intent Architect.
Note
Intent Architect has two Architecture Templates for quickly setting up a Blazor application:
- Blazor Server (Fullstack ASP.NET core Server)
- Blazor Web Application (Standalone) (Standalone UI which composes one or more Service Applications)
How to Model Pages
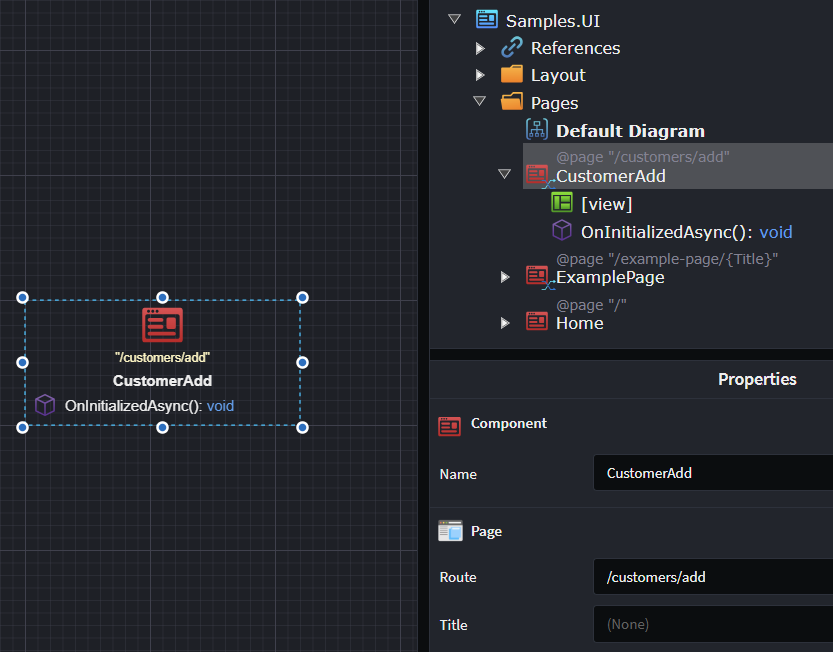
- Add a
Pageto a diagram in the UI Designer. - Name the
Page, typically describing its function (e.g.,CustomerSearchorCustomerAdd). - Optional: Adjust the route in the property pane.
To quickly add your page to the Sider Menu, use the Add to Sider Menu suggestion.

Adding Route parameters to your page
If your page requires Route Parameters (e.g., customers/edit/{customerId}), you can model these as follows:
- Right-click on the
Page→ Add Property. - Name the property (e.g.,
CustomerId) and set its type (e.g.,Guid). - Apply the
Route Parameterstereotype to the property using F3.
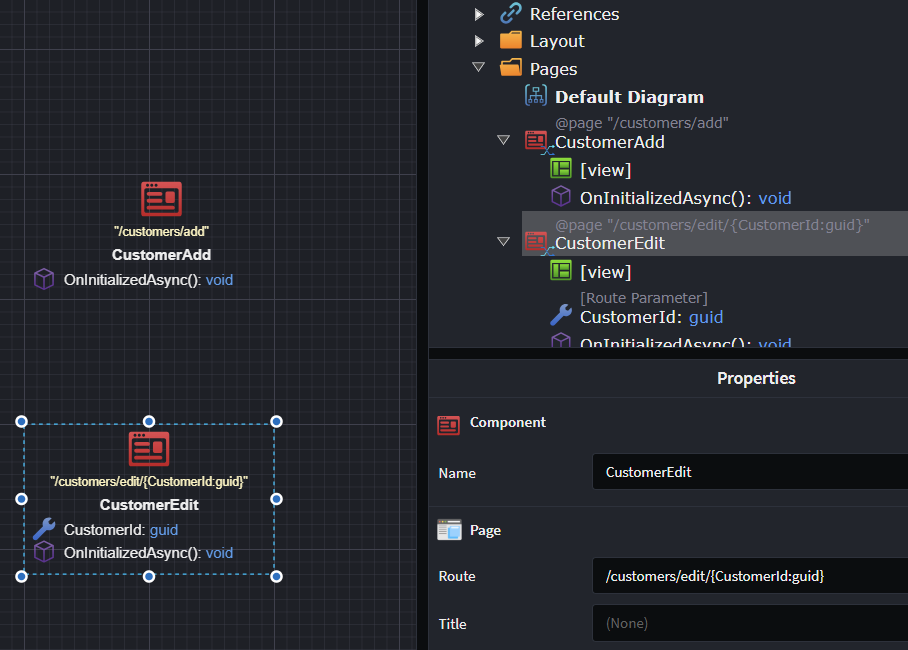
The page route will automatically update based on the route parameters.
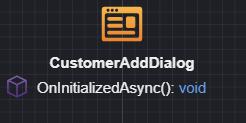
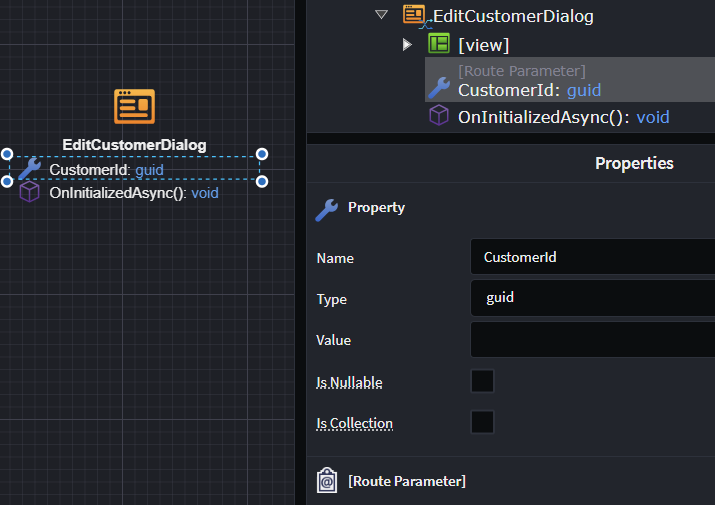
How to Model a Dialog
- Add a
Pageto a diagram in the UI Designer. - Name the
Page, suffixed with the word Dialog (e.g.,CustomerAddDialog).
If your dialog requires parameterization, you can model that as follows:
- Right-click on the Dialog → Add Property.
- Name the property (e.g.,
CustomerId) and set its type (e.g.,Guid). - Apply the
Route Parameterstereotype using F3.
How to Model UI Navigations
- Right-click on the
Component(Page, Dialog, Component) → Add Operation. - Name your operation (e.g.,
AddNewCustomer). - Right-click on the operation → Navigate to Page or Show Dialog.
- Connect the navigation to the destination by left-clicking the destination.
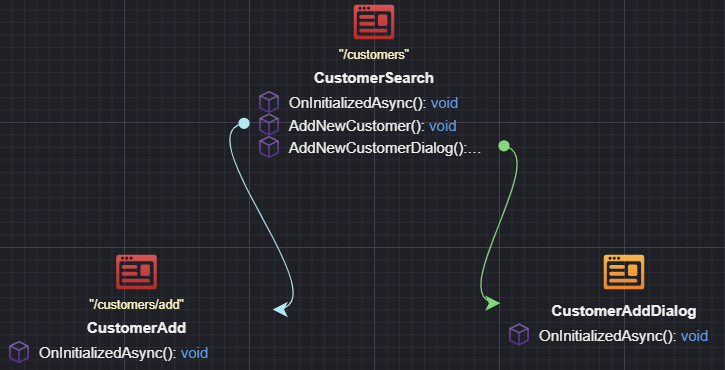
If your Component has Route Parameters, a mapping dialog will open for you to bind those parameters. Typically you would simply add these parameters to your navigation Operation.

Modeling Service Interactions
UI Components interact with services to retrieve data and to affect change on the system. This is how we model this behaviour.
- On the
Component's suggestions, click theCall Backend Servicesuggestion. - On the Add to Diagram dialog select the service endpoint you want to call.
Note
If you are not seeing the Services you want to call, add a package reference to the Service Package which contains those Services in the UI Designer.
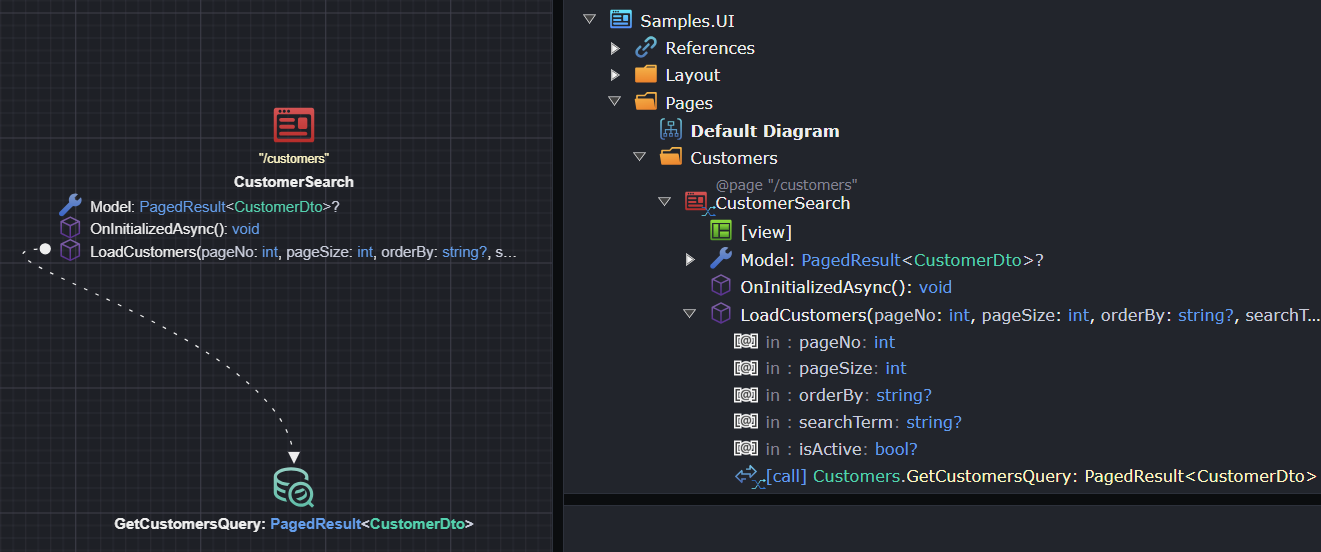
Depending on the nature of the service being invoked, the default setup is slightly different:
- For
Querys: the result is added to theComponentas a property, and request parameters are modeled asOperationparameters. - For
Commands: a correspondingModel Definitionis created, based on the command, and added to theComponent. This model is mapped to the command for invocation. Typically forCommands you want a separate model which may have additional view concerns.
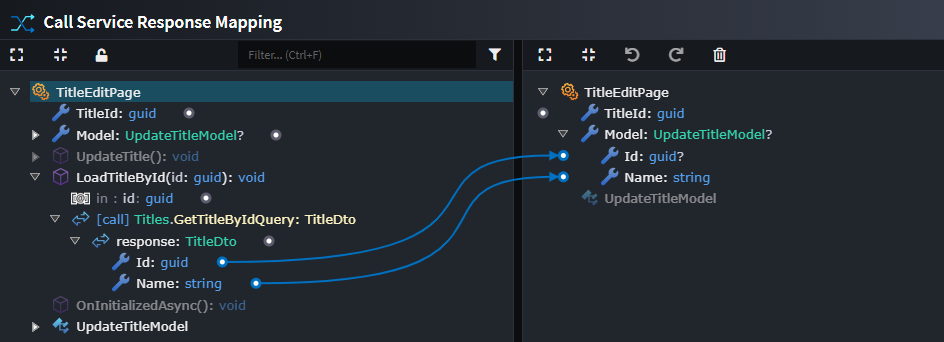
Pages using a Query and Command
For pages that use both a Query and a Command (for example, an Edit Page with a Query to retrieve the record by Id and a Command to update it), there is some additional configuration required.
When you use the Call Backend Service suggestion and select both the Query and Command, two properties are created:
- A property to store the response from the
Query(this will be of typeDto) - A property to store the information to be passed to the
Commandand bound to the UI controls (this will be of typeModel Definition)
Perform the following steps to ensure the correct end-to-end data flow. Instead of having the data returned from the Query populate the Dto, it should populate the Model Definition:
- On the
Call Service Operation Actionto the GetByIdQuery (the dashed line between the page and theQuery), right-click and selectMap Response. - In the right panel, delete the
Dtoproperty completely (including its mappings), and then configure the mappings from the response on the left-hand side to theModel Definitionon the right-hand side.
This ensures that the data returned from the Query call is stored in the Model Definition property, which is then bound to the UI controls and used when invoking the update Command.
Here is an example of what the Query mapping should look like after being updated. Instead of the response being mapped to a Dto, it is mapped to the model.
Connecting Your UI Components to Services in Other Applications
When modeling service invocations, you may want to connect to Services defined in applications beyond your UI application.
To use these services in your UI application:
- In the
User Interface Designer, under theUser Interface Package, right-clickReferences→ Add a Package Reference. - In the
Package Reference Managerdialog, select the package containing the Services (e.g.,OtherApplication.Services).
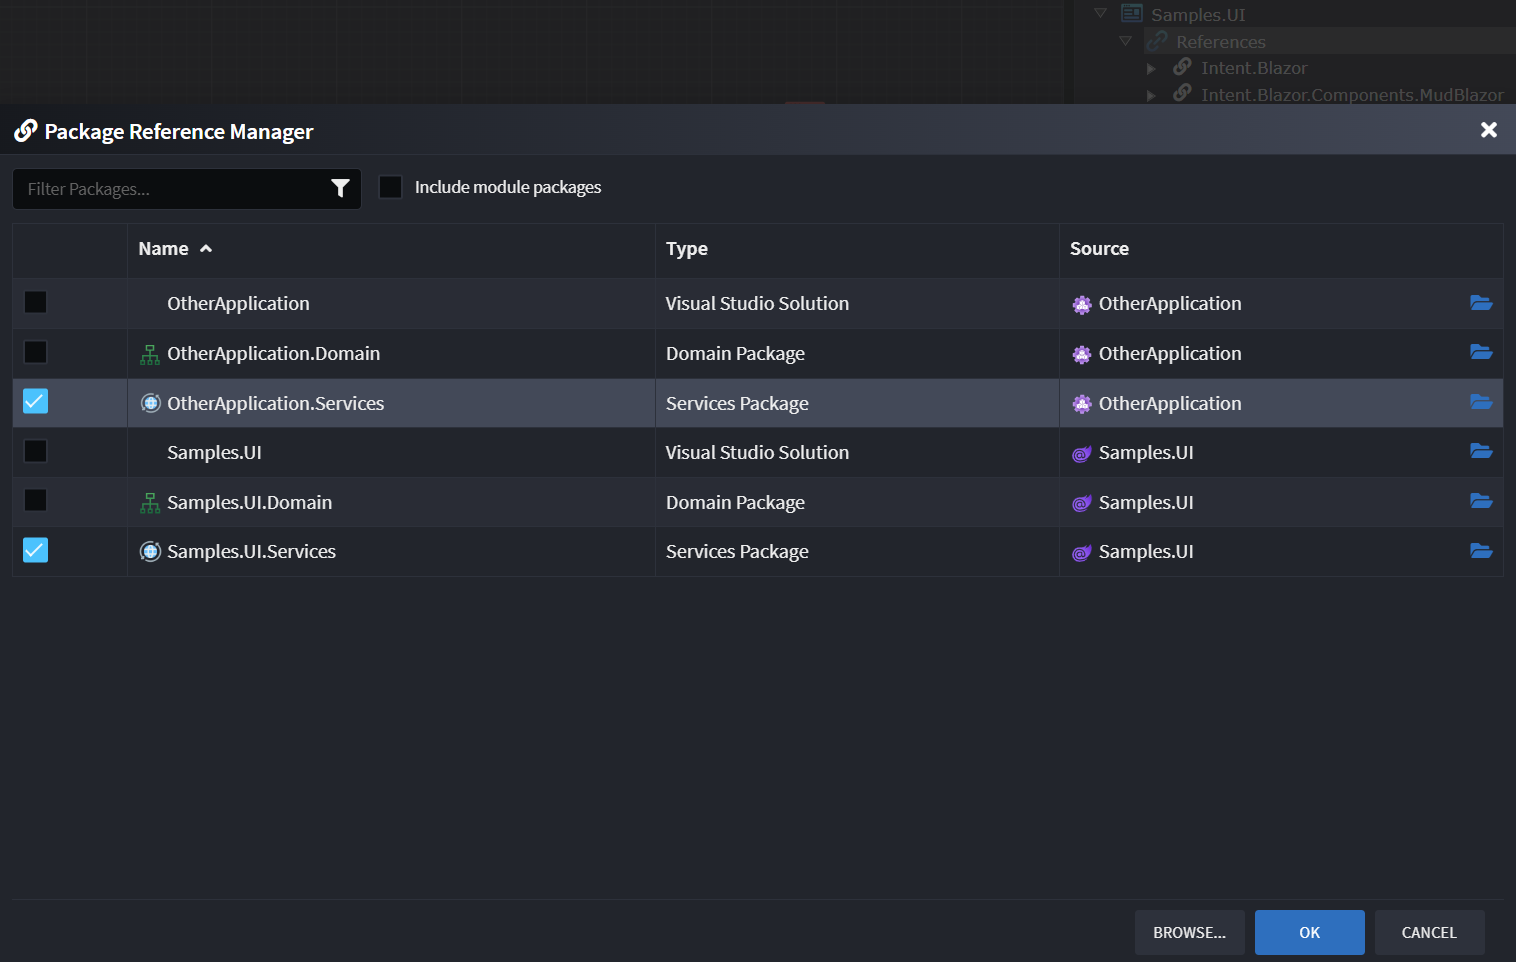
You can now use these external services in the diagrams of the UI application.
Note
You will also need the appropriate integration module installed to make the remote communication work (e.g., Intent.Blazor.HttpClients for a WASM UI talking to an external REST Web API, or Intent.Integration.HttpClients for a server-side Blazor application talking to an external REST Web API).
Implement Your View with AI
Tip
You will need to install the Intent.AI.Blazor module and connect Intent Architect to an LLM API of your choice. Ensure that the required User Settings have been completed - including a valid API key for your selected AI provider. The time and accuracy of the AI prompt results will vary depending on your provider and model. Try a few and find the combination which works best for your preferred workflow.
Once you are satisfied with your View Model design, you can use the Blazor AI accelerator to have AI generate the remaining implementation details.
Note
Don't forget to apply your Software Factory before running AI prompts, as the generated code is input/context for the AI.
Generate Your View with AI
- Make sure you have run and applied the Software Factory.
- Right-click on the
Component→ Implement with AI. - (Optional) Adjust the settings in the AI Prompt dialog.
- Click Done - IA will generate and submit a prompt to the LLM (this may take a little while).
- Review the AI's proposed changes as a code diff.
- Click Apply to accept the changes.

Note
AI by its nature is non-deterministic. While we put a lot of effort into making this interaction as predictable as possible, results will vary. Test the results and make changes as desired.
Common Compilation Issues (with MudBlazor)
The AI does not always get it right, even when guided explicitly. Here are a few common compilation issues you may run into.
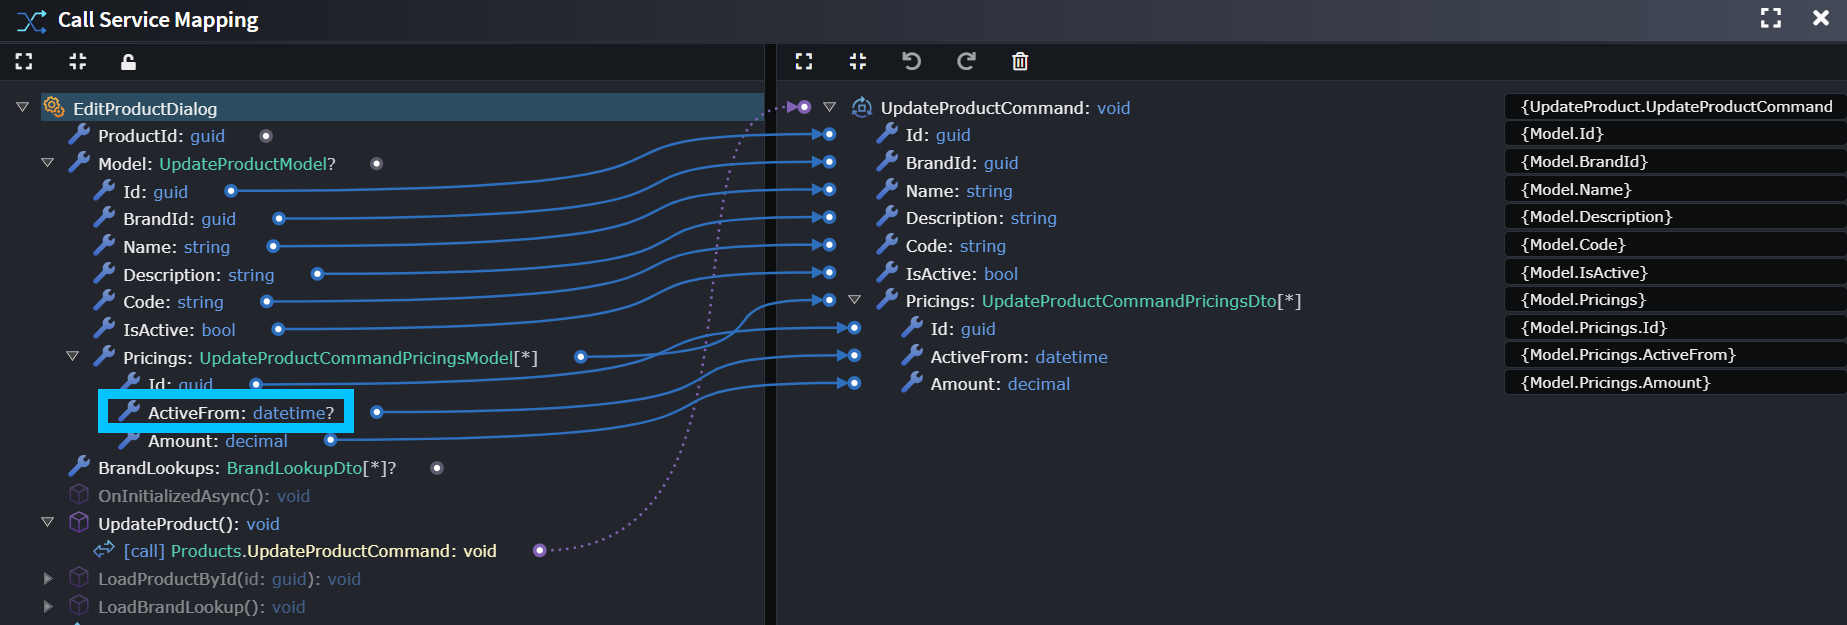
Non-nullable Model Fields
Certain MudBlazor components expect nullable bindings. For example, MudDatePicker requires a DateTime?. If it gets bound to a DateTime on your model you will get the error:
Argument 2: cannot convert from 'Microsoft.AspNetCore.Components.EventCallback<System.DateTime>' to 'Microsoft.AspNetCore.Components.EventCallback'
To resolve this issue, make the corresponding properties on the model nullable, ideally in Intent Architect, and run the Software Factory.
If the field is required on the service contract, it still will be. We are only changing the model, and the AI should have configured the component as required based on the contract, so the value will be populated when form validation passes.
The Missing T=""
Sometimes the AI generates code like this, which does not compile:
@if (context.IsActive)
{
    <MudChip Color="Color.Success" Variant="Variant.Filled" Size="Size.Small">Active</MudChip>
}
else
{
    <MudChip Color="Color.Error" Variant="Variant.Filled" Size="Size.Small">Inactive</MudChip>
}
Error:
The type of component 'MudChip' cannot be inferred based on the values provided. Consider specifying the type arguments directly using the following attributes: 'T'.
Fix: Simply add T="string" into the MudChip components.
Improving the Results of AI
Hopefully you are getting good consistent results "out of the box" with the AI Prompt, but there are several things you can do to tweak/improve the results even further.
Additional User Prompt Context
You typically don't have to provide additional context to the LLM, but if you find it frequently making the same mistakes or you need to give it more guidance (e.g., how to refactor code it previously generated), you can provide extra instructions in the AI dialog. Examples:
- "Ensure buttons/actions exist for the new navigations I added."
- "Refresh the grid if the add customer dialog closes successfully."
- "Ensure you have controls for adding and removing addresses."
Using a Template
You can select a template to further guide the AI. These templates contain:
- Additional rules and guidance for the AI
- Sample implementations

There are several pre-configured MudBlazor templates for various types of Pages and Dialogs. These templates are also designed to automatically select the correct template based on your Component naming convention (this can be adjusted as required).
| Template | Keywords |
|---|---|
| Page - Search Entity | search, find, list, lookup |
| Page - Add Entity | add, create, new, insert, register |
| Page - Edit Entity | edit, update, modify, change |
| Page - View Entity | view, details, detail, show |
| Dialog - Add Entity | dialog, add, create, new, insert |
| Dialog - Edit Entity | dialog, edit, update, modify, change |
Note
These templates can easily be customized, extended or replaced. They could even be changed to work for a completely different component library.
Giving It an Example
If you already have an example of a similar screen to the one you are trying to create, you can simply select it in the Example Components. This will submit code associated with that Component to guide the AI.
Blazor Component Comments
Whatever comments you put on your Blazor Component will also be included in the prompt. This can be used for persistent, instance-based prompting context. For example:
- "The page does the following and has X, Y, Z features."
- "Ensure the customer grid refreshes when a dialog closes."
Updating Styling from a New design.md
As part of the default Blazor templates, a design.md file is generated alongside your application. It documents the out-of-the-box style sheet - colors, typography, spacing and component conventions - and is automatically included as context whenever the AI generates a View. This is what keeps styling consistent across all your AI-generated pages.
If your design changes (e.g., a new brand palette, updated component variants, or a refreshed style guide), you don't need to touch each Component individually. Instead:
- Replace the existing
design.mdwith your updated version. - Run an AI Task with an instruction such as:
"A newdesign.mdis available - update the stylesheets with the new design values."
A dedicated skill picks up on this, extracts what's required fromdesign.md, and updates the relevant CSS files accordingly. - Review the proposed changes as a code diff and click Apply.
Because styling is centralized in the CSS files rather than duplicated per Component, this single AI Task updates styling application-wide - there is no need to run it against each Page or Dialog separately.
Note
Because design.md is included automatically as AI prompt context, any new Views you generate after replacing it will already reflect the updated design. The AI Task above is only needed to retrofit the CSS for styling that was already generated before the change.
Try to Keep Your ViewModel Managed
In this approach you have used both deterministic and non-deterministic code generation.
- Everything you modeled will be generated deterministically through the Software Factory in the ViewModel (e.g.,
MyComponent.razor.cs). - The AI/LLM will generate the code in the View (e.g.,
MyComponent.razor), and may augment or change some code in the ViewModel.
Implications/considerations:
- The ViewModel runs in Merge mode by default. This means both systems can operate there smoothly.
- If the AI changes deterministic code in the ViewModel, the Software Factory may not be able to automatically merge the changes and may attempt to undo or duplicate code blocks.
- Ideally, you can refactor the code and/or add explicit Code Management instructions to the point where Intent Architect can merge code automatically.
- If not possible, you may need to add an
IntentIgnore.
Blazor AI Prompt Augment and Customization Through Templates
The Blazor AI prompting can be further extended through AI Prompt Templates. Out of the box these come pre-configured for MudBlazor, but the system is simple and extensible. Embrace it, extend it, or completely re-configure it - the choice is yours.
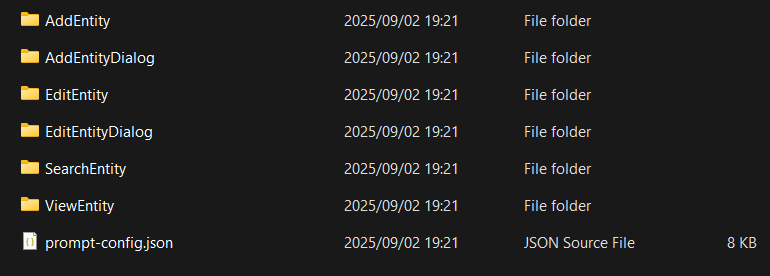
Look in the following folder within your Intent Architect Solution:
.\Intent\AI.Prompt.Templates\{application name}\Intent.Blazor.AI
You will find:
prompt-config.json(prompt configuration)- Folders containing sample code files for the various templates
Prompt Overview
The main prompt (prompt.md) is a readable markdown file, which can be adjusted to suite your specific rules and requirements.
This file contains the generic rules, limitations and instructions for the prompt, including:
- Component Libraries rules
- Styling guides and rules
- Rules for when and how to modify existing code
- Rules for navigation between components
Template Specific Prompt
Each template also has its own markdown file (e.g. add-entity.md) which contain any additional template specific rules to be passed to the LLM.
JSON Schema Overview
The prompt-config.json file defines templates which define reusable AI prompt blueprints for common scenarios (e.g., Search Page, Add Dialog). They include:
1. metadata
The metadata block provides contextual information that is injected into the AI prompt. This ensures generated code aligns with your project’s dependencies and conventions.
"metadata": {
  "component-library": {
    "name": "MudBlazor",
    "version": "8.10.0"
  }
}
2. templates
Templates define reusable AI prompt blueprints for common scenarios (e.g., Search Page, Add Dialog). They include:
- id → Unique identifier
- name → Human-friendly label
- description → What the template does
- applicability → Keywords that help Intent Architect pick the most appropriate template
- template-folder → The folder containing sample files
- metadata → Template-specific context
Example Template: Search Entity Page
{
  "id": "SearchEntity",
  "name": "Page - Search Entity",
  "description": "Search Entity",
  "applicability": {
    "key-words": [
      { "word": "search", "weight": 3 },
      { "word": "list", "weight": 3 }
    ]
  },
  "template-folder": "SearchEntity"
}
Example Template Types
The schema already defines several templates:
Page Templates
SearchEntity→ Generates search/listing pagesAddEntity→ Generates entity creation pagesEditEntity→ Generates entity update pagesViewEntity→ Generates read-only entity views
Dialog Templates
AddEntityDialog→ Generates dialogs for adding entitiesEditEntityDialog→ Generates dialogs for editing entities
Each template includes its own rules to ensure compliance with MudBlazor and project conventions.
Extending Configuration
To extend the configuration:
To extend the configuration:
- Add new rules in
prompt.md(global) or under a specifictemplatemarkdown. - Create a new template in
prompt-config.jsonby adding an object undertemplates.- Define keywords under
applicability. - Specify a
template-folderwith an example implementation.
- Define keywords under
Example A: Bulk Import Entities
The entry in prompt-config.json:
{
  "id": "BulkImportEntities",
  "name": "Page - Bulk Import Entities",
  "description": "Upload a CSV/Excel file, preview parsed rows, validate, and commit in bulk.",
  "applicability": {
    "key-words": [
      { "word": "import", "weight": 3 },
      { "word": "upload", "weight": 3 },
      { "word": "bulk", "weight": 3 },
      { "word": "csv", "weight": 2 },
      { "word": "excel", "weight": 2 },
      { "word": "batch", "weight": 2 }
    ]
  },
  "template-folder": "BulkImportEntities",
  "metadata": {}
}
Examples rules defined in bulk-import-entities.md:
### Form generation rules
- Provide a file input and a server-side parse action. Reuse existing parse, validate, and commit methods where available.
- Render a preview table with paging and basic filtering using `MudTable` or `MudDataGrid`.
- Use official enum values for component parameters. Do not use raw strings.

### Save behavior
- Surface row-level validation messages using `Func<T, IEnumerable<string>>` validators.
- Disable `Commit` until there are no blocking validation errors.
- Show success and error toasts/dialogs using existing notification services where present.
Example B: Upsert Template
The entry in prompt-config.json:
{
  "id": "AddOrUpdateEntity",
  "name": "Page - AddOrUpdate Entity",
  "description": "Create a new entity or update an existing one, using a single page flow (upsert).",
  "applicability": {
    "key-words": [
      { "word": "add", "weight": 3 },
      { "word": "create", "weight": 3 },
      { "word": "new", "weight": 2 },
      { "word": "insert", "weight": 2 },
      { "word": "register", "weight": 2 },
      { "word": "update", "weight": 3 },
      { "word": "edit", "weight": 3 },
      { "word": "modify", "weight": 2 },
      { "word": "change", "weight": 2 },
      { "word": "upsert", "weight": 3 },
      { "word": "save", "weight": 2 }
    ]
  },
  "template-folder": "AddOrUpdateEntity",
  "metadata": {}
}
Examples rules defined in add-or-update-entity.md:
### General behavior
- Reuse existing backing methods if present (e.g., SaveEntityAsync, UpdateEntityAsync, LoadEntityAsync). Do not invent new ones if appropriate methods already exist.
- If an Id or key is present in the model or route, treat the page as Update; otherwise treat as Add.

### Form generation rules
- Use MudForm and consistent variants/density/margins across all inputs.
- For MudBlazor generics (MudSelect, MudRadioGroup, MudChipSet, MudSwitch), always declare T explicitly.
- When binding to inputs that accept nullable values (e.g., MudSelect, MudDatePicker), update the backing model property to be nullable.
- Validation delegates must match Func<T, IEnumerable<string>>.
- Always use official enum values for component parameters (no raw strings).
✅ With this setup, you can tailor AI prompt behavior, enforce conventions, and event using a different blazor component library