Create a Module and Template
In this step of the tutorial, we will create a new Module Builder Application in Intent Architect, use the Designer to add a template to it, run the Software Factory against this Application to generate a .NET Core C# solution, and then finally build in our IDE to generate the Module.
Create a new application
On the home screen, click Create a new module.
Fill in a Name (such as MyModules), review/change the Location as desired and click NEXT.
Ensure the following components are selected:
Module Builder CoreModule Builder - C#Visual Studio Integration
Click CREATE.
An Application Installation dialogue will pop up showing the progress of downloading and installing Modules and Metadata for the Application, once it's finished it will disappear allowing you to start building your own Module.
Open and rename the package
Click on Module Builder on the left of the screen to enter the designer.
Click on the MyModules package, right-click and select Rename.
Note
The name of the package is what the name of your module will be. This rename step is optional but demonstrates the process of how to accomplish this if required.
Enter a name for the Package (such as MyModules.Entities) and press ENTER. It will prompt you whether you want to change the underlying files. Click on YES. Finally, click on Save.
Create a template
Right-click the Package and click the New C# Template option:
Name it EntityBase and for its type select Single File.
Run the software factory
We are now ready to run the software factory. Press the play button near the top right of the screen and the execution will start.
Note
If your changes are unsaved, you will be asked if you want to save them before proceeding.
Once the Software Factory has executed the templates, it pauses to allow you to review the proposed changes (called staging). You can click an entry and it will open in a diff tool. If you are satisfied with the proposed changes you can press the APPLY CHANGES button to continue.
As the Software Factory Execution is running, it will present expandable items that allow you to drill deeper into the current activity currently being performed by the Software Factory.
When the Software Factory Execution is complete, you can choose to close it (the button with the cross) or minimize it (the button with the underscore). For this tutorial, we recommend you minimize it to make use of Intent Architect's continuous processing feature that runs in the background (which will be demonstrated later in the tutorial).
Edit the template in Visual Studio
During the Software Factory Execution, Intent Architect generated a Visual Studio solution along with the EntityBase template which was added in the create a template step above.
Navigate to the folder where the .sln solution file (and associated files) has been placed and open it with Visual Studio.
Tip
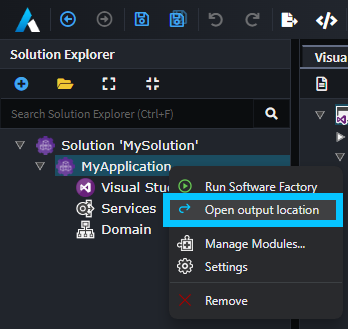
Intent Architect can open the folder where the generated content was placed by you using the Application's context menu and clicking Open output location:
Go to the MyModules Project and expand the Templates folder and then the EntityBase folder.
Open the EntityBaseTemplatePartial.cs file and it should look as follows:
...

namespace MyModules.Templates.EntityBase
{
    [IntentManaged(Mode.Fully, Body = Mode.Merge)]
    public partial class EntityBaseTemplate : CSharpTemplateBase<object>, ICSharpFileBuilderTemplate
    {
        public const string TemplateId = "MyModules.Entities.EntityBase";

        [IntentManaged(Mode.Fully, Body = Mode.Ignore)]
        public EntityBaseTemplate(IOutputTarget outputTarget, object model = null) : base(TemplateId, outputTarget, model)
        {
            CSharpFile = new CSharpFile(this.GetNamespace(), this.GetFolderPath())
                .AddClass($"EntityBase", @class =>
                {
                    @class.AddConstructor(ctor =>
                    {
                        ctor.AddParameter("string", "exampleParam", param =>
                        {
                            param.IntroduceReadonlyField();
                        });
                    });
                });
        }
        ...
    }
}
Note
This is a C# File Builder template, this templating paradigm uses a builder pattern to construct your C# file. The methods on the builder are intuitive and semantically aligned with concept's you would find in a C# code file, for example methods, constructors, fields, properties etc.
Reading through the builder code you can get a sense for what it is constructing:
- Add a class named
EntityBase. - within that class ->
- Add a constructor.
- for that constructor ->
- Add a parameter of type
string, named 'exampleParam. - Add a read only field to the class, for storing this parameter.
- Add a parameter of type
And as you can imagine this builder will end up producing a C# file as follows:
...

    public class EntityBase
    {
        private readonly string _exampleParam;

        public EntityBase(string exampleParam)
        {
            _exampleParam = exampleParam;
        }
    }
Let's change this sample implementation to something more relevant for a EntityBase class. For the purpose of this tutorial let's assume you would like to add some standard auditing properties to the base class. Go ahead and modify the code as follows:
...

namespace MyModules.Templates.EntityBase
{
    [IntentManaged(Mode.Fully, Body = Mode.Merge)]
    public partial class EntityBaseTemplate : CSharpTemplateBase<object>, ICSharpFileBuilderTemplate
    {
        public const string TemplateId = "MyModules.Entities.EntityBase";

        [IntentManaged(Mode.Fully, Body = Mode.Ignore)]
        public EntityBaseTemplate(IOutputTarget outputTarget, object model = null) : base(TemplateId, outputTarget, model)
        {
            CSharpFile = new CSharpFile(this.GetNamespace(), this.GetFolderPath())
                .AddUsing("System")
                .AddClass($"EntityBase", @class =>
                {
                    @class.AddProperty("DateTime", "CreatedDate");
                    @class.AddProperty("string", "CreatedBy");
                    @class.AddProperty("DateTime", "UpdatedDate");
                    @class.AddProperty("string", "UpdatedBy");
                });
        }
        ...
    }
}
The template will now output a file like this:
using System;

namespace TestProject
{
    public class EntityBase
    {
        public DateTime CreatedDate { get; set; }
        public string CreatedBy { get; set; }
        public DateTime UpdatedDate { get; set; }
        public string UpdatedBy { get; set; }
    }
}
Note
The actual output may look a little different to this, due to things like Code Management.
Save your changes and build the project.
Once the build has been completed you will notice that the Build log includes the following line:
Successfully created package C:\Code\MyModules\Intent.Modules\MyModules.Entities.1.0.0.imod
This was output by the Intent Packager and lets you know where it has placed the built Module.
Summary
You have successfully created an Intent Architect Module.
Next Steps
Install and run the module
Create a test Application to install and run our Module.