Create a "Files Per Model" template
In this next part of the tutorial, we will extend our MyModules.Entities Module to create and manage domain entities based on modeling in the Domain Designer. To do this we will create a Template which generates a new file for each Entity which has been created in the Domain Designer.
Install the Domain Metadata
First, to access the Domain types so that we can configure our Template correctly, we must install metadata from the Intent.Modelers.Domain Module into our Module Builder.
Right click on the
MyModulesApplication in Intent Architect, and selectManage Modules.Ensure that the
Alloption in the repository drop-down is selected.Search for the
Intent.Modelers.DomainModule.In the Module details pane, expand the
Optionsand check theInstall metadata onlycheckbox.Note
By selecting the
Install Metadata onlyoption, Intent Architect will not install the Designer. This feature is typically used in the Module Builder.Note
A Software Factory Execution minimized in the background might trigger upon installation (which can be safely ignored for now).
Click
Installto install the Module.
Create a new Template
Next, we will create a new Template that we can configure to receive the models from the Domain Designer and create a new C# class for each entity.
Navigate to the
Module BuilderDesigner.Create a new C# Template, call it
Entity, and set its type to beFile per Model.In the properties panel, under
Template Settings, set itsDesignertoDomainand Model Type toClass.Note
These options are available because we installed the
Intent.Modelers.DomainModule's metadata in the previous step.Save your changes.
Click on the status button at the bottom of the screen which detected changes made to the
My Modulesapplication (this will only happen if you have minimized the Software Factory Execution process, normally you would have to click on theRun Software Factoryyourself).Click
APPLY CHANGES.
Warning
It is always recommended to inspect the changes that Intent Architect wants to make to your codebase before applying them.
Note
You may notice that the EntityTemplateRegistration.cs class is wired up to create a new Template instance for each ClassModel that is retrieved from the Domain Designer by Intent Architect's metadata management system. Later in this article you will see how ClassModels relate to Classes in the Domain Designer.
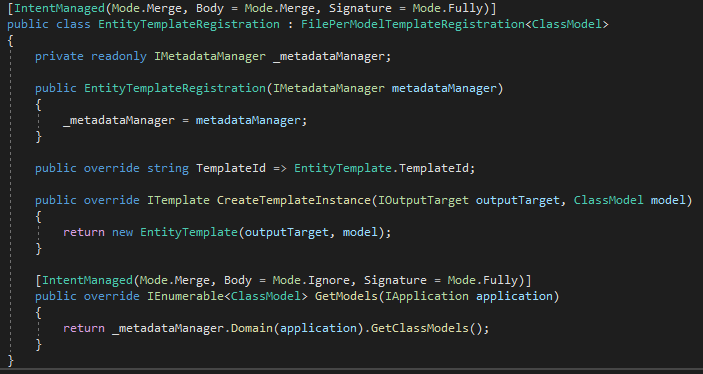
Tip
If you want a template to only generate files for some classes and not others, you can edit the GetModels(...) method to filter the available classes.
Implement Template Logic
Next, we will implement the logic of the Entity Template, essentially templatizing a pattern ("rules" followed by developers) for creating entities. In this tutorial, we will create public properties for each attribute and association that we describe in the Domain Designer.
Open the
MyModule.Entitiescode solution in your IDE (e.g. Visual Studio).Open the
EntityTemplatePartial.csfile.Implement the following logic to create the properties for the attributes and associations of each
Domainentity:.AddClass($"{Model.Name}", @class => { foreach (var attribute in model.Attributes) { @class.AddProperty(GetTypeName(attribute), attribute.Name.ToPascalCase()); } foreach (var association in model.AssociatedClasses.Where(x => x.IsNavigable)) { @class.AddProperty(GetTypeName(association), association.Name.ToPascalCase()); } });Note
The Module Builder has automatically wired up our Template so that the
Modelproperty is aClassModelwhich is a C# class which has all the data of an entity as modelled in theDomainDesigner including itsAttributesandAssociatedClassescollections.Note
The
GetTypeName(...)method returns the referenced type that was specified as a qualified and namespace-normalized C# type. It also tracks dependencies between this template and others, allowing it to dynamically addusingstatements to managed classes (created by Intent Architect) in different namespaces.Note
We filter the
AssociatedClassesby those that are Navigable:foreach (var association in model.AssociatedClasses.Where(x => x.IsNavigable))This prevents every association relationship from being expressed as bidirectional in our code.
Open the
EntityTemplatePartial.csfile. Now we want to make ourEntitys inherit from ourEntityBase, as follows:.AddClass($"{Model.Name}", @class => { @class.WithBaseType(this.GetEntityBaseName()); foreach (var attribute in model.Attributes) { @class.AddProperty(GetTypeName(attribute), attribute.Name.ToPascalCase()); } foreach (var association in model.AssociatedClasses.Where(x => x.IsNavigable)) { @class.AddProperty(GetTypeName(association), association.Name.ToPascalCase()); } });Note
The
this.GetEntityBaseName()is a helper extension method, which is simply usingGetTypeName(...)under the hood. These methods allow you to easily reference the generated template output types of other templates. In this case we want our entity generated by theEntitytemplate, to inherit from the class generated by theEntityBasetemplate.
Apply Module changes in Test Application
With the Module changes made, follow the next few steps (keep Visual Studio open):
- Open the
TestAppApplication in Intent Architect. - In Visual Studio, rebuild the module by recompiling the project.
- Notice that Intent Architect has automatically detected that the Module's
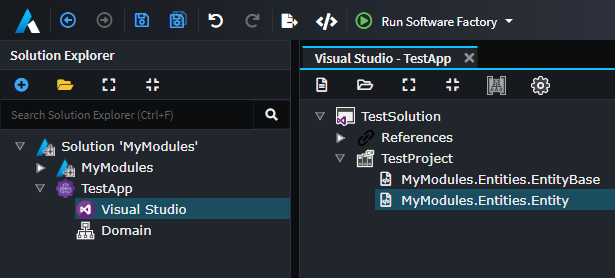
.imodfile was updated, installed, and executed by the Software Factory process again. There should be no output changes so click onAPPLYand minimize it. - Navigate to the
Visual StudioDesigner and assign theMyModules.Entities.EntityTemplate Output to theTestProjectproject. The configuration should look as follows:
Note
Notice that the Domain Designer has now been installed. When we configured our Entity Templates to use the Domain Designer, the Module Builder automatically added a dependency to the Intent.Modelers.Domain Module in the .imodspec file.
Tip
Instead of having to manually assign Template Outputs, it can be done automatically by Intent Architect during Module installation through use of roles.
Visually model a test domain
Next, we will use the Domain Designer to model out a basic test domain. We will use this to test our entity's pattern.
Navigate to the
DomainDesigner tab.Create a new
Domain Package.Create classes on the diagram by right-clicking, and selecting
Create a Class. For this example, let's create the following classes:UserPrivilegeAssignedPrivilege
We can now add attributes to each of the classes as follows:
UserfirstName: stringlastName: stringemailAddress: stringisActive: bool
Privilegename: string
AssignedPrivilegecanUpdate: bool
Next, let's create relationships between each class as follows:
User1 --> *AssignedPrivilege(one-to-many)AssignedPrivilege* --> 1Privilege(many-to-one)
Tip
Associations in the
DomainDesigner have a Source End and Target End. To set the multiplicity of relationships we change theIs CollectionandIs Nullablesettings of each end. For example, a one-to-many relationship will be set up that the Target EndIs Collectionistrueand the Source EndIs Collectionisfalse.Save your changes.
Notice again that on saving, the Software Factory Execution automatically kicked itself off. A new C# entity class should be created for each of our entities with their properties for each Attribute and Association.
Click
APPLY CHANGES.
Summary
This tutorial introduced using the Module Builder to create a Module (composed of a single file Template as well as a file per model Template), and then using it in a different Intent Architect application. We then covered how to templatize an entity pattern inside of the T4 .tt files, and how to set up methods in the Template's partial class that are called from the T4. We finally covered how to install and reinstall Modules, some basic domain modelling using the Domain Designer, as well as how to assign Template Outputs to projects in the Visual Studio Designer.
What's Next
Use Stereotypes
Stereotypes provide powerful metadata extensions, allowing you to add extra custom information to your Designers. This information can be used to make all kinds of decisions in your Modules.
Decorate a Template
Sometimes you may want to optionally extend a Template from another Module. Decorators allow you to achieve this and can help keep your Modules cohesive with a good separation of concerns.
Get type names
When you need to get the name of a type generated by a template while also:
- Automatically applying a collection format as needed.
- Adding any required
usingdirectives. - Adding any required project references.