Make your first change with the AI
Just installed Intent Architect? Get your first change from the AI, reviewed and committed, without leaving the app: open your code or start something new, choose your coding agent, ask for the change, then check what it did and commit it.
Sign in and open your code from the Home screen
When Intent Architect starts, sign in with your Intent Architect account. If you don't have one yet, click Create an account on the sign-in screen.
The Home screen opens next. Under Get started, pick whichever fits:
- Open a folder opens code you already have, whether or not it has an Intent Architect solution.
- Clone a repository clones a Git repository from its URL into a folder you choose, then opens it the same way.
- Open an existing solution opens an Intent Architect solution, the
.islnfile your team may already have. - Create a new solution starts from nothing. Name it and click Create solution, then click Create new application and choose a template for your first application. The solution gets its own Git repository by default.
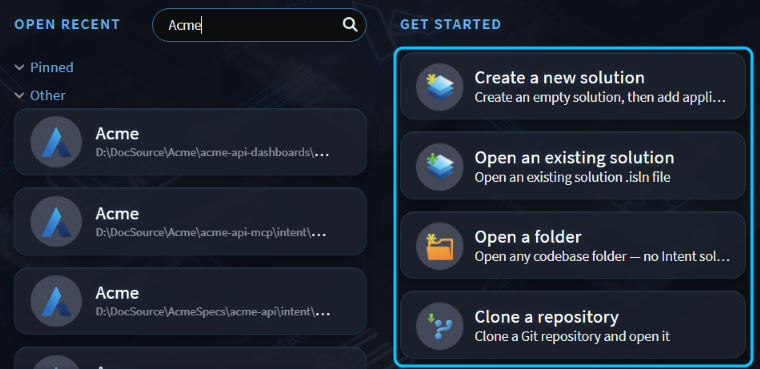 Get started on the Home screen, with the four ways to open or start your code boxed.
Each one opens your code in the Solution Shell, with the AI chat docked on the right.
Note
If the folder you open or clone contains an Intent Architect solution, open that solution with Open an existing solution before you ask for a change. When it's opened as a folder, the agent can change the solution's design but can't generate the code from it.
Use your own coding agent in the AI Assistant
The AI Assistant chat can use a coding agent you already have: Claude Code, Codex, GitHub Copilot CLI, Cursor CLI, Kiro or OpenCode. The agent runs on your computer, signed in to your own account:
- Install the agent's CLI and sign in to it from a terminal. If you haven't before, follow the install steps for your agent.
- In the AI Assistant, docked on the right of the Solution Shell (press
F8if it's hidden), open the model picker below the message box and click the cog at the top of the list. AI Configuration opens on the AI Providers tab. - Check that your agent shows Installed, and turn on its power button if it's off.
- Back in the model picker, pick one of the agent's models, such as Claude Code Default.
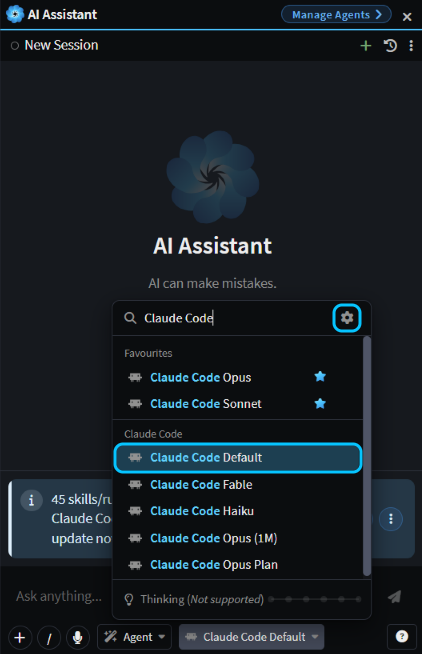 The model picker filtered to Claude Code, with Claude Code Default and the cog that opens AI Configuration boxed.
The chat may show a banner offering to Enable auto sync for the agent's skills and rules. You can leave it for now; it adds files to your repository.
Ask for your first change in the AI chat
Check that Agent is selected in the agent picker beside the model, then describe the change in plain words and press Enter. Start with something small that you can check yourself.
In an Intent Architect solution, the agent changes the design first and generates code from it. Asked "Add an optional date of birth to Customer, and let the customer endpoints set and return it.", Claude Code added the field to the domain and service designs, generated the code, added the field to the two hand-written request handlers itself, then checked that the solution built, in just under three minutes.
The agent asks before it edits files or runs a command. Click Allow to approve that one step, or Allow all to switch the chat to Bypass all permissions, so it stops asking for the rest of the chat and edits files and runs commands without checking with you.
When it's done, Agent’s Changes above the message box lists everything it changed: the design changes in each designer, then the files.
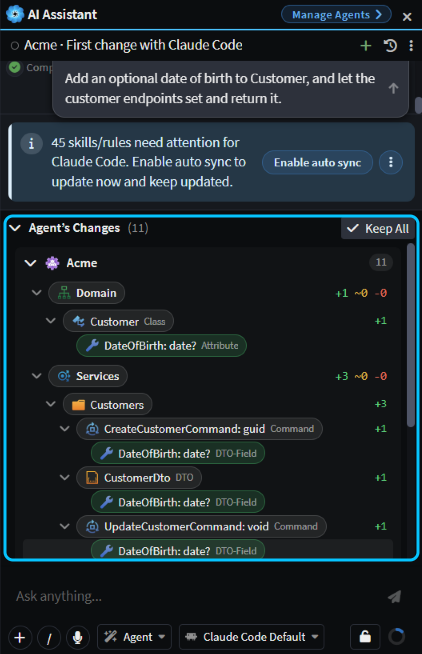 The finished change, with Agent’s Changes expanded and boxed.
For a bigger change, plan it first. Pick Plan in the agent picker, or press Shift+Tab before you send: the agent asks its questions and writes a plan, and builds nothing until you approve it. To decide when to plan and when to just ask, see Vibe coding, Plan Mode or Spec-Driven Development: when to use which.
See what changed in Change Review
The agent leaves its change uncommitted, so you can check it first. Open Source Control from the activity bar on the left, or press Ctrl+Shift+G, and click the flag button at the top of the pane. Change Review opens on everything you haven't committed yet:
- Under your application, each designer lists its design changes. Click one to see them on a diagram, with what changed highlighted.
- Code lists every changed file. Click a file to read its diff.
- When files need a person's eyes, such as hand-written code nobody has approved yet, they're listed first under Needs attention. Click a file's tick once you're happy with it.
For the date-of-birth change, that was four design changes in two designers, and seven code files, including the two handlers the agent edited by hand.
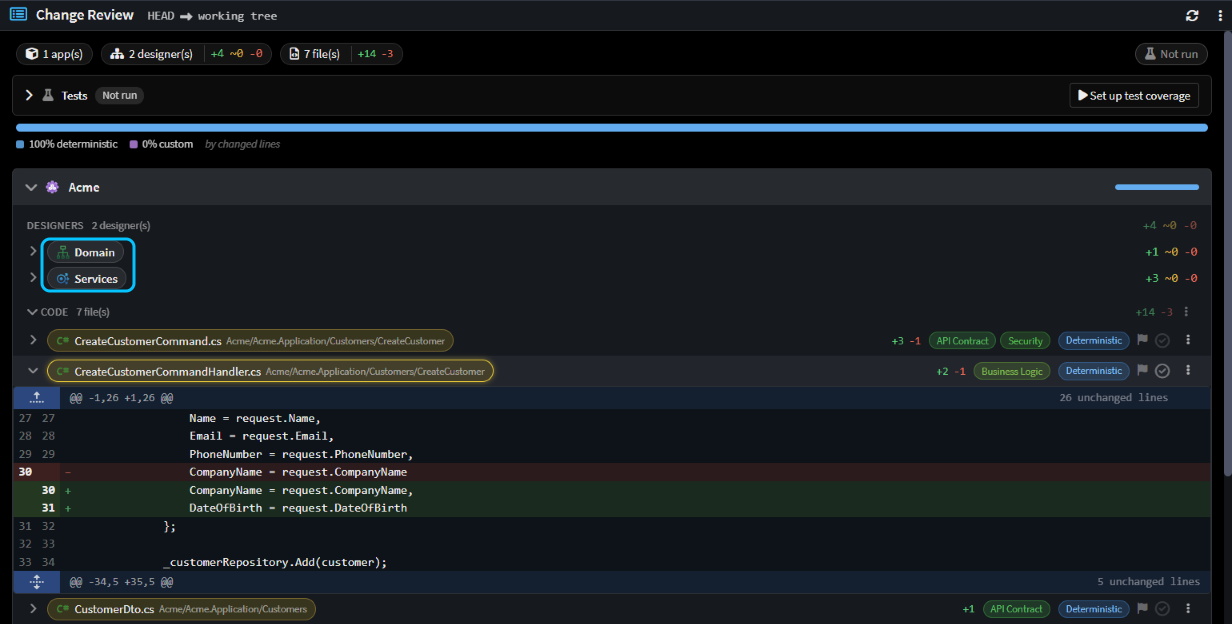 Change Review for the date-of-birth change, with the designers boxed and one handler's diff open.
Commit the change in Source Control
In the Source Control pane (Ctrl+Shift+G), type a commit message, or click the wand in the message box to have the AI write one. Then click Commit, or press Ctrl+Enter. If you haven't staged any files, it asks whether to Stage all and commit; click that to commit the whole change.
For the date-of-birth change, the AI wrote "Add DateOfBirth to Customer", and the commit took the whole change.
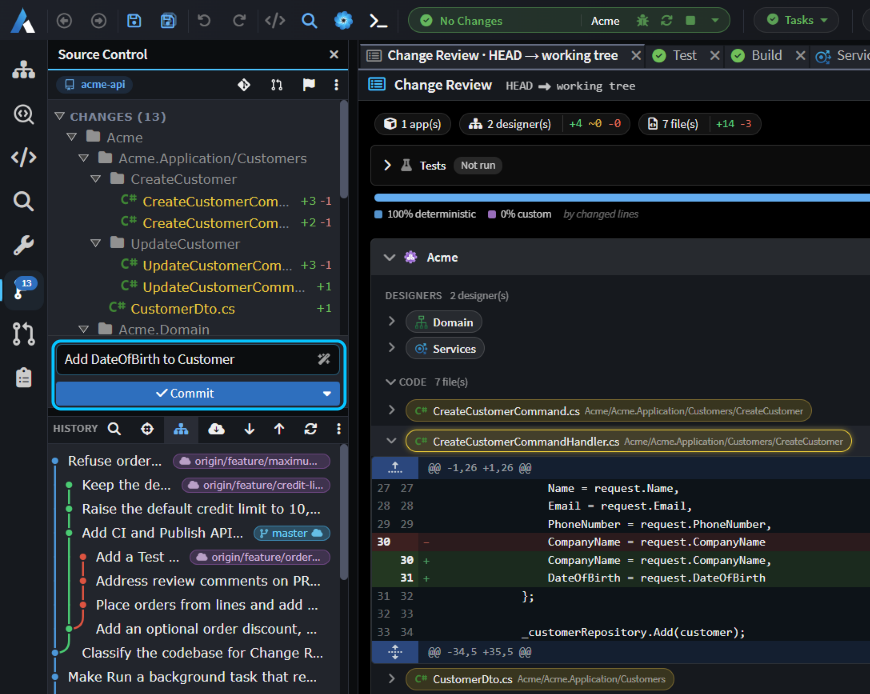 Source Control with the AI-written message and Commit boxed, beside Change Review.
To share it, push from the History toolbar below the commit box.
Related articles
- CLI Agents as AI Providers - setting up Claude Code, Codex, GitHub Copilot CLI and the other coding agents.
- Vibe coding, Plan Mode or Spec-Driven Development: when to use which - when to just ask, when to plan first and when to write a spec.
- Change Review - everything Change Review shows.
- Source Control - committing, pushing and pulling.
- Use Claude Code, Cursor or Copilot with Intent Architect - working with the coding agent you already use.