Metadata installation
Overview
Intent Architect can automatically install metadata for Designers as an Intent Architect Application is created from an Application Template or alternatively as a Module is installed.
Note
Metadata installation for a Module does not occur if it is being upgraded or re-installed, this allows users to delete installed metadata from Designers without it "coming back" again each time a Module is updated or re-installed.
During packaging of both Application Templates and Modules, the Intent Architect packager will look for any .installation.config files present in the content sub-folder. We recommend following a convention of naming .installation.config files after the designer for which they have metadata, for example visual-studio.installation.config for the Visual Studio designer or domain.installation.config for the Domain Designer.
These files are expected to contain an XML representation of the metadata to install as well as specifying which designer it should be installed into. The easiest way to create this XML in a valid format is to use the "Export" button on the toolbar when a designer is open:

Pressing this button will copy an XML representation of all (even unsaved) content within the designer onto your clipboard which you can then paste into the .installation.config file of the Module or Application Template.
Template string substitution
All content of .installation.config files support template string substitution, allowing values such as the solution or application name to be resolved at installation time.
Metadata merging
To avoid duplicate elements from being created, Intent Architect merges the metadata to install with any metadata already existing in the designer. For each element it needs to install, it searches in all folders by its id in the .installation.config file with the externalReference value in the Designer's existing metadata. If no match is found by id and externalReference it will then try match by name and folder path within the metadata.
When there is a match it will merge child elements recursively following the same logic.
Because Intent Architect fundamentally requires that all elements have a unique id, during metadata installation it will always create new unique ids for them, but it will also store the source element's original id value in the externalReference attribute so that the above correlation is possible.
Avoid exporting metadata from "production" Applications for installation
We recommend that in your Intent Architect "Modules" Solution, you create a new Application with a name such as <module-name>.Metadata. In this Application install any designers which you want to export metadata from and then model the desired metadata in them as you normally would.
This allows you to put template string values in element names so that the exported metadata requires no "correction" after export.
Exporting from working Applications also has other disadvantages in that you may export additional data that you didn't intend to (for example since your original export other data was captured as necessary for the Application), or that shouldn't ideally be installed (for example it's better NOT to export and install Template Output elements of the Visual Studio designer as these should be managed as per output targetting).
Tutorial
Tutorial overview
This tutorial will guide you through setting up metadata to be installed for an Application Template and then walk you through setting up metadata to be installed for a Module.
Assumptions
This tutorial assumes we already have an existing Intent Architect solution called MyOrganisation.Modules with the following Applications:
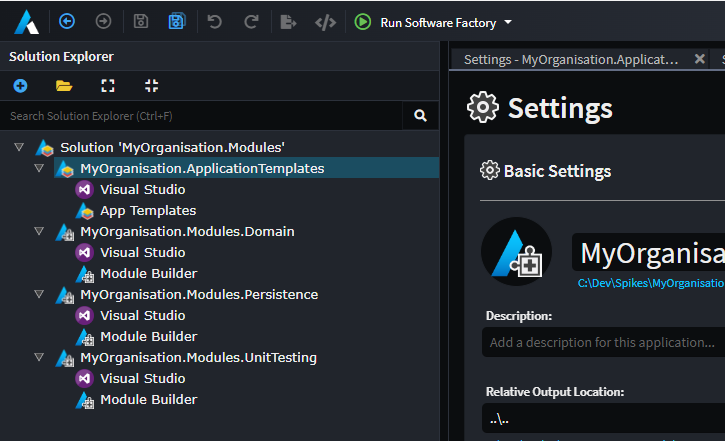
By default the Application Template will install the Domain and Persistence Modules with the UnitTesting Module being optional.
The software factory has been executed before for these Applications with a working Visual Studio solution with projects having been generated.
Create the metadata Application for the Application Template
- Click
Create new application. - Click the icon so we can change it:
![]()
- Click the
Font Awesometab, then enterexportin the filter box, select theFile Exportitem and finally clickSELECT:
![]()
- Change the Name to
MyOrganisation.ApplicationTemplates.Metadata. - Press
CREATE EMPTYat the bottom of the dialogue.
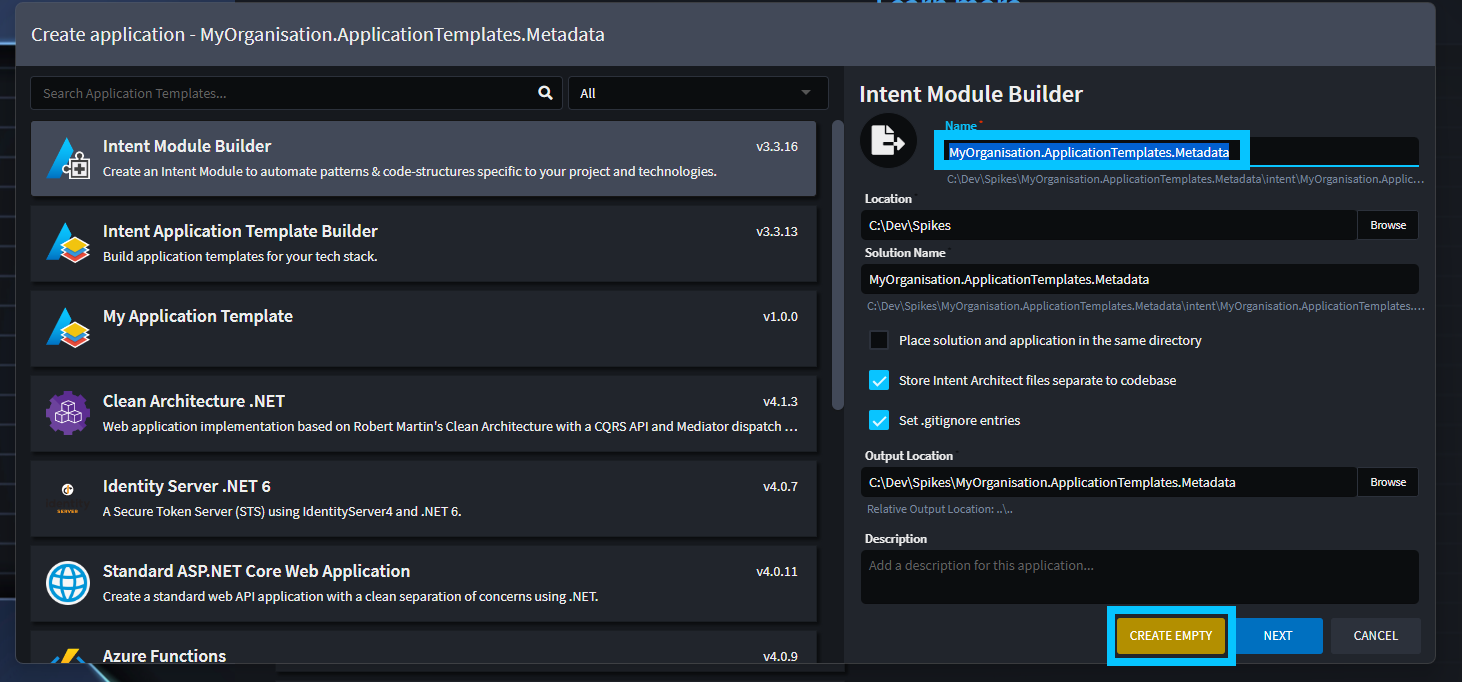
- Press
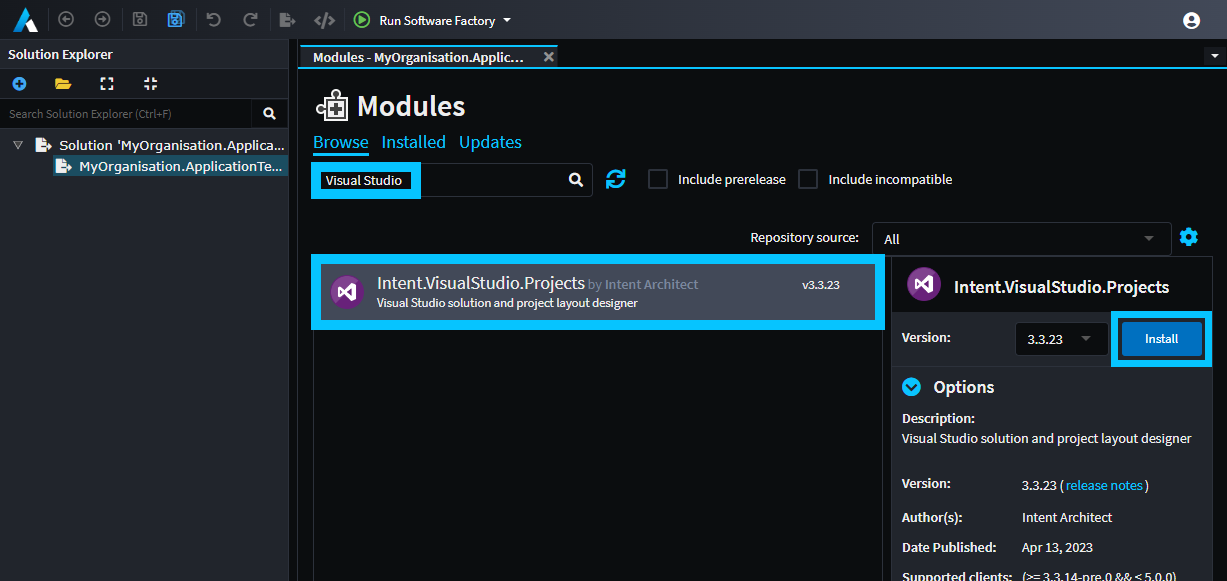
YESwhen asked to confirm that you want to continue creating an empty Application. - Once the application is created, right-click on the application and select
Manage Modules. On the Modules tab search forVisual Studio, select theIntent.VisualStudio.ProjectsModule and finally click the install button on the right:
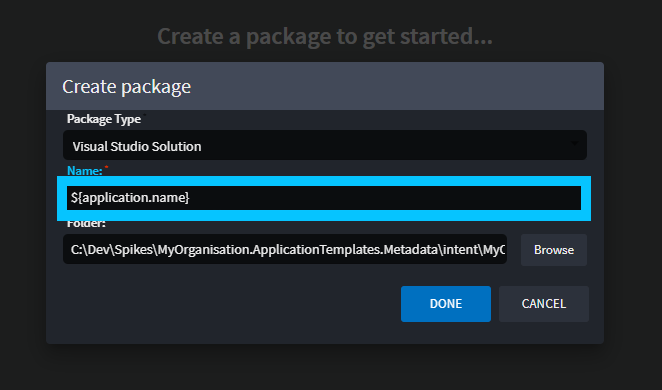
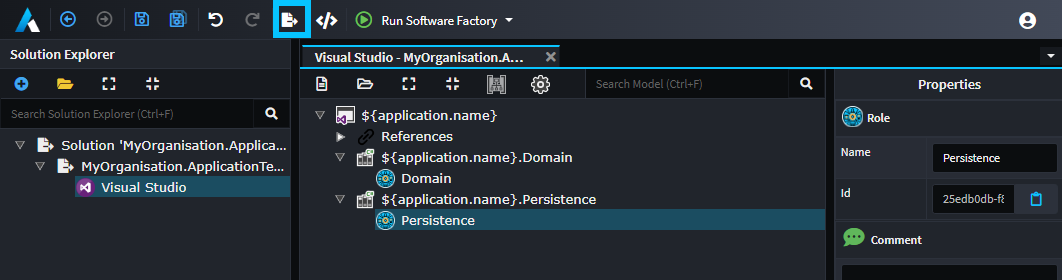
- Select the
Visual Studiodesigner on the left. - Press the
CREATE NEW PACKAGEbutton. - Use
${application.name}for the "Name" of the package and pressDONE:
- Right-click on the
${application.name}element and selectC# Project (.NET). - Set its name to
${application.name}.Domain. - Right-click the
${application.name}.Domainelement and selectAdd Role. - Set its name to
Domain. - Right-click on the
${application.name}element and selectC# Project (.NET). - Set its name to
${application.name}.Persistence. - Right-click the
${application.name}.Persistenceelement and selectAdd Role. - Set its name to
Persistence. - Press the
Exportbutton in the toolbar andCopied to clipboard...will appear at the bottom right of the window.
Add the exported metadata to the Application Template
- Open the
.slnfile for your Modules solution.
Tip
To quickly locate the .sln file, click Settings on the left and then on the link below Relative Output Location which will open the folder which contains your .sln file.
Note
This tutorial assumes you have already run the software factory for the other Modules and that the .sln file and its projects would already have been generated.
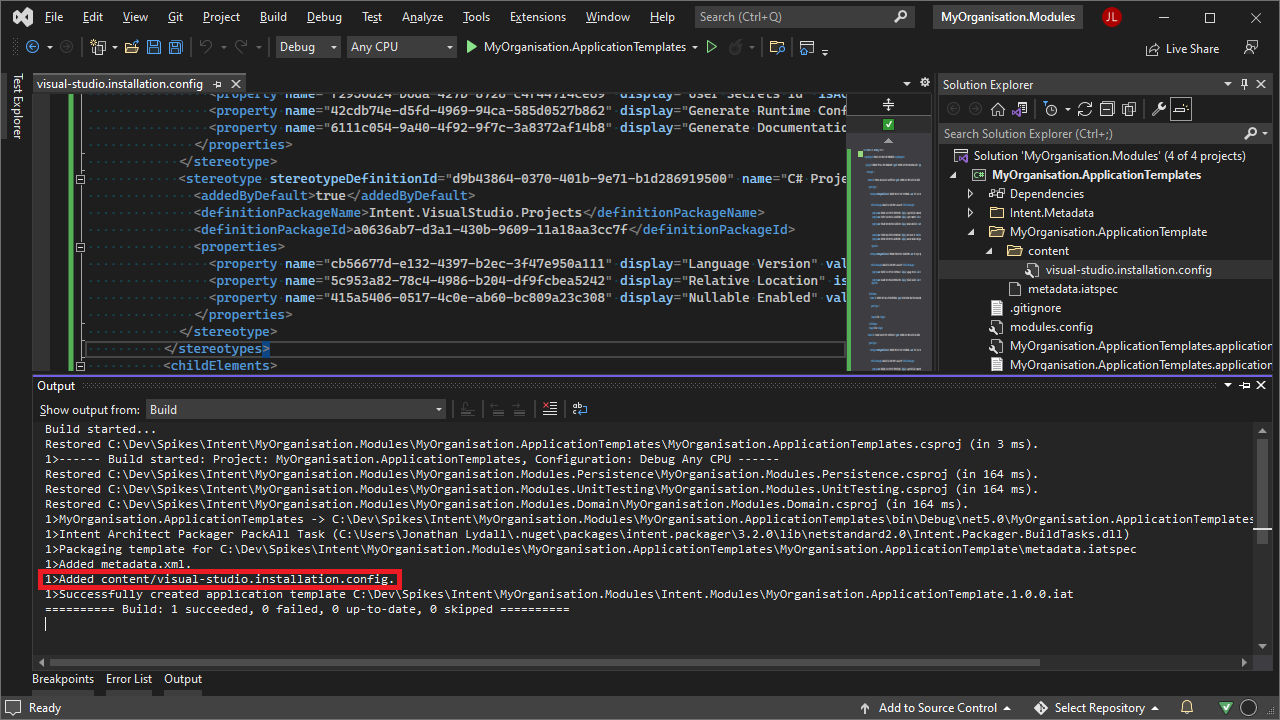
- Inside the
MyOrganisation.ApplicationTemplatesproject, expand the folder containing your Application Template'smetadata.iatspecfile (for exampleMyOrganisation.ApplicationTemplate) and inside it create aresourcesfolder. - Inside the
resourcesfolder create a file calledvisual-studio.installation.config. - Paste the contents from your clipboard into the file.
- Build the project.
- Note the line with
1>Added resources/visual-studio.installation.config.in the build log which confirms that the file was included in the packaged.iatfile.
Application Template metadata summary
If you create a new Application with the Application Template, you will see it now installs the metadata into the Visual Studio designer.
Create the metadata Application for the Module
Note
Creating the metadata Application for the Module is almost the same as creating the metadata Application for the Application Template, so for brevity, nearly identical screenshots have not been included below.
- Click
Create new application. - Change the icon for the new Application to the
Font AwesomeFile Exporticon. - Change the Name to
MyOrganisation.Modules.UnitTesting.Metadata. - Press
CREATE EMPTYat the bottom of the dialogue. - Press
YESwhen asked to confirm that you want to continue creating an empty Application. - Once the Application is created, click on
Modulesin the left pane, search forVisual Studio, select theIntent.VisualStudio.ProjectsModule and finally click the install button on the right: - Select the
Visual Studiodesigner on the left. - Press the
CREATE NEW PACKAGEbutton. - Use
${application.name}for the "Name" of the package and pressDONE.
Note
By having given the Solution element the same name as for the Application Template, when this Module is installed the metadata merging logic prevents a duplicate being created.
- Right-click on the
${application.name}element and selectC# Project (.NET). - Set its name to
${application.name}.UnitTesting. - Right-click the
${application.name}.UnitTestingelement and selectAdd Role. - Set its name to
UnitTesting. - Press the
Exportbutton in the toolbar andCopied to clipboard...will appear at the bottom right of the window.

Add the exported metadata to the Module
- Open the
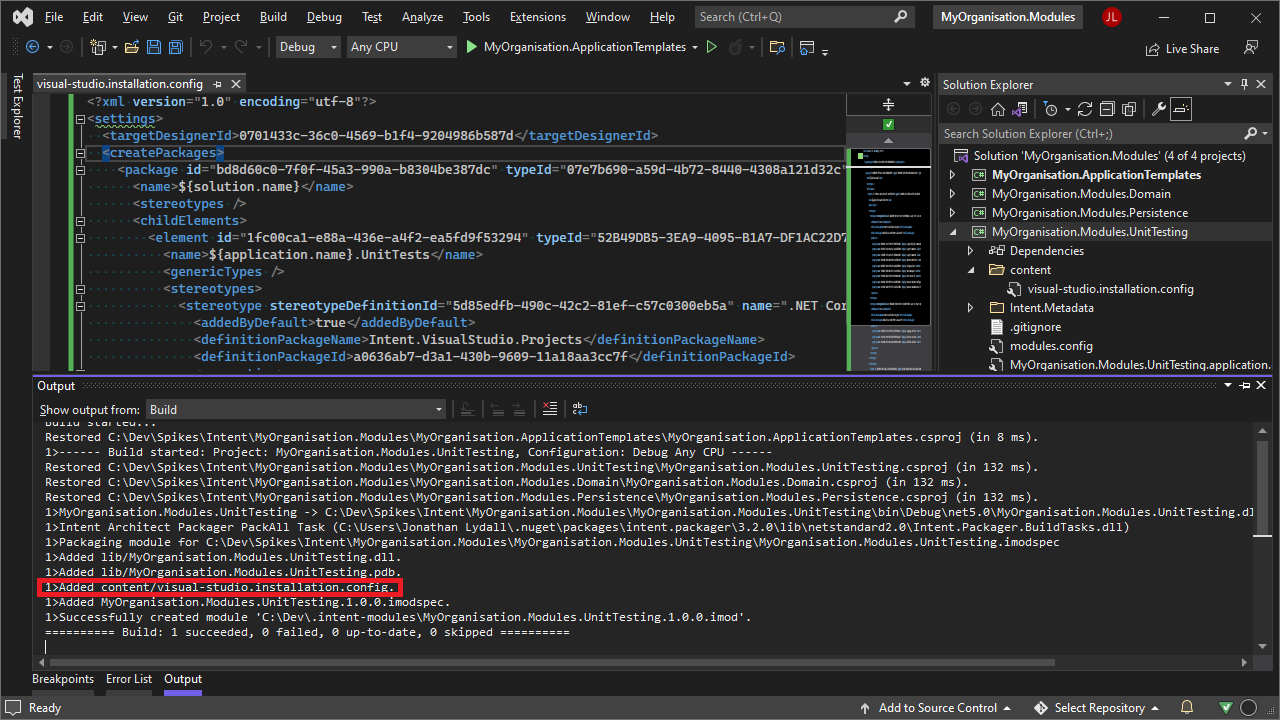
.slnfile for your Modules solution. - Inside the
MyOrganisation.Modules.UnitTestingproject create acontentfolder. - Inside the
contentfolder create a file calledvisual-studio.installation.config. - Paste the contents from your clipboard into the file.
- Build the project.
- Note the line with
1>Added content/visual-studio.installation.config.in the build log which confirms that the file was included in the packaged.imodfile.
Module metadata summary
If you install (or re-install) the Module, you will see it now adds a project called ${application.name}.UnitTesting to the Visual Studio designer.